Showing posts with label potatoes. Show all posts

Wednesday, June 8, 2011

New York Steak and Quick-Roasted Potatoes

It's been a busy time at work for me, so cooking elaborate (or even not-so-elaborate) meals for myself has definitely not been a possibility. That's why I'm here to tell you about one of my favorite "quick" meals, which can be prepared in about 30 minutes. I know, I know, Jamie Oliver can prepare a 4-course meal in that amount of time, but I'm no Jamie Oliver. I do, however, take advantage of his trick with quick-roasted potatoes to make this meal!

New York Steak and Quick-Roasted Potatoes

First, I want to share my favorite way of preparing great steak in your oven. It's actually my dad's method, and if grilling's out, this is the next-best thing, especially because it's not fussy at all. First, marinate your steak. I basically rub sugar, seasoned salt, pepper, and soy sauce over both sides, then let it sit in a baggie or on a plate. When you're ready, stick the steak on a pan -- I used cast iron this time -- and place it directly under your broiler. Turn it up to about 450°F, or "high." You do not need to preheat (I know, isn't it awesome?). For a steak about an inch thick, cook for about 8 minutes. Flip the steak over, then cook for another 6 minutes for medium rare steak, or until the meat is how you'd like it. Note that cooking times will also vary depending on the thickness of your steak and if you use cast iron. If you do use cast iron, it may cook a lot faster, so you'll want to adjust times accordingly. Once the steak is out of the oven, transfer it to a plate and let it sit for 5 minutes to allow the juices to settle.

New York Steak

While the steak is marinating, make the quick-roasted potatoes a la Jamie Oliver. Quarter 6-8 red potatoes. If the potatoes are large, cut them into sixths or even eighths. Place them in a deep pan and cover with water. Turn the heat up to high and get the water boiling. Simmer for 10 minutes, or until the potatoes are tender enough for a fork to pierce them easily. Drain the water. Return the potatoes in the pan back to the stove over medium heat. Add some canola or olive oil, salt to taste, and about a tablespoon of butter. Cook for 2 minutes. Use a metal turner and stir up the potatoes without breaking them. They may stick a bit; that's good, it means they'll be turning nice and brown. Turn them every 2 minutes. Depending on your heat, this will take 20-25 minutes. If you've timed things right, they should be done about the same time as the steak.

Quick-Roasted Potatoes

You can also fancy things up a bit, if you like ... for instance, I had some homemade herb butter, so I placed a dab of that on top of the steak when it was having its rest. I also had some cherry tomatoes I needed to use up and some caramelized onions I'd made the other day, so I threw those in with the potatoes in the last 5 minutes or so.

And don't let those steak drippings go to waste; that would be a crime! Transfer them to a small pan (or if you used a cast-iron pan, just use that) and set over medium heat. Add a tablespoon or two of flour and cook for a minute or two, stirring. Gradually add about a cup and a half of beef stock (in my case, made in 30 seconds with Better than Bouillon beef base), stirring constantly, for a wonderfully rich brown gravy. Serve with steak and potatoes or reserve for another use!

A very quick, delicious, and satisfying meal.

Wednesday, September 8, 2010

Slow Cooker Potatoes Au Gratin

When Trix picked potatoes au gratin for our weekly slow cooker meal, I agreed readily because... potatoes and cheese, what's not to love? The problem was, the recipe served 10-12 (!!!). I decided to cut it in half, but I really should have quartered it. It's lucky I decided on half, at least, because it turns out that my Crock Pot was just able to fit that amount. I can't imagine the size of the Crock Pot needed to make the entire recipe. O.o

Rotisserie Chicken with Potatoes Au Gratin and Broccoli

Some people are able to have just potatoes for a meal; for me it's more of a side dish (though believe me there was plenty to have made an entire meal on its own). But in order to adhere to the spirit of a hot meal without spending too much time on preparation, I bought a rotisserie chicken from the grocery store and also quickly stir fried some broccoli. Not very upscale, maybe, but quite yummy just the same.

As for the star of today's show, the potatoes were great. Maybe not as cheesy as I expect from potatoes au gratin, but the dish makes up for that by being surprisingly sophisticated in flavor. Not very salty, a bit tangy, with surprising heat -- or maybe I added a little too much pepper. Or mustard. Or both.

Dishes like this are why I have a mandoline. Actually, I have two. One full-sized mandoline, which I love, but am loath to drag out and actually use, because it's a chore to clean. Then there's my little OXO hand-held mandoline, which I got only recently, and it is a DREAM. It works incredibly well, and is convenient, small, and easy to wash. It's not good for very wide items, but it worked perfectly in this case.

Potatoes Au Gratin

I should also mention that I didn't have the heavy cream that the recipe called for. I actually deliberately went to Trader Joe's on Labor Day (thank goodness they were open), with the EXPRESS PURPOSE of buying heavy cream, but I somehow got home without any whatsoever, and I didn't realize it until late at night. How a person can go to the store to buy a specific item and walk out with practically everything BUT that item, is still a mystery to me. Sigh. It could have been more of a disaster, I suppose. I substituted 1 1/4 cups of half & half and 1/2 cup of soy milk. The half & half made things decently rich. The sauce came together beautifully, and while I don't know what the dish would have tasted like made with heavy cream, it tasted just fine to me. Plus, it helps that after the dish is done you're adding cheese to it.

Warning, if you're like me and with work and travel time, are gone from the house for longer than 8 hours or so, the potatoes may overcook a tad on the edges. I had to leave mine in (on low, of course) for about 10 hours, and the potatoes on the outside were already starting to darken too much. They weren't burned, but texture wise was extra chewy somehow, not great. I know it kind of defeats the point of a slow cooker to have to watch the dish, but in this case of these potatoes it would probably be a good idea if you were able to check on them once in awhile, or know for sure how long you'll be gone.

I think this would be a great dish to make for a big family dinner, or maybe as a contribution to a pot luck. :D

Slow Cooker Potatoes Au Gratin (adapted from A Year of Slow Cooking)

Ingredients
  • 3 large Russet potatoes, thinly sliced
  • 1 parsnip, thinly sliced
  • 1/2 onion, diced
  • 4 tbsp butter
  • 3 tbsp flour
  • 1 3/4 cups heavy cream
  • 1 tsp dried thyme
  • 1 tsp sea salt
  • 2 tsp dried mustard
  • 1/2 tsp black pepper
  • 1 cup shredded cheddar cheese
Method
  1. Place prepared vegetables in the slow cooker.  Combine haphazardly.
  2. In a small saucepan, melt the butter.  Add the flour and stir to create a roux.  Cook the roux for 3-5 minutes, until it turns golden in color.  Slowly add the cream.  Cook until heated through and the sauce has the texture of a slightly thickened sauce (not thick like gravy).  Add thyme, sea salt, dried mustard, and black pepper.  Stir until everything is well incorporated into the sauce.
  3. Pour the sauce on top of the vegetables and turn on the slow cooker.  Cook on high for 5-6 hours or on low for 8-9.
  4. Just before serving, stir in the cheese until melted.

Saturday, May 15, 2010

Tom Douglas's Garlic Smashed Potatoes

At long last, an overdue recipe.  These are possibly the best potatoes you will ever eat.  Certainly of the non-mashed variety.  That's right, I said it.  I'm putting it out there.  Now you HAVE to take on the challenge, maybe just to prove me wrong.  But I bet I won't be wrong.

Garlic Smashed Potatoes

Making these is a labor of love.  It's very simple and easy, but I'm not going to lie, also time consuming.  From start to finish, it'll take 1 hour and 40 minutes to cook them.  But it will be worth it, I promise you that.  Every single person I've made these for has been amazed by how good (and simple) they are.  They in turn have made them for other people, who demand to know how to do it themselves.

I adapted this recipe from Tom Douglas's "Greek Smashed Potatoes" recipe in Tom's Big Dinners.  At Tom's restaurant Lola, they serve garlic smashed potatoes, which is where I first had them.  They were so good that I had to find a recipe so that I could have them whenever I pleased (and wouldn't have to pay $8 for a small dish).  The Greek Smashed Potatoes recipe seemed just right, with a slight adaptation to make them purely garlic.

The key to making these successfully is to choose smaller potatoes.  The recipe says to use red-skinned potatoes; I've used yellow skinned ones to good effect (once they're done cooking, you can barely tell what color they started out as -- see photo above!).  What doesn't work is bigger potatoes (it used to be that you couldn't even GET red-skinned potatoes that were very big; now I've seen them in a size close to a Russet!).  They should be golf ball size or slightly larger; if you go bigger than that they may not cook properly in the time indicated in the recipe, which means you may not get that perfect harmonious blend of salty crispness on the outside and soft potatoey inside.

Garlic Smashed Potatoes (adapted from Tom's Big Dinners by Tom Douglas)

Ingredients
  • 3 lbs small red-skinned potatoes (about golf ball size or slightly larger) 
  • 1/2 cup olive oil, divided
  • salt and pepper
  • 1 tbsp garlic
Method
  1. Wash and dry the potatoes, then put them in a roasting pan large enough to hold them, with a bit of room between each potato. Roast them in a 450F degree oven for 40-45 minutes, until just tender.
  2. Remove the pan from the oven, then use the bottom of a china mug to smash down each potato to about 1/2". The skins will split and the white of the potatoes will show through.
  3. Drizzle with 1/4 cup of olive oil and season generously with coarse salt and pepper. Pop back in the oven for 25 min.
  4. Remove the pan, flip the potatoes over with a spatula (the bottoms should be nicely browned), then drizzle with another 1/4 cup of olive oil, keeping 1 tbsp of oil in reserve. Pop back in the oven for another 25 min.
  5. Remove the pan again, season the second side of the potatoes with salt and pepper, and sprinkle the garlic over them.  Drizzle the 1 tbsp of remaining olive oil over the potatoes. Toss to make sure seasoning is evenly distributed, then roast for a final 5 min.

Tuesday, April 21, 2009

Red Hot and Blue's Potato Salad

One of my favorite places in the country is Washington, D.C. I lived there for about two years, and in that time I grew to love it (and its surrounding areas). I moved back to the west coast because it ultimately proved too hard to be in a whole other timezone from my family and friends (and I didn't enjoy the job I had there), but I always think of D.C. fondly and wish it were located on the west coast, because then I'd move there like that. Of course, if it were on the west coast, it wouldn't be what it is.

When you live in a place, you find restaurants that you come to know and love, and that you miss once you don't live there anymore. (Even though I don't think the Pacific Northwest is for me in a forever way, there are restaurants here that I'll miss once I leave, whenever that might be.) This includes one-of-a-kind restaurants like Bistrot Lepic in Georgetown (D.C.), or Umi Sake House in Belltown (Seattle). But it also includes chain restaurants that are particular to the area. I miss In-N-Out Burgers like crazy, as well as Mimi's Cafe, both of which are very common in California (in fact, it looks like Mimi's just doesn't like the north of the country, for some reason).


The chain I miss from D.C. is Red Hot and Blue. It's a barbecue joint. The barbecue itself is good, nothing I'd turn my nose up at, but it doesn't especially stand out. What does stand out? Their potato salad. It is AMAZING. It's the best potato salad I've ever had, and with something as ubiquitous as potato salad, you better believe I've had my fair share of it. Red Hot and Blue serves it at room temperature, and it is definitely best that way. It's fairly simple, and a bit unusual, as far as potato salads go. I say this because of the presence of green onions, which I've generally found is not a common ingredient in this dish.

This copycat recipe is one that I created on my own -- not that it took rocket science or anything. It's not difficult to discern the red potatoes (since Red Hot and Blue leaves the skin on), eggs, and green onions when you're eating it. And of course, there's the mayo, a necessary component of potato salad. I do have to say that the final ingredient is somewhat of a 'secret' ingredient (though not really), because it's not immediately obvious. Something made this potato salad taste especially good, but what? I tried making it once, using just the four ingredients I named, and it just didn't taste right, it wasn't as good. So the next time I was at Red Hot and Blue (ironically, not until I had moved away and was visiting -- dragging my companion to the restaurant just so I could have their potato salad again), I took a chance and asked my waitress what made their potato salad taste the way it did -- was there some special seasoning? And bless her heart, she actually went and asked the kitchen, and the answer was: celery salt. I still wish that my financial situation at that time had more closely resembled what it does today, so that I could have left her a bigger tip. Because thanks to her, now I can have Red Hot and Blue's delicious potato salad any time I want, without having to fly across the country for it.


To make it more like Red Hot and Blue's version, you'll want to cook the potatoes to a point where they are just soft enough to sink your teeth into, but before they start to get really mushy. I went a little too far this time and so it ended up being half mashed. It's no less delicious that way, and in fact has its own charms, but I want to make sure I'm conveying the true, authentic Red Hot and Blue experience. I've used different kinds of mayo and they all seem to work (unlike for Hodge Podge Salad, which absolutely requires Miracle Whip) -- this time I used one from Trader Joe's. It may be easier to achieve a firmer consistency with the potatoes if you boil them whole; I tend to be lazy and pre-chop them into medium-sized pieces before boiling so I don't have to deal with hot potatoes. The eggs can be boiled right in with the potatoes or separately; up to you. The components for this potato salad are so few and simple that you just can't leave anything out, or the flavor simply won't be the same. You've been warned.

Even though this isn't an official version of their recipe, every time I've made it I've been happy with the results. It tastes like Red Hot and Blue's version, which is what I'm looking for. When searching for copycat recipes for this potato salad online, I found one that sounded similar (but had no measurements), though it included celery. I don't remember celery being in Red Hot and Blue's potato salad, but it's been awhile, maybe my memory's wrong. Or maybe it's something they've added recently. I don't think it'd detract from it, so perhaps one day I'll try it. For now, I'm sticking with my version!


Red Hot and Blue's Potato Salad (copycat recipe by yours truly)

Ingredients
  • 2-2 1/2 lbs red-skinned potatoes, skin on
  • 6 eggs
  • 1 bunch green onions, just the green parts, diced finely
  • generous 1/2 cup real mayonnaise
  • 3/4 tsp celery salt

Method

  1. Place potatoes and eggs in a large pot of cold water and bring to a boil. Cook for 10-15 minutes, until the potatoes are tender but not mushy. You can pre-cut the potatoes if you wish, though this will probably make for mushier results unless you're super diligent about checking them. The eggs can be boiled separately if you wish; they just need to be hard boiled.
  2. When potatoes are done, drain them into a colander. Run cold water over the eggs to make them easier to handle. If you boiled the potatoes whole, chop them into bite-sized pieces when cool enough to do so. Shell the eggs and dice them. If you're watching your cholesterol intake like me, set aside half of the yolks to throw away or use for another purpose -- like giving them to the dog for a nice treat.
  3. In a large bowl, gently mix all the ingredients together (you don't want to end up with mashed potatoes if you're too rough with this step!). Serve at room temperature for best flavor.

Sunday, March 29, 2009

Friday Dinner: Baked Garlic Parmesan Fries

Here was our attempt at being healthy and bad at the same time. Fries, being made of potato, which is all starch, are never really "good" for you. But there's bad, and then there's slightly less bad. That's what we had on Friday.


They were good -- I made half the recipe, which called for 1 1/2 pounds of potatoes, and I ate every last one. But were they just like regular french fries? Not so much. Frying gives fries the texture that makes them fries; baking them is an OK substitute, but in the end you're really just roasting potatoes in the shape of french fries. And hey, that's OK too. It's certainly easier to bake them -- there are more steps involved -- but not having to deal with large amounts of frying oil is a reward in itself. At the end of the day, I'll say that both methods of making fries have their strong and weak points, and really, when you get to eat potatoes at the end of it, there's not much to complain about.

Making fries isn't new to me... after all, I've fried them properly and tried baking them as well. But this was a slight twist on the latter method. It required first baking the fries, then tossing them with butter, garlic, parmesan cheese, and parsley. It took the full 50 minutes of baking time to get my fries as brown as they look, and they didn't even start remotely looking brown until about 41 minutes. Alas for Trix, whose oven must not run as hot as mine, never got hers to be even half as brown after 60 minutes. Depending on your oven, you may find that you need to keep your fries in longer (or take them out earlier).

As usual I kept the skin of the potatoes on, as I like how they look, they don't taste any different to me, and they add what minimal nutritional value there is to fries.


Baked Garlic Parmesan Fries

Ingredients
  • 1-1/2 lbs russet potatoes (about 4 medium-sized ones), peeled or not
  • cooking oil spray
  • 2 tsp canola oil
  • 1/2 tsp salt
  • 1 tbsp butter
  • 4 cloves garlic, minced
  • 1 tbsp parmesan cheese, grated
  • 1 tbsp fresh parsley, chopped

Method

  1. Preheat oven to 400°F. Layer a baking sheet with parchment paper and spray with cooking oil.
  2. Using a knife or mandolin, slice potatoes into fries about 1/4" thick. Blot away moisture as best as you can. (If you're a slow chopper or are doubling the recipe, you may want to immerse your potatoes in water as you cut them so they don't oxidize. Be sure to dry them thoroughly before baking.)
  3. Place the fries into a gallon-sized plastic bag along with the canola oil and salt. Seal the bag and massage the contents so that all the potatoes are well coated.
  4. Layer the fries onto the prepared baking sheet, spreading them out into a single layer as best as you can.
  5. Place the sheet into the oven and bake for 20 minutes. After 20 minutes, remove the baking sheet from the oven and turn the fries (I just kind of give them all a toss). Put them back in the oven for another 30 minutes or until golden brown.
  6. During the last minute or two of baking, heat the butter in a large pan. Saute the garlic for 30-45 seconds, making sure that they don't brown. The garlic should remain soft for best flavor. Turn off the heat.
  7. Add the baked fries to the garlic and butter. Using tongs or a spatula, carefully move the fries around (they're more delicate than their fried counterparts) so that they're coated. Top with parmesan and parsley. Give everything a quick toss, place on a dish, and serve.

Saturday, March 21, 2009

T-Bone Steak with Melting Marrow Gremolata

One of the simplest pleasures in life is a perfectly cooked steak.

Beef is enjoyable in many forms, but steak is possibly the simplest and best of all -- you throw it over some heat and minutes later, you're sitting down to a satisfying meal. At least, that's the way it should be. Cooking a steak is simple. It doesn't take much to cook beef. But cooking it perfectly is another story.


My idea of a perfect steak is: seared and crusty on the outside, with a warm red center. It sounds so deceptively simple, but it's taken me years to finally figure out how to make something close to what I love (though not perfected yet) with the tools I have at hand. The thing with steak is that it's so easily overcooked. One second it's too rare, and the next second it's brown throughout. If you brown it on high heat, the outside is charred but the inside is too rare. Brown it on lower heat, and it'll take longer to brown, by which time the meat will be far too well done.

My dad doesn't worry about the browning. As long as it's medium rare, he's good with it. And his steaks are definitely fantastic. But he uses a broiler, and I've never been able to figure out my electric broiler, so that's out. Others use outdoor grills with great success. I love the flavor of meat that's been grilled on a barbecue, but I'm just one person and it's a lot of effort to get a grill going just for one steak, and anyway I don't have a great grill (just a small hibachi) or experience with grilling steak. Basically, all I have is my oven and my stove. Is it possible to get perfectly cooked steak with just those? It might be. I'm still in the experimental stages. What I do know is that my first try was a steak that came close to being perfect, maybe as perfect as I can get with home equipment. Time will tell.


Until today, I generally avoided cooking steak at home because it never comes out the way I want. Why did I finally cave? Well, it has to do with bone marrow.

The other day I went to a neighborhood butcher for the first time, with the intent to buy marrow bones. I ended up buying 6 pieces. (One was given raw to my dog, as marrow bones have been proven to be a great recreational bone, keeping dogs busy for hours as they chew happily away -- and it keeps their teeth clean and tartar-free at the same time!) I've been doing a LOT of research and reading about eating bone marrow, which has sadly gone out of practice in modern times, even though it's chock full of goodness. "Bone marrow is a source of protein and high in monounsaturated fats. These fats are known to decrease LDL cholesterol levels resulting in a reduced risk of cardiovascular disease." (Source)


I've ordered Bones: Recipes, History, and Lore by Jennifer Mclagan, which won a James Beard award as the best single subject cookbook of 2005. The cover of the book is a plate of delectable-looking roasted marrow bones. I love this quote from the author in an interview she did: "But when you [...] get to chew on the bone it is something primordial. It takes us back to our ancient wild past as humans. It is a pure basic human pleasure and the basis of the truism 'the closer to the bone, the sweeter is the meat'."

The most common method of preparation is to roast the marrow right in the bone, then use it as a spread on toasted bread. Anthony Bourdain has said that if he were on death row, his last meal would consist of bone marrow (here is his recipe). For something a little fancier, you could also roast it, remove the marrow and mix it with aromatics and mushrooms, then stuff it back into the bone, and serve it that way. I'm also intrigued by this method of removing the marrow from the bone, brining it, rolling it in flour, then sauteing it in oil. Then you spread it on bread to eat.

But perhaps the method that's intrigued me the most is the recipe for Melting Marrow Gremolata, which comes from Judy Rodgers's The Zuni Cafe Cookbook, one of the favorites in my collection of cookbooks. Her recipe has you mixing together a traditional gremolata of garlic, lemon peel, parsley and other seasonings along with chunks of cold bone marrow. You then cook yourself up a nice juicy steak, and spread the marrow gremolata over the steak. The heat melts the marrow and the aromatics spread and bloom over the surface of the meat (paraphrasing now as I don't have the book in front of me).

Thus while at the butcher's, I also picked up a T-bone steak, one of my favorites. If I was going to make the gremolata, I'd have to have a steak to use it on. And if I was going to cook steak at home, I'd have to try and make it good. I made the gremolata while waiting for the steak to come to room temperature and kept it in the fridge until it was ready to be used.

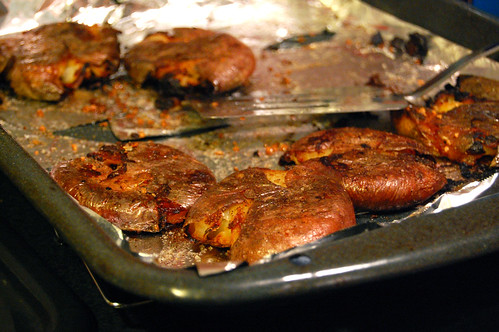
I preheated my oven to 450°F and started heating my new Le Creuset grilling pan (yes, the same one I used yesterday for my flounder). When the latter was hot, I rubbed a bit of canola oil over both sides of the steak. If I didn't have the gremolata I would have seasoned it with salt and pepper as well, but I did have it, so I did no further seasoning. The steak sizzled when I placed it into the pan. After 3 minutes, the steak was seared with lovely stripes of brown that you see on TV commercials -- I wish I'd taken a picture of it at this point. I'll be trying this with a normal pan as well, to perhaps get an all-over crust (I'll also use a higher temperature to sear). I flipped the steak over, sprinkled the gremolata over the top, and placed the pan into the oven. After two minutes, the steak was done. You should let it sit for a few minutes to keep in the juice.

Overall, the result was very good. The only problems were that it was actually a little more well done in parts than I really like, and that there was a bit of inconsistency in how evenly the steak cooked. Some parts were overdone, while other parts (the bits closer to the bone) were underdone. There will always be some inconsistency, but the range here was a little more than I would have liked.

For my next attempt, I'll use a higher heat when doing the initial searing and lessen the time as well. I'll also try using a lower temperature in the oven, and keep it in a minute longer. Still, I must say that it was very exciting to come this close on a first attempt. It gives me great hope! As for the gremolata, I think it was a bit heavy on the parsley. If I make it again I'll use more garlic and less parsley. Not being familiar with bone marrow, I'm not really sure I could taste it! I'll definitely need to prepare it using one of the other methods.

I served the steak with Ruth's Chris au gratin potatoes (recipe here).


Taking it out of the oven in preparation for the last step: Lots of cheese sprinkled on top!


And the finished product...

Melting Marrow Gremolata paraphrased from The Zuni Cafe Cookbook

Ingredients
  • 1 tbsp cold beef marrow (0.5oz)
  • 2 tbsp packed, chopped flat-leaf parsley
  • 1 clove garlic, minced
  • 1 tsp lemon zest, chopped
  • 1 tsp freshly ground black pepper
  • 3 pinches of salt

Method

  1. Mix together everything but the bone marrow.
  2. Chop the beef marrow into small pieces and toss with the aromatics. Keep it in the refrigerator until ready to use.

Tuesday, March 3, 2009

Friday Dinner: High Roast Chicken

This last Friday, Jade and I roasted a chicken. Well, what passes for roasting these days (it's really just baking) -- there was no open fire or anything. I've baked my share of chickens, but I've always found it kind of annoying to have to baste it repeatedly in order to achieve that lovely golden skin all over, it took what seemed a long time, I never found a marinade that really pleased me consistently, and even when it was done cooking, it wasn't the end of the meal preparation, as I'd still have to make sides.


I think this method of cooking chicken has managed to accomplish the impressive feat of solving all those problems. First, the skin is crispy and nearly golden all over (enough to satisfy me) without requiring any basting at all. Second, it takes 40 minutes to roast. Third, flavoring it is very simple and really delicious. And finally, with a little extra effort, you're making a yummy side at the same time. It's great!

Before:


After:


The key to even browning and quick cooking is butterflying the chicken by cutting out the backbone. If you have really good kitchen shears, this may not pose much of a challenge for you. I have mediocre kitchen shears and I was able to cut it out with moderate effort -- nothing that made me break a sweat. Trix wasn't so lucky; her shears didn't do the job and so she ended up using a knife, but that is definitely not the ideal method for removing the backbone (you end up hacking other parts you don't want to be hacking at).

The other thing you need for this is a broiling pan -- both the top part with slits in it and the roasting pan it goes on top of. While the chicken roasts, its delicious juices trickle through the slits into the bottom ... which will have a layer of lovely scalloped potatoes! Make sure you cover it with foil for easy cleaning, and make sure you spray cooking oil on the foil to help the potatoes brown (if you forget, as both Trix and I did, the potatoes won't brown nicely -- though at that point you could layer them in a cast iron pan and cook at high heat until they are golden and crisp). If you like, you can make a second side, something with color, like baby carrots or green beans. Since I had half a head of cabbage in the fridge, I went for the tried and true spicy stir-fry cabbage that I love so much.


The flavoring of the chicken comes from brining (which needs at least an hour, or overnight) and an easy flavored butter that you make from mixing unsalted butter with Dijon mustard, thyme, garlic, and pepper. The mustard seems very strong once it's mixed in, and I was afraid that the resulting meat would taste too much like mustard -- but that was not the case at all. It mellowed while baking into something amazingly tasty.

To get even more mileage out of your chicken, I really recommend saving the bones and making a flavorful stock from it. Because it's only been cooked for 40 minutes, there's still plenty of chicken essence to be eked out.

Now that we know this recipe, it's going to be hard to buy one of those ready-made rotisserie chickens in the market again!


High Roast Chicken

Ingredients

  • a 3 to 4 pound chicken
  • 2 ½ pounds potatoes, peeled (preferably ones with a lot of starch, such as russets)
  • 1 tbsp + 1 tsp of olive oil, divided
  • Salt and pepper to taste

For the brine

  • 2 quarts of water
  • ¼-½ cup table salt (to taste -- ¼ cup is on the bland side)
  • ½ cup sugar

For the flavored butter

  • 2 tbsp unsalted butter, slightly softened
  • 1 garlic clove, crushed
  • 1 tbsp Dijon mustard
  • 1 tsp fresh thyme
  • Pinch of pepper

Method

  1. Prepare the brine, at least an hour before you plan to roast the chicken or overnight. Mix the salt and sugar into the water and make sure it’s dissolved well. Place the chicken in the brine and leave for about an hour, or overnight. Cover and put into refrigerator.
  2. In the meanwhile, prepare the flavored butter. Mix all the ingredients except for the pepper. Let it sit until you are ready to flavor the chicken.
  3. Place a rack on the lower middle rung of the oven and preheat to 500°F.
  4. Remove the chicken from the refrigerator and rinse it off (remaining sugar crystals on the skin will burn). Pat the chicken dry. If there's visible fat, use the paper towel you're using to pat dry to simply pull it off and discard.
  5. Butterfly the chicken by cutting out the backbone with kitchen shears (use the tail as guidelines on where to cut). Flatten the chicken down by pressing on it with the heel of your palm – you will probably hear bones break.
  6. Stretch out the pockets of chicken skin around the breasts, thighs, and legs – this will not only create crevices for the butter, but will separate the skin from the flesh, which will make for a crispier skin.
  7. Add a pinch of pepper to the flavored butter and mix. Put dollops of butter under the chicken skin on the breasts, thighs, and legs, massaging the butter in through the skin.
  8. If the chicken is still wet, pat it as dry as possible. (At this point, you could put it in the refrigerator overnight on a sheet pan to get rid of even more moisture.)
  9. Place the chicken on top of a broiling pan. Rub it with 1 tsp of olive oil and sprinkle some pepper on top.
  10. Line the bottom of the broiling pan with heavy duty aluminum foil. Spray it with nonstick cooking spray.
  11. Fit the slicing blade attachment to a food processor. Scallop the peeled potatoes by placing them one at a time through the feeding tube. If a potato won’t fit, peel off some more or use a knife to cut off a small amount until it will fit.
  12. Place the potatoes in a large bowl and season with 1 tbsp of olive oil, and salt and pepper to taste. (Remember, the chicken drippings will also season the potatoes, so don’t over season during this step.) Mix well, then layer in the prepared foil-lined bottom pan.
  13. Place the top of the broiler pan with the chicken on it over the bottom pan of potatoes.
  14. Roast in the oven for 40 minutes. Cut into a thigh and if the juices run clear it’s done. If the juices run pink, keep it in the oven for another 10 minutes or until juices run clear.
  15. Remove the chicken from the oven and let it sit while you prepare the potatoes. Dab grease from the top of them using a paper towel. Place a cutting board over the potatoes, then flip the whole thing over. Carefully remove the foil – it’s likely that even with the nonstick spray some of them will stick to the foil. Again dab them with a paper towel to remove as much grease as possible.
  16. Cut the chicken into fourths (or however many pieces you desire) and serve with potatoes.

Thursday, December 4, 2008

Baked Fries

Healthy fries?

If there were such a thing, I probably wouldn't like it much. But I think these come close. Potatoes are what they are, good and bad. But this method of making fries uses olive oil and the oven, and is a lot tastier/like its fried counterpart than you might expect. It's also quite easy, but a bit time consuming. Not in terms of preparing them, but waiting for them to bake.

First what you'll want to do is get some potatoes. I usually just use russets, but you can get fancier if you like. I like to leave the skin on, because much of the potato's nutritional value (fiber, specifically) is there. Plus I like the way fries look when the skin's been left on. Either using a mandolin or with a good ol' knife, cut the fries into the shape and size you prefer. I like skinny fries. As you're cutting them, drop them into a bowl of cold water laced with salt. The water will keep the potatoes from oxidizing and turning brown, and the salt in the water will draw water out of the potatoes, enabling them to get crispier in the oven. Leave them in the salt water for about half an hour.


Dry your "fries" as best as you can. Leaving a lot of water on them will cause them to steam in the oven, which will prevent them from getting as crunchy as one might like. Line a baking tray with parchment or wax paper -- learn from my mistakes, don't use aluminum foil as I've got in my photo, as the fries will stick to it!


Arrange your fries in a single layer on the parchment. Brush the fries with a tablespoon or two of extra virgin olive oil. Try and get some oil on the other side of them too, but generally I just do that kind of willy nilly. I haven't tried brushing the baking paper with oil, that might work also. In this case, I also used a tiny bit of white truffle oil, because I wanted to be decadent. :D


Stick them in a 400°F oven for 30-45 minutes, flipping them once or twice so that they brown evenly. They're done when they're golden brown or however you like them. Sprinkle some salt on them and serve with your favorite dipping sauce!

Wednesday, December 3, 2008

A Post-Thanksgiving Thanksgiving

This year for Thanksgiving, I went to have hot pot with my cousin. The rest of our family is in Los Angeles, and without them, it wouldn't have felt like a real Thanksgiving anyway. We considered doing the turkey and fixings and the whole bit, but with just two of us, it just didn't seem worth the bother. Plus having turkey or poultry of any kind just hadn't particularly appeal to me for some time.

Then came post-Thanksgiving, with everyone posting pictures from their Thanksgiving feasts. Everyone's food looked so good. On top of that, I finished a writing project I'd been working on, the reward for which was being able to crack open The Zuni Cafe Cookbook, which had arrived a couple weeks before. I was just flipping through it when I came across a recipe for buttermilk mashed potatoes. I thought about the 15-lb bag of russet potatoes I had sitting in my kitchen. I thought about how good a piece of roasted chicken would taste with mashed potatoes. Uh oh. I was hooked.

The next day, I went to the store and bought a cooked rotisserie chicken (that's right -- I wanted instant gratification), canned pumpkin, and some salad fixings. Then I went home and made myself a truly satisfying post-Thanksgiving meal, including chicken, buttermilk mashed potatoes, garlic Brussels sprouts, salad, and even pumpkin pie.


The chicken was a little cold by the time everything else was ready, but that was okay. It wasn't the star. It provided some lovely contrast and texture (nothing replaces meat when it comes to making my mouth and stomach satisfied), but it was all the components working together that made the meal great. I of course did not have room for pumpkin pie after everything else, but it was still cooling anyway.

Speaking of the pie, I was pretty happy with the way it came out. On Thanksgiving day my cousin had given me a generous slice of pumpkin pie that her "dessert slave" had made, and it was probably the best pumpkin pie I've ever had. It had a candied ginger and walnut topping on it, and was made with fresh roasted pumpkin. Maybe one day I'll have the energy/will to roast my own pumpkin then make a pie out of it, but that day was not yesterday. Until my cousin can track down the recipe for that one, I found a similar one online that I adapted to my own preferences (less sugar, and hazelnuts instead of walnuts -- I'm just not a big fan of walnuts).


The mashed potatoes were excellent, even though I used russet potatoes rather than the yellow potatoes Judy Rodgers suggests (as much as I love yellow and red potatoes, well, I had 15-lbs of russets!). She also claims that the buttermilk in them helps them keep really well, so since I love mashed potatoes, I went ahead and doubled her recipe.


The Brussels sprouts were a revelation. I'm fairly new to Brussels sprouts, and I've given several recipes a try, but this very simple method using olive oil, garlic, and salt was by far my favorite. They were so good I could have eaten them as a meal all on their own. Well, on any day but post-Thanksgiving day. Granted I'm not very experienced with buying Brussels sprouts, but I had never actually seen them on the stalk before. When I saw a beautiful stalk of them for only $2.50 each, I nabbed one. The sprouts were much fresher/cleaner than the ones I've purchased before off the stalk.


As for the salad, I used red-leaf lettuce and after making the potatoes, Brussels sprouts, and pie, I was too beat (and eager to start eating) to add anything else, though normally I would have included diced tomato (or halved cherry tomatoes), thinly sliced radishes, etc. I did, however, make the delicious yet simple balsamic vinaigrette that my cousin introduced me to awhile ago.

Perhaps best of all was getting to eat the leftovers of everything. I even busted out some of my stored bacon grease to make a cream gravy for the potatoes. Dipping bites of rotisserie chicken in mashed potatoes and gravy = heaven.


And now, onto the recipes! There are quite a few of them, but hopefully it won't be hard to find the one you're interested in.

Buttermilk Mashed Potatoes paraphrased from The Zuni Cafe Cookbook

Ingredients


  • 1 1/2 lbs potatoes (preferably yellow, but russets will work fine), peeled and chopped into 1 1/2" chunks
  • 2-3 tbsp milk, heavy cream, or half and half, heated
  • 2-3 tbsp buttermilk, room temperature
  • 3 tbsp butter, just melted so it's still warm
  • parsley or chives, to garnish (optional)
  • salt
  • water

Method

  1. Place potato chunks in a pot, then cover with cold water by about an inch. Add salt -- about 1 tsp per quart -- and mix, until you can just taste it in the water.
  2. Heat until boiling, then simmer for 8-15 minutes, until the potatoes are tender.
  3. Drain water. Put the potato chunks in a large bowl and mash. Add the heated milk/cream, mash. Add the buttermilk, mash. Finish with the melted butter. Whip/mash well.
  4. Salt the mashed potatoes to taste.
  5. Garnish with parsley or chives, if desired.

Judy Rodgers says it's good to have the cream and butter heated so that their addition doesn't cool down the potatoes too much. Buttermilk can't really be heated or it will separate. (I put it in the microwave for about 10 seconds, to at least take the chill off.) It seems so obvious now, but I can't tell you how many years I've been making mashed potatoes and just adding cold milk and cold butter, then wondering why it was impossible to keep mashed potatoes hot.

Cream Gravy from Homesick Texan

Ingredients:

  • 2 tbsp pan drippings, bacon grease or vegetable oil
  • 2 tbsp flour
  • 1 1/2 cups milk
  • 1 tsp cracked black pepper
  • salt to taste

Method

  1. Combine fat with flour in a hot skillet, continuously stirring, cook on medium for a couple of minutes until a dark roux is formed.
  2. Add milk slowly to skillet, and mix with roux using either a whisk or wooden spoon (be sure and press out any lumps).
  3. Turn heat to low and continue stirring until mixture is thickened, a couple more minutes.
  4. Add pepper and salt to taste.
  5. If gravy is too thick for your taste, you can thin it by adding either more milk or water a tablespoon at a time.

Garlic Brussels Sprouts

Ingredients

  • 8-10oz Brussels sprouts, washed, stemmed, trimmed, and halved
  • 3 large garlic cloves, minced
  • 2-3 tbsp extra virgin olive oil
  • salt to taste

Method

  1. Heat oil on medium-low heat in a saucepan large enough to hold the Brussels sprouts in one layer. (I used my wok.)
  2. When oil is hot, carefully add the Brussels sprouts -- the water droplets clinging to them from their wash will probably make the oil sizzle and crackle, possibly violently.
  3. Stir fry a bit, then turn each sprout onto its flat side.
  4. Cover the pan, turn the heat down a little lower, then cook until the sprouts are tender and their flat sides are nicely browned (about 10-12 minutes).
  5. Add the garlic and stir fry for about 30 seconds.
  6. Add salt to taste, stir fry a few seconds more, then serve.

My notes: You don't want to use heat that's too high because they'll brown too quickly without having enough time to get cooked by the steam. Also, I find that salt greatly enhances Brussels sprouts. It won't save them if they're cooked beyond hope, but salting them a bit more generously than you might salt other foods is highly recommended by me!

Pumpkin Pie with Hazelnut and Ginger Streusel

Ingredients:

  • 1 pie shell, frozen or homemade

For the Pie Filling

  • 3 eggs
  • 1 can (15 ounces) solid-pack pumpkin
  • 1 cup heavy whipping cream
  • 1/3 cup packed brown sugar
  • 1 1/2 teaspoons ground cinnamon
  • 1/2 teaspoon salt
  • 1/4 teaspoon ground allspice
  • 1/4 teaspoon ground nutmeg
  • 1/4 teaspoon ground cloves

For the Streusel

  • 1/2 cup all-purpose flour
  • 1/4 cup packed brown sugar
  • 4 tbsp cold butter
  • 1/4 cup chopped hazelnuts
  • 1/3 cup finely chopped candied or crystallized ginger

Method

  1. Preheat oven to 350°F.
  2. In a large bowl, whisk together the eggs, pumpkin, cream, sugar, salt, and all the spices.
  3. Pour the mixture into a prepared pie shell.
  4. Bake at 350° for 40 minutes.
  5. To make the streusel, in a small bowl combine the flour and brown sugar. Using a pastry blender or fork, cut in the butter until crumbly. Mix in the hazelnuts and ginger.
  6. Remove the pie from the oven, and gently sprinkle the streusel over the filling.
  7. Bake for an additional 20-30 minutes longer or until a knife inserted near the center comes out clean. Cool on a wire rack.


Here's the pie, pre-streusel topping.


A messy, but delicious slice of pie.

My notes: This pie is plenty sweet, even though I cut the sugar in the filling from 3/4 cup to 1/3 cup, and the streusel topping from 1/2 cup to 1/3 cup (from the original recipe). I can't imagine how cloyingly sweet it would have been if I hadn't made those adjustments. When I make this again, whether for this recipe or the one my cousin finds, I'll probably toast the hazelnuts ahead of time and skin them as well. I already cut down on the liquid some since I cut down the sugar, but if I made this again I would probably cut it down even further.

Balsamic Vinaigrette Salad Dressing

Ingredients

  • 1 small shallot, sliced or diced (about 1 tbsp)
  • 1 tsp red wine vinegar
  • 2 tsp balsamic vinegar
  • 2-3 tbsp extra virgin olive oil

Method

  1. Soak shallot in a small bowl with the vinegars for 10-15 minutes.
  2. Add the olive oil and mix well, then toss with salad.

My notes: I usually use 2 tbsp of olive oil, but that's because I like my dressing a little more acidic. My cousin prefers using 3 tbsp of oil for a milder taste.