Showing posts with label garlic. Show all posts

Thursday, September 30, 2010

Creamy Tomato Bisque

Homemade tomato soup is one of those things that is a hundred, no, a thousand, times better than any premade stuff you can buy at the store.  It's a bit involved to make, true, especially for something that seems so deceptively simple.  I mean, a tomato soup -- what could sound easier?

Creamy Tomato Bisque

Don't get me wrong, it is easy.  It's just more dishwashing than I would like. :D  Still, the results are so spectacular that I can't really complain.  Start with good tomatoes.  I used tomatoes from my garden -- a few of the larger ones that actually ripened during our cold Seattle summer.  The garlic and basil were also from my garden, I'm proud to say!

Roasted Tomatoes and Garlic

Start by roasting the tomatoes, garlic, and onion with salt, pepper, and olive oil.  Once the tomatoes are nice and soft, puree them with the garlic, onion, and some basil.  I used my new immersion blender, but this can also be done in a regular blender or a food processor.

Tomato Puree for Bisque

This next step, in my opinion, is not really optional.  After the tomato mixture has been pureed, strain it through a fine mesh sieve.  All the little bits of tomato skin and things that didn't get finely pureed get separated out, making the resulting soup wonderfully smooth in texture.  To this I added soy milk (substituting for heavy cream with no ill effect, though I'm sure it would have been even more delicious with the cream), a splash of white wine, and a pinch of sugar.  I like my soups very hot, so I strained the soup into a small pot and kept it on low heat while I prepared the other part of dinner -- what's tomato soup without grilled cheese?

Bagel Grilled Cheese Sandwich

In this case, it was a grilled cheese sandwich made from a plain bagel and Irish white cheddar.  It was the only kind of bread I had, but it worked great.  Excellent dunkability.  A fantastic complement to the deep, rich flavor of the soup. :-)  The recipe I provide makes one large bowl, or two smaller ones.  If you decide to double or even triple it, to make all the dishes worth it, keep in mind you'll probably have to puree and strain in batches.

Creamy Tomato Bisque

Creamy Tomato Bisque

Ingredients
  • 4 large tomatoes, cored
  • 4 cloves of garlic, peeled
  • 1/4 of an onion, chopped
  • salt
  • pepper
  • olive oil
  • 1 tbsp basil, sliced or chopped
  • a splash of white wine (optional)
  • a big pinch of sugar
  • 1/4 to 1/2 cup heavy cream (can be substituted with milk)
Method
  1. Preheat the oven to 375°F.
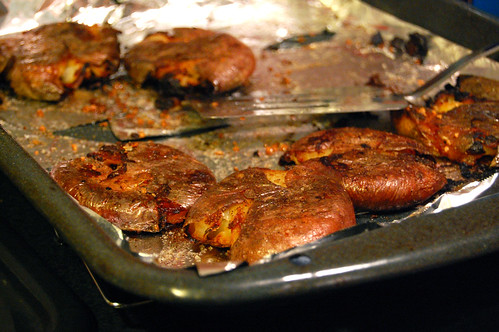
  2. Line a baking sheet with foil.  Place the cored tomatoes on the sheet.  Partially wrap garlic and onion in some foil.  Sprinkle salt and pepper over the tomatoes, garlic, and onion.  Drizzle with olive oil.  Close the foil over the garlic and onion to make a pouch.
  3. Roast in the oven for 35 minutes, until the tomatoes are soft and starting to brown on top, but not falling apart.
  4. Place the tomatoes, garlic, and onion (be careful opening the pouch!) in a container (bowl, blender, food processor).  Add the basil, reserving some for garnishing if you wish, and the wine, if using.  Blend to a fine puree.
  5. Strain the mixture into a small pot or a large bowl.
  6. Add the sugar and stir.  Taste and adjust seasoning.
  7. Add the milk or cream, enough to achieve the desired color and texture, and stir until combined completely.
  8. When soup has reached the desired temperature, divide into bowls, garnish, and serve.

Sunday, July 4, 2010

Garlic Scape Pesto

This 4th of July is a double celebration.  First, there's America's 234th birthday, and second, I am celebrating the second harvest from my first attempt at edible gardening! :-)

One of the first things I planted in my square-foot garden were garlic bulbs from some great garlic I'd purchased at a farmer's market.  This was last fall.  Sometime after our very mild Seattle winter, green shoots started coming up; very exciting business.  They grew and grew, until they reached a certain height (about 3 feet), then stopped.  After a few more months of waiting, longer than usual, probably, due to the extremely mild spring/summer Seattle has been experiencing, the garlic finally started sending up scapes, which is one of the first signs of the plant starting to mature (if you leave them alone long enough, they'll eventually flower).  As a gardener and a cook, the scapes are a wonderful thing to look forward to.  They're tasty, and by cutting them off the garlic plant, it allows the garlic to put more energy into developing the bulb of garlic beneath the earth.

DSC 5779

Garlic scapes grow out curly.  It's usual to wait until the scape has made one or two loops before harvesting.  I harvested mine a few days ago, so now all that's left is to wait for the leaves to turn brown, then dig those garlic bulbs out of the ground!

Garlic Scapes

There are a great many thing you can do with scapes, which taste mildly of garlic.  The most popular method of eating them seems to be in a quick stir-fry, or roasting them like asparagus.  The stem of the scape is solid, while from the bulbil up, the scape is hollow like a scallion.  Some like to cut off the bulbil and only eat the stem, while others like eating the whole thing.  It's up to you.

After some research, I decided to make garlic scape pesto.  Not only do I love normal pesto, but this way, I'd also be able to stretch my scape harvest as much as possible -- garlic scape pesto freezes well.

Garlic Scape Pesto

If you're familiar with making pesto, you know the ingredients involved are few and simple: garlic scapes/basil, pine nuts, parmesan cheese, olive oil, and salt.  Here I've got the ingredients in my new Viking food processor.

Garlic Scape Pesto

A few minutes later, I had garlic scape pesto, which was so incredibly inviting with its bright green freshness.  I bottled most of it to be frozen (I plan to enjoy it slowly over the summer, hopefully mostly when my tomatoes have come in), but set some aside for one serving of pasta.

Garlic Scape Pesto

It was, in a word, heavenly.  I was tempted to pull the jar of pesto out of the freezer and just eat pasta for the next few days until it was all gone, but I managed to refrain.  It doesn't taste like pesto made from basil.  It definitely has a garlicky flavor, but isn't overwhelmed by it.  Garlic scape pesto has its own delicious charm.

Garlic Scape Pesto Pasta

Garlic scape season is all too fleeting, but this is one of the ways it can be preserved for just a little while yet.

Garlic Scape Pesto

Ingredients
  • 12 garlic scapes
  • 1/2 cup shredded parmesan cheese
  • 1/2-1 cup extra virgin olive oil
  • 1/3 cup of pine nuts
  • salt to taste
Method
  1. Chop the scapes into one-inch lengths, bulbils and all.
  2. Add the chopped scapes, cheese, pine nuts, and 1/4 cup of the olive oil to a food processor.
  3. Puree the mixture, adding more olive oil in a thin stream as desired.  (Less for a thicker consistency, more for thinner.)  Scrape down as necessary to make sure all the ingredients are evenly processed.
  4. Add salt to taste at the end, and pulse a few times to combine.
To serve with pasta, toss desired amount of pesto with pasta and top with parmesan cheese, if desired.  Alternatively, spread pesto on top of toasted bread and enjoy.

Garlic Scape Pesto

Saturday, May 15, 2010

Tom Douglas's Garlic Smashed Potatoes

At long last, an overdue recipe.  These are possibly the best potatoes you will ever eat.  Certainly of the non-mashed variety.  That's right, I said it.  I'm putting it out there.  Now you HAVE to take on the challenge, maybe just to prove me wrong.  But I bet I won't be wrong.

Garlic Smashed Potatoes

Making these is a labor of love.  It's very simple and easy, but I'm not going to lie, also time consuming.  From start to finish, it'll take 1 hour and 40 minutes to cook them.  But it will be worth it, I promise you that.  Every single person I've made these for has been amazed by how good (and simple) they are.  They in turn have made them for other people, who demand to know how to do it themselves.

I adapted this recipe from Tom Douglas's "Greek Smashed Potatoes" recipe in Tom's Big Dinners.  At Tom's restaurant Lola, they serve garlic smashed potatoes, which is where I first had them.  They were so good that I had to find a recipe so that I could have them whenever I pleased (and wouldn't have to pay $8 for a small dish).  The Greek Smashed Potatoes recipe seemed just right, with a slight adaptation to make them purely garlic.

The key to making these successfully is to choose smaller potatoes.  The recipe says to use red-skinned potatoes; I've used yellow skinned ones to good effect (once they're done cooking, you can barely tell what color they started out as -- see photo above!).  What doesn't work is bigger potatoes (it used to be that you couldn't even GET red-skinned potatoes that were very big; now I've seen them in a size close to a Russet!).  They should be golf ball size or slightly larger; if you go bigger than that they may not cook properly in the time indicated in the recipe, which means you may not get that perfect harmonious blend of salty crispness on the outside and soft potatoey inside.

Garlic Smashed Potatoes (adapted from Tom's Big Dinners by Tom Douglas)

Ingredients
  • 3 lbs small red-skinned potatoes (about golf ball size or slightly larger) 
  • 1/2 cup olive oil, divided
  • salt and pepper
  • 1 tbsp garlic
Method
  1. Wash and dry the potatoes, then put them in a roasting pan large enough to hold them, with a bit of room between each potato. Roast them in a 450F degree oven for 40-45 minutes, until just tender.
  2. Remove the pan from the oven, then use the bottom of a china mug to smash down each potato to about 1/2". The skins will split and the white of the potatoes will show through.
  3. Drizzle with 1/4 cup of olive oil and season generously with coarse salt and pepper. Pop back in the oven for 25 min.
  4. Remove the pan, flip the potatoes over with a spatula (the bottoms should be nicely browned), then drizzle with another 1/4 cup of olive oil, keeping 1 tbsp of oil in reserve. Pop back in the oven for another 25 min.
  5. Remove the pan again, season the second side of the potatoes with salt and pepper, and sprinkle the garlic over them.  Drizzle the 1 tbsp of remaining olive oil over the potatoes. Toss to make sure seasoning is evenly distributed, then roast for a final 5 min.

Wednesday, April 1, 2009

Sourdough Starters Come Out of Hibernation

I've been a fan of making sourdough using wild yeast since about August of last year. This is the post I made about my discovery of wild yeast and all the trials and tribulations I had making bread until self-made sourdough came into my life.


One of the most difficult things about living in the Pacific Northwest is that we have good weather 3 months out of the year -- if we're lucky. In the summer, it often doesn't get much hotter than 85°F, and in my house, often not even that. This means that the ideal temperature for yeast activity isn't just "room temperature" for me. I have to use a proofing box. But even with a proofing box, when the air is cold yeast simply doesn't perform as well. And there's also the fact that I don't want to be in my kitchen dealing with dough, when it's that cold.

That's why my sourdough starters have been languishing in the fridge for many months now. This week it started to get warmer (though ironically it snowed today), and technically it's spring, so I pulled them out and started the process to get them out of hibernation. On the first day I made the tough decision to throw out one of the starters -- Italy (Ischia Island). Maintaining 3 starters is a pain, and it was always my least favorite starter. I had held on to it for so long because in the beginning it was my best performer, and because my starters are like pets and deciding to let one of them go is a hard decision. It was easier when I could make it after not seeing them for awhile. After the first day or two, Italy (Camaldoli) was bubbling and lively, while France was still languishing. It sometimes takes 4-6 days to bring a starter back to full activity after it's been in hibernation as long as mine has, but I took the opportunity to cull my 3 starters down to 1. I got rid of France also. I've read that after awhile, all starters start to take on your region's bacteria/yeast anyway, so having 3 starters of essentially the same thing is kind of a waste. I don't have the laboratory equipment to actually tell if my Italian yeast has actually turned into Seattle yeast, but at this point it doesn't matter.


Since my remaining starter was so active already, I resolved to feed it and put it back in the fridge, and use the discard to make 3 things: 1) English muffins; 2) the tried-and-true sourdough loaf from The Bread Bible; and 3) this roasted garlic bread from Wild Yeast. I was browsing Yeast Spotting when that recipe jumped out at me. It seemed like a great plan, except preparing 3 different things, all with different rising times and slightly different recipes? A little more complicated than I really bargained for.

The English muffins were a disaster. I don't know what I'm doing wrong. I've tried making them 3-4 times now, and each time, they come out super dense, without any nooks and crannies, and basically just not like English muffins at all. I ran out of bread flour (you can tell I wasn't really prepared to bake so soon) and time so the sourdough loaf didn't get made until today (in fact, I'm on step 2 of the rising stage).

However, I did get a chance to make the roasted garlic bread, and it came out spectacularly. Well, for me. I know the bread is an adaptation of a recipe from a book, but I wish the name indicated that there's parmesan cheese stuffed inside along with the roasted garlic. It's an important part of the bread, imo!


These are probably two of the best loaves of bread I've made yet. Susan's step-by-step recipe/photos helped a great deal. I followed the recipe she posted almost exactly. The two changes I made were: 1) Rather than using 3 whole heads of garlic, which seemed like too much garlic even for me, I used 2 1/2, as I happened to have a half of a head lying around; and 2) During the final proofing phase after the loaves had been shaped, I proofed them for 3 hours instead of 4, then them in the fridge, because I knew I wasn't going to be able to bake them right away. Many recipes call for dough to be retarded in the fridge like this, so I figured it would be okay. They were in the fridge for about 4-5 hours. I took them out and let them sit at room temperature while I preheated the oven and prepared the steam, which took about 40 minutes. I slashed the dough while they were still cold with my new lame, which probably made them easier to slash. (I am THRILLED with the lame, by the way. Slashing has always been difficult for me, and while my use of the lame still requires more practice, it already worked 100 times better than the box cutter/knives I used before.) As usual I used Peter Reinhart's method of steaming with hot water and a cast iron pan.

Here are the proofed loaves right out of the fridge:


Right after baking, and before brushing off the excess flour:


Cooling on a wire rack:


Here's a shot of the crumb. You couldn't tell in any of the other pictures, but the loaves were stuffed with a mixture of garlic paste and parmesan cheese. Mmmm. You can see how that turns out once you slice into the bread. I ate almost half a loaf today, just plain. The other I'm freezing for later!

Sunday, November 23, 2008

Hand-Cut Garlic Fries

I was going to make matchstick fries again today, because I had an extra Idaho potato lying around, the fries were so delicious last night, and I had leftover frying oil that I didn't want to toss out just yet.


But today someone on LJ's Food Porn community posted his hand-cut fries, and I decided that it was time to try doing that. He didn't post directions, but since the fries last night had turned out so well just by dropping them in oil, I decided I wouldn't complicate matters and just try doing the same thing. Previously, I'd seen a post about making homemade fries and it involved boiling the potatoes and extra work that I didn't feel like going through.


I now know: you don't need to boil them beforehand. The potato cooks through perfectly. Maybe that's because I made thinner fries rather than, say, steak fries, but still -- a very good thing to know.

The first thing I did was brown the remaining duck that I had (the less meaty pieces, as well as the head and the feet!) in order to render the fat, so I could use it for the fries. If I hadn't done this I would have just thrown all of the duck into my stockpot for soup, and the fat would have rendered out that way, anyway, so I don't feel that this was an extraneous, indulgent step. I am making a stock from the remaining duck, but I tossed the pieces into the water (along with half an onion, a carrot, and two celery ribs) after they were browned. I had a nice pool of duck fat after I was done, and to this I added the duck fat/peanut oil from last night.


I sliced up my potato (a large one) into the fry size that I prefer -- this only took a couple of minutes. When the oil was heated and ready, I dropped the fries in and cooked for about 6-8 minutes, until they turned a nice shade of brown. Learning my lesson from last night, I didn't drop them all in at once; I made the fries in 3 batches, draining them on paper towels in between.


I sprinkled the fries with salt and minced garlic (two cloves), and used last night's leftover pomegranate sauce as a dip instead of ketchup. Ahhh bliss!! Now that I know how easy it is to make great fries at home, I won't crave them so much when I'm out.


The one caveat I have to this is that many of the fries were limp after I put them all into my container (a clean Starbucks cup). Now, I am one of those strange people who like limp fries, so this made it even better to me. But I'm not sure what would need to happen to make them crispier. Leave them in the oil longer, maybe, but they were already a nice shade of brown -- doing that would have overcooked the outsides. Higher heat, perhaps. Will have to experiment for my friends and family who prefer crispy fries.