Saturday, January 31, 2009

Friday Dinner: Spaghetti with Meat Sauce, and Browned Butter and Mizithra

Stand aside, Old Spaghetti Factory, we've discovered your secrets. Well, all right, they weren't really secrets to begin with. Nothing so mysterious about spaghetti with meat sauce or mizithra cheese and browned butter ... except for the availability of the mizithra, an unpasteurized cheese made from sheep's milk.


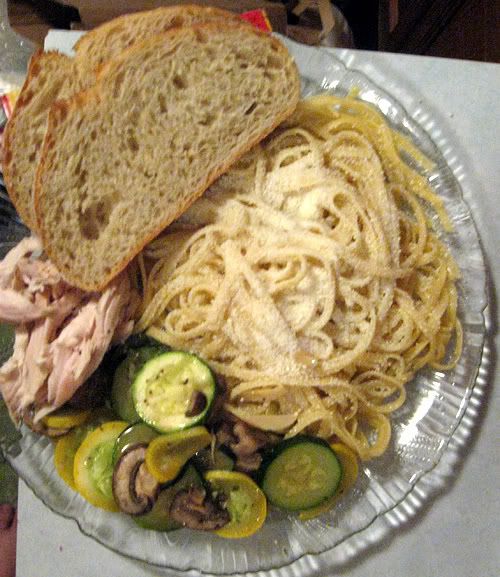
Too much of a good thing? Never. Trix prefers her pasta with all mizithra and browned butter, no meat sauce.

Trix and I have long been fans of OSF's spaghetti with browned butter and mizithra, a dish made even more desirable due to the fact that no one else, no restaurant or grocery store, seemed to know about mizithra cheese. That all changed the other week when I found a hunk of "mizythra" (no other brand label visible) at my local Fred Meyer. Trix found some at Ralph's.

Thus we set out to recreate our favorite OSF dish at home -- hers being pure mizithra and browned butter, and mine being half and half (the other half being meat sauce). I like having the tang of the tomato sauce cut into the buttery goodness when it gets to be too rich. I find that after having some of the tomato sauce, going back to the mizithra portion makes it taste as powerful as it did on the first bite. And the tomato sauce seems sweeter and heartier when I go back to it after eating the mizithra. Thus the two are true complements for me, each making the other even better.


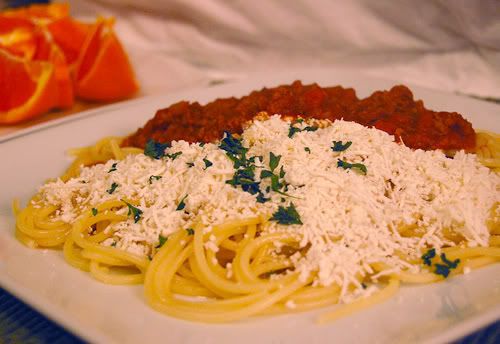
Half meat sauce, half browned butter and mizithra. 100% yummy.

The mizithra and browned butter part wasn't difficult to figure out; OSF doesn't do anything fancy. As far as we can tell, they just toss some pasta with browned butter, then pile some grated mizithra on top and garnish with a bit of parsley. The meat sauce was a little more challenging (but not much), because we have a favorite Bolognese sauce, but it's far thicker than OSF's version. Not that OSF's meat sauce is, frankly, anything special -- but a "saucier" meat sauce seemed more appropriately paired with the mizithra and browned butter to me. So I set about retooling the Bolognese sauce I usually use to make it the right consistency for what I wanted here. And I'm very happy to say that it came out wonderfully.


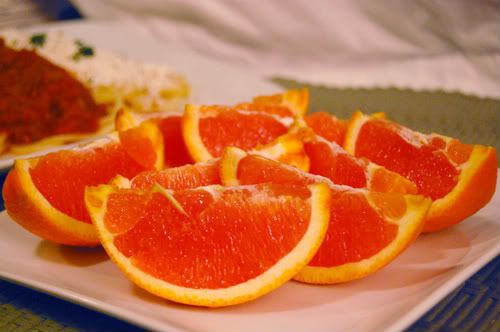
Dessert for me was this gorgeous orange. Your eyes do not deceive you, nor is the picture distorted. It was that orange in color, practically red. I believe the variety was Cara Cara.

Despite having to make two sauces, I never felt rushed. The meat sauce requires an hour of simmering to achieve the best results, so once that's going preparing the browned butter and mizithra is fast and easy.

Now that I know I can make this delicious meal at home, OSF will be seeing a lot less of me!

Spaghetti with Meat Sauce, and Browned Butter and Mizithra

Ingredients
  • your favorite brand of spaghetti (or other long pasta) - I like Trader Joe's brand, or Barilla
For the Meat Sauce
  • 1/2 lb ground beef
  • 1/2 onion, diced
  • 1 6oz can tomato paste
  • 1 1/2 cups water
  • 4oz tomato sauce (the small cans in the stores are 8oz, so use half of one)
  • 7-8oz diced tomato and green chiles (I used half of a 14.5oz can)
  • 1 tsp oregano
  • 1 tsp sugar
  • 3/4 tsp basil
  • 1/2 tsp salt
  • 1/2 tsp marjoram
  • 1/4 tsp rosemary
  • 1 bay leaf
  • dash of garlic powder
For the Browned Butter and Mizithra
  • 1/2 cup unsalted butter (1 stick)
  • 4oz mizithra cheese, grated
  • salt to taste
  • minced parsley, to garnish (optional)
Method
  1. Make the meat sauce. Start by browning the beef and onion in a medium saucepan. Drain.
  2. Add the diced tomato and green chiles, tomato sauce, sugar, salt, and spices.
  3. Mix the tomato paste with the water until it looks like a thick sauce. Add it to the mixture.
  4. Heat everything until it's boiling, then reduce the heat, cover the saucepan, and leave it to simmer for an hour. You'll want to check on it occasionally and stir.
  5. While that's going, melt the butter in a small saucepan. Simmer until the butter is amber in color. Don't stir -- the milk solids will darken and fall to the bottom of the pan.
  6. Grate the mizithra and mince the parsley.
  7. When the butter has sufficiently darkened, strain it into a small bowl using a strainer and some cheesecloth (to make sure none of the solids get through).
  8. Time it so that you will be ready to top warm pasta with the meat sauce when it's ready. Heat a large pot of water to boiling, adding salt and oil if you desire. Prepare your pasta according to the package's directions. Usually al dente spaghetti will take between 7-9 minutes. Drain the pasta and pour a cup of cold water over it to stop the cooking.
  9. Transfer the pasta back to the same pot. Drizzle with a desired amount of browned butter (depending on how many servings you've got) and toss. If you're making meat sauce, it's up to you if you want to reserve some unbuttered pasta for that half (I do). Alternatively you could simply spoon butter over the portion you desire while it's on the plate and skip this tossing step entirely.
  10. On a serving plate, heap with half buttered pasta and half unbuttered pasta. Ladle the meat sauce over the unbuttered half. Generously sprinkle the buttered half with grated mizithra and garnish with parsley.

Thursday, January 29, 2009

Winter Vacation Food Round Up

Here are some of the food photos I took during my winter vacation in Los Angeles -- some weren't included because they were blurry or had bad lightning. And this doesn't nearly encompass all the food I ate!


These avocado rolls are from BJ's Brewery. They also serve thick crust pizza and pizookies (a large cookie warmed in a pan with ice cream on top). My favorite thing here is actually their roast beef dip -- delicious. The avocado rolls were better than the ones that I've had at the Cheesecake Factory, imho.


I can't remember what kind of burger this is because it wasn't actually mine. It had avocado in it, I know that much. And it was apparently delicious. From Fab's in the Valley.


This is what I had from Fab's. A chili cheese hot dog with mustard and onions. Mmm.


A chocolate-dipped creampuff from Beard Papa's. It was in a mall.


Pan-fried dumplings from Ho Ho Kitchen in El Monte. The owner and chef keep closing up places and opening new ones under different names. We keep finding them because their food is so good that everyone follows them around and passes along the information.


Again from Ho Ho Kitchen, which has the best Shanghainese food, even if it is a tiny hole in the wall. These eggrolls are the only kind I like -- filled mostly with veggies and fried to a perfect crisp.


Fried fish from Long John Silver's, which is a fast food joint. We don't have them in Seattle. This 8-piece fish 'treasure chest' was just over $8 -- incredibly good price. If you've ever been to Ivar's, which is Seattle's 'fast food' seafood joint, you'll know that $8 will barely get you a 2-piece fish meal there.


This pastrami sandwich from Jerry's Deli was good, but overpriced. It was listed under "sky high sandwiches." Does that look sky high to you? Me either.


My mom made shrimp cocktail while I was home. Mmm.


My dad followed it up with T-bone steaks, seen here marinating. He's the best at it.


Here we've got frozen yogurt from Purenaked Yogurt -- it's sour in the style of Pinkberry, Red Mango, etc. I really love it. My toppings were raspberries and mango, but it was underripe. I should have gone with pineapple! You can see my friend Robbie's in the background ... she got pineapple and Captain Crunch on hers. :D


This delicious pizza is from Mulberry Street Pizza. It's the closest thing I've found to New York style pizza on the west coast. I'm just sad it's in LA and not Seattle (which apparently doesn't have any true NY-style pizzerias). The pizza was 22" around, which is huge, but this great perspective shot (taken by Robbie) makes it look even bigger. Some have asked what the difference is between NY-style pizza and regular pizza -- the answer is, it's all about the crust. It's very thin crust pizza that's not crunchy. The toppings are minimal (usually just plain cheese) because the thin crust doesn't support it, and because the ratio of cheese/sauce/crust is so perfect and delicious that it doesn't need anything more. The slices are usually very wide, so much so that people fold them in half to eat. Mulberry Street Pizza's pizza is very much like Ray's, which is a chain in NY. I'd consider it "fast food pizza." Other pizza places in NY, which are more like real restaurants (you couldn't just walk in and buy a slice), such as Pasty's or Lombardi's, use fresh mozzarella and bits of basil.

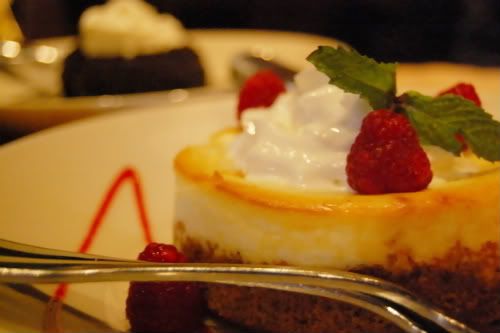
This is the cheesecake from Wood Ranch. But skip the cheesecake. The best thing Wood Ranch serves (even better than their steaks) is their mac & cheese. Really, really wonderful real cheese flavor.

That's it! I wish more of my food photos from the trip had turned out well. But rest assured that I had some good eats. The 7 pounds I gained attest to it. :P

Sunday, January 25, 2009

Apple Tart Cake

I've been intrigued by both of the latest recipes on Orangette, the cream of scallop soup and the apple tart cake. Of the two I thought I would be making the soup first, as I love scallops, I love soup, and I love the idea of combining the two. However, the method and the ingredients for that one were definitely more challenging than the tart cake, which only required that I buy a few apples as I had everything else.


First I have to say something about the name. There really is no better way to describe this, as it's neither a tart nor a cake, but has properties of both. Second, I'm not usually a fan of too much filling. Think of an apple pie ... toward the end of the slice I'm usually picking out some of the apples and concentrating on the crust and syrup/topping, which are the parts I like best. Also, I've made an apple cake before, and it also turned out too appley (and soggy from all the juice from the apples). So when making this cake I thought 3 apples were far too many (even despite the warning that it would seem that way), and that I would probably end up picking some off the top. Not so! It actually ended up being just right, so I'm pleased that I went ahead and used all 3 apples.


The one change I would make the next time is that more and more I'm preferring my desserts to be less sweet, so I'd change this to 3/4, maybe even 1/2, a cup of sugar. Too much sugar "numbs the palate" as Judy Rodgers says in The Zuni Cafe Cookbook, and isn't good for you besides. I'd maybe also add a pinch of salt to the crust/cake. Now whenever I have a slice, I just sprinkle some salt on top, which gives it a nice depth of flavor.


Apple Tart Cake

As posted on Orangette

Ingredients

For the base:
  • 1 cup granulated sugar
  • 1 cup all-purpose flour
  • 1 tsp. baking powder
  • 5 Tbsp. cold unsalted butter, cut into a few pieces
  • 1 tsp. vanilla extract
  • 1 large egg, lightly beaten
  • 3 large Granny Smith apples, peeled, cored, and sliced very thinly

For the topping:

  • 3 Tbsp. granulated sugar
  • 3 Tbsp. unsalted butter, melted and cooled slightly
  • 1 tsp. ground cinnamon
  • 1 large egg

Method

  1. Preheat oven to 350°. Butter and flour a 9-inch springform pan.
  2. In the bowl of a food processor fitted with the steel blade attachment, combine the sugar, flour, and baking powder. Pulse to mix. Add the butter, and pulse until no large lumps remain. Add the vanilla and the egg, and blend well, until it resembles cornmeal.
  3. Dump it into the prepared springform pan. Nudge it around with your fingertips to distribute it evenly, and then gently press it along the bottom of the pan. You’re not trying to really tamp it down; you just want to compact it a little. At the edges, let it curve up ever so slightly, like a tart shell with a very low, subtle rim.
  4. Arrange the apple slices over the base in a tight circular pattern. It may seem as though you have too many apple slices to fit, but keep going. Really squeeze them in.
  5. Slide the pan into the oven, and bake for 45 minutes.
  6. Meanwhile, make the topping. Combine the ingredients in a small bowl, and whisk to blend well.
  7. After the cake has baked for 45 minutes, remove it from the oven, and spoon the topping evenly over it.
  8. Bake for another 25 minutes or so, until the topping looks set.
  9. Transfer the pan to a wire rack, and cool for 20 minutes. Then run a thin knife around the edge to release any areas that may have stuck, and remove the sides of the pan. Cool completely before serving.

Orangette's Note: This cake is even better on the second day. So if you can, make it a day ahead: just wrap it in plastic wrap and leave it at room temperature until you’re ready to eat it. We ate ours plain, but I think it would be great with vanilla ice cream.

Yield: about 8 servings

Friday Dinner: Roasted Salmon Steaks with Pinot Noir Sauce

Now that I'm caught up ... two Friday dinners in a row! This is what we had this last weekend. Since the chicken friand was rather rich, we decided to make something from the "healthy meals" column. The recipe we used was Mark Bittman's Roasted Salmon Steaks with Pinot Noir Sauce. As per his minimalist cooking ideal, the recipe and sauce are simple, though the sauce may take a little longer to come together than the 20-25 minutes indicated on the recipe -- it took me a good 40 minutes to get it reduced enough.


I accompanied my salmon with Cuban black beans -- the canned sort from Trader Joe's. It was a last-minute decision! I garnished the plate with some thinly sliced Fuji apple, which is what I had for dessert.

Salmon is salmon no matter how much you fancy it up, so most methods of preparation, such as this one, relies on the sauce for definition. I am pleased to report that Trix and I both liked the sauce very much -- we feel lucky to have 'discovered' two yummy, easy-to-make sauces two weeks in a row. It's a sweet sauce (particularly as I forgot to season mine with salt and pepper), which I normally don't care for, but it works really well with the salmon. I'm looking forward to trying it on other meats and fish as well.


Trix was more prepared than I was, and had sauteed mushrooms and spinach as sides. Her sauce was also 'redder' than mine -- I probably reduced mine for longer, deepening the color, or maybe the cast iron pan I used darkened the sugar faster.

Neither of us had ever melted sugar without the aid of a liquid before. It works surprisingly well.

I used the cheapest pinot noir I could find. I'm not a wine drinker, and especially if it's just going to be cooked, I figure it doesn't need to be costly (Bittman himself says that the wine used in this need not be expensive). I used Stonehenge, which was $5.99 at Trader Joe's. I normally buy their Charles Shaw wine to cook with, but they don't make pinot noir. I can still taste welcome notes of fruitiness in the sauce despite the inexpensive wine, and that's good enough for me.

Roasted Salmon Steaks with Pinot Noir Sauce

From Mark Bittman's recipe, found here

Ingredients
  • 1/2 cup sugar
  • 2 cups pinot noir
  • 1 sprig rosemary, plus 1 teaspoon chopped rosemary
  • 4 salmon steaks, each about 1/2 pound
  • Salt and freshly ground black pepper
  • 1 tablespoon balsamic vinegar
  • 1 tablespoon butter

Method

  1. Preheat oven to 450 degrees. Place sugar in heavy-bottomed saucepan, preferably nonstick and with rounded sides, and turn heat to medium. Cook without stirring (just shake the pan occasionally to redistribute sugar) until sugar liquefies and begins to turn brown, about 10 minutes. Turn off heat, and carefully add wine. Turn heat to high, and cook, stirring, until caramel dissolves again. Add rosemary sprig, and cook over high heat, stirring occasionally, until mixture is syrupy and reduced to just over 1/2 cup, 10 to 15 minutes.
  2. As liquid reduces, heat a nonstick skillet over high heat until it begins to smoke. Season salmon on both sides with salt and pepper, then place in pan and immediately transfer to oven. Cook 3 minutes, then turn salmon and cook another 3 minutes. Remove salmon when medium-rare or thereabouts (or cook another minute or two if you like it more done), and keep warm.
  3. When sauce is reduced, stir in balsamic vinegar and butter and turn heat to medium-low. Cook until butter melts. Season with salt and pepper, and remove rosemary sprig. Taste and adjust seasoning, then serve over salmon, garnished with chopped rosemary.

Saturday, January 24, 2009

Friday Dinner: Chicken Friand

I know, it's been a long time. I don't even have the excuse that I don't have any food pictures to share. I do. It's just ... laziness. I'm not going to lie: it's winter and I don't like being in my kitchen. I hate that I don't want to be in my kitchen when I love being in my kitchen. But when I can see my breath and washing veggies freezes my hands, it's hard to want to do it.


A good impetus is the resumption of Friday night dinners. I can't let Trix make yummy, homemade things while my contribution is takeout or pb&j sandwiches, can I? Of course not. But that doesn't mean my post-vacation apathy about blogging is as easily dismissed. (Though I did change the layout a bit -- just a subtle stretching.) Well, maybe not so much apathy as just getting back into the habit. That said, let me say that the recipe I'm sharing today is actually one that we made last week. Hey, it's only a week late -- that's not so bad, is it?

What we made was chicken friand, and it was delicious. The recipe makes 6 pastries, and even if you're just cooking for 1 or 2 people, like me, you'll want to make all 6. Why? Well, as mentioned before, they're delicious. On top of that, they freeze well. So the initial effort of making them yields multiple yummy, hot meals.


Essentially, puff pastry is stuffed with a mixture of chicken, gruyere cheese, and mushrooms, and seasoned with salt, pepper, and rosemary. It's then baked until puffy and golden brown, and topped with a thick mushroom gravy. It's perfect cold weather food.


I'm normally not a huge fan of rosemary, but it works well here. In future I may add just a tad less than the recipe calls for, but would otherwise not change a thing. The sauce is especially wonderful, though it thickens after the first day and needs to be thinned out for subsequent reheating (and doesn't freeze all that well). But it's so good and easy that it may be my new go-to gravy for just about anything, including mashed potatoes.


Chicken Friand

Ingredients
  • 1 1/2-2 cups rotisserie chicken, diced
  • 1 package (2 sheets) frozen puff pastry, thawed
  • 2oz dried shiitake, porcini, or mix of dried mushrooms
  • 1 can chicken broth
  • 3 large scallions, white and greens, minced
  • 2 large garlic cloves, minced
  • 6 tbsp butter, divided
  • 2 cups chopped fresh mushrooms (such as white button or cremini), chopped
  • 4 tbsp flour
  • 1/2 cup heavy cream (milk or half/half)
  • 1 tsp dried rosemary
  • 1 egg, beaten
  • 4oz Gruyere cheese, shredded
  • salt, to taste
  • pepper, to taste
Method
  1. Pour chicken broth into a bowl and rehydrate the dried mushrooms in it for as long as it takes to fully hydrate the mushrooms -- varies depending on the size of the mushrooms you're using (my shiitakes took about 30 min). When they're hydrated, squeeze the broth out of the mushrooms, chop them up, and transfer them to another container. Set both aside.
  2. In a large pan with a lid, melt 2 tbsp of butter and saute scallions and garlic in it. Add the fresh and rehydrated mushrooms and saute until cooked. Season with salt and pepper to your preference. When done, transfer the mushroom mixture to another container.
  3. Clean out the pan, then melt the remaining 4 tbsp of butter in it. Add 4 tbsp flour, stir in well and cook 1-2 minutes to make a roux. Slowly pour the mushroom-infused chicken stock into the roux, stirring all the while to keep lumps from forming. Set the sauce to barely simmering, and stir every few minutes. When it's thick enough to coat the back of a spoon, reduce heat to low, stir in the cream, and place the lid on it. Stir every 5 minutes or so.
  4. In a large bowl, add the diced chicken and 1 tsp dried rosemary. Add 1/2 of the mushroom mixture. Add the shredded Gruyere, reserving a tbsp or two for the sauce (or none, if that's your preference). Take 2-4 tbsp of the sauce and add it to the chicken mixture -- just to wet the mixture a bit and help combine everything evenly.
  5. Unfold a sheet of thawed puff pastry and roll it out to thin the dough, about 3 times each way. Cut the dough into thirds.
  6. Mound a generous 1/2 cup of filling on half of each dough piece, leaving room around the edges to seal. Wet the edge around the filling with egg wash, fold the other half over to encase filling, and use the tines of a fork to press it closed.
  7. Brush the tops of each pastry with egg wash. (At this point, the raw, filled pastries can be flash-frozen on a parchment-lined tray, then individually wrapped and bagged for long-time freezer storage. Thaw pastry before baking.)
  8. Bake at 350°F for 25 minutes on a sheet tray lined with parchment paper. The pastries should puff and turn golden brown.
  9. While the pastries are baking, add the other half of the mushroom mixture to the sauce and stir in. Optionally you can add a bit of Gruyere (if you reserved any) here as well. There should be about 1/4 cup sauce for each pastry.