Monday, August 18, 2008

Donut Peaches & Bacon

We're in the midst of peach season, but it wasn't until this last weekend that I saw these scrumptious gems:


I love peaches in general, but white-fleshed ones are my favorite, and of those, nothing tops the donut, or Saturn, peach. Peaches are native to China, and the "flat peach" is no exception -- but lucky for me, they're commercially grown in Central California and Washington. Though they aren't a new fruit, I didn't have one, or even know of their existence, until a few summers ago when I sampled one at Pike Place Market. I was, needless to say, blown away by their deliciousness!

If you've never had one, you're missing out. Donut peaches have very little fuzz, with tender white flesh that is unbelievably sweet, due to being low in acid. They can be quite small -- in fact, until I found these this weekend, I had never seen them this large.


For dinner tonight I used some leftover ingredients to make a shrimp and mushroom egg white omelette topped with cheese. I should have taken the time to pre-sauté the mushrooms, as the omelette came out a bit watery (but good nonetheless).

I also fried up a slice --cut in half -- of the bacon from Wooly Pigs, which was delicious. (Warning: Gratuitous bacon shot below.)


I was a little bit perturbed by how much bacon grease resulted from that one slice of bacon, but thrilled at the same time. I know, I'm such a contradictory person. It certainly didn't stop me from getting out a new jar in order to save the drippings (I have another jar of bacon drippings from "normal" bacon; I wanted to have a separate jar for the Wooly Pigs bacon). For those of you who read my blog post about lard and might be wondering, bacon drippings do not fall into the category of "the good kind of lard," as it is typically cured using sodium nitrate, which has been linked to chronic obstructive pulmonary disease. "Uncured" bacon is available (Trader Joe's has a very good one), but the reason that's in quotes is because it just means the bacon hasn't been cured in the traditional way using added sodium nitrate, and is instead cured with some combination of salt, lactic acid starter culture and celery juice, which has natural sodium nitrate. >.> Yeah. So, it's kinda sorta the same thing. Totally uncured bacon would actually be called pork belly, which is delicious in Korean BBQ. But that's another subject.

Okay, pork obsession aside. Back to the matter at hand: tonight's dinner. I finished off with a juicy, sweet donut peach that was perfectly ripe. That leaves me with 3 to devour in the coming days. I have to say, I'm not a hater of cooked fruit; in fact, I quite like it depending on the dessert, but a donut peach should never, ever be cooked. That would be a damn waste.

Saturday, August 16, 2008

Lard: The Misunderstood Fat

LARD.

Just the word alone is enough to make people cringe away and shudder with horror. Its connotations are all negative. It might be one of the few foods that I actually feared growing up, as if even being in its presence would clog my arteries and cause a heart attack right on the spot.


But like so many foods that have gotten a bad rap -- egg yolk comes to mind -- it turns out that tales of its detriments to people's health were largely exaggerated. Unlike other foods, including egg yolk, however, lard has never recovered from the stigma of being labeled unhealthy. To this day, even though we know more than ever about the food we consume, lard is still widely thought of as the worst thing people who care about their health could possibly eat.
It's not true. Well, it's a little more complicated than that.

As usual, man, trying to improve upon nature, only managed to eff things up further. In its pure state, lard has LESS saturated fat (the bad kind) and MORE unsaturated fat (the good kind) and LESS cholesterol than an equal amount of butter by weight! Don't get me wrong; there is lard that's bad for you -- and that's lard that's been messed with by man. See, back before we learned that just because we could do something didn't mean that we should do it (okay, we still haven't really learned that lesson), someone thought, hey, this stuff eventually goes bad. Wouldn't it be great if we made it shelf stable, so that it wouldn't need to be refrigerated, and it could last forever? Thus the hydrogenation of lard was born. It's the lard you'll typically find at supermarkets, sitting away from the refrigerated meats. The hydrogenation process produces trans fats, which, if you didn't already know, is the evil, arch enemy of health that we all should avoid. It's what's responsible for increased risk of coronary heart disease, raising LDL (bad) cholesterol, and lowering HDL (good) cholesterol.

So yes, hydrogenated lard is every bit as bad for you as the old stories say. Good lard that has not been touched by industrial processes, however, is -- I hesitate to say good, as it's still fat and has the calories of fat, and I wouldn't recommend consuming it in large quantities -- not nearly as bad for you as you might think.

Well so what, you point out. Why would I want to use it?

Good question. Bakers, foodies, connoisseurs of deep-fried foods, and food writers like Melissa Clark already know the answer. I think Lisa of Homesick Texan (whose blog I enjoy muchly) puts it best: "People think that cooking with lard will make everything taste of pork, but this is not true; its flavor is neutral. What it does, however, is create incredible texture and structure. With lard, you'll fry chicken that is both moist and crisp. With lard, you'll make a tender pie crust that flakes. With lard, you'll make airy French fries that crunch. With lard, you'll cook refried beans that caress your mouth like velvet. With lard, you'll steam tamales that are soft and fluffy. And with lard, you'll bake ginger cookies that snap."

The next obvious question is, where do I get me some of this wondrous fat? Well, you have a few options.


  1. Buy it online. The convenience here is that you can find specialty merchants who sell non-hydrogenated, rendered lard from responsibly raised hogs, which means your conscience can rest easy, and you won't have to go through the rendering process yourself.
  2. Find a local butcher that has pork fat s/he is willing to sell or give you. During my researching online, I saw many people say that a butcher was only too happy to hand pork fat over, as it would have otherwise been thrown away. Others have gotten fresh pork fat for about $1 a pound. It's pretty rare that you would find already rendered, non-hydrogenated lard for sale at a brick and mortar, but if you find it, grab it!
  3. Save bits of excess fat from pork cuts (fat freezes really well) and when you've got a good amount, do your rendering then.

In terms of convenience, #1 and #3 are probably the way to go. But #1 is probably much costlier than you'd prefer it to be, and #3 might take too long (a consideration if you're impatient like me). Okay, so #2 then. But warning: finding a butcher that has pork fat to sell may not be a simple matter. As has already been noted, people don't like pork fat. They want nothing to do with lard. So of course merchants typically don't carry it (plus with today's lean SuperPigs, it's kind of hard to come by anyway). If you're lucky and live in an area with butchers aplenty, or already have a butcher you frequent regularly, it might be quite easy. But my own experience was far from simple. It consisted of me calling the meager handful of butchers that even came up in a search of my area, only to be told that no, they did not have pork fat. I finally struck gold when I found Wooly Pigs, which specializes in Mangalitsa pigs from Europe. I began a short exchange with the owner, Heath ("Do you sell pig fat?" "Yup." "How much do you charge?" "$3 a pound." "See you Thursday."), and began looking forward to the day when they would be at the farmers market closest to me.

In the meanwhile, I did a little more research on Wooly Pigs, and honestly, I totally lucked out. They treat their animals humanely, which was a relief because even though I had set out with that preference, I eventually reached a point in my search for pork fat that I would have had to get whatever I could due to what was available to me. Animals at Wooly Pigs are not fed antibiotics to promote growth. The Mangalitsa is considered an "unimproved lard type" breed, instead of the "meat type" breed prevalent today that became more popular after WWII (when people stopped using as much lard and started messing around with nature with regard to breeding, drugs/hormones, etc.). Thus Mangalitsas aren't as lean as commercially bred hogs and have much more fat. And on top of that, Mangalitsa fat has more unsaturated fat than normal pig fat. All very good news to me, since I was only interested in the fat!

Once I got to the farmers market to pick up the fat, I encountered another pleasant surprise: I hadn't specifically asked (I would have taken just about anything at that point), but the fat they had reserved for me (when I marched up and asked for pork fat, the woman managing the stand asked if I was the one who had emailed Heath about it, and said that they didn't normally bring fat to the markets since people rarely ask for it) was leaf lard. Well, I was super stoked by this unexpected boon.

Okay, so up until now I have neglected to mention that there are 3 grades of pork fat. They are:

  1. Leaf lard. The highest grade of lard, taken from the fat deposit surrounding the hog's kidneys. This lard is best saved for making pastries, which will flake like nobody's business.
  2. Fatback. The next highest grade of lard, taken from ... you guessed it, the back of the hog. This fat is good to use for deep frying.
  3. Caul fat. This is the lowest grade of fat for rendering into lard; it's often used in pâtés.

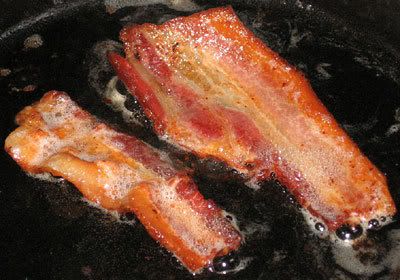
I was hoping for fatback, figuring that leaf lard would be in much shorter supply and more costly. In fact, I didn't even once think that I would be getting leaf lard. So I was pretty happy with my new treasure. I paid $3 a pound, which I realize is probably about the same price I'd pay for meat in a grocery store, but considering a) this was the only place I could find that even had pork fat to sell; b) the humane and natural way the meat was raised and butchered; and c) their pork cuts cost $22 a pound, I thought was a fairly reasonable price. While I was there I also picked up a pound of bacon (it cost me $19, which is insanely expensive, but heck, I wanted to try it, and I'd just learned about my promotion at work so felt I could splurge).

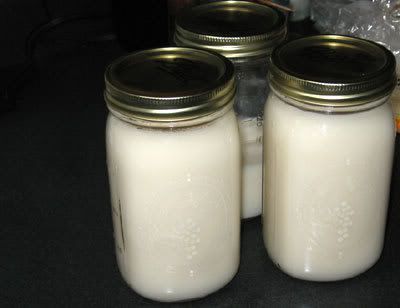
The roughly 5 pounds of fat I purchased had been frozen, but it was a particularly warm day, so it had thawed a bit by time I got home. I let it sit on the counter for another hour, then I went to work. It was still partially frozen, so chopping it up into small pieces was a little more work than it otherwise might have been (hopefully yours will not be frozen at all). I put some water into my trusty Dutch oven, turned the heat on low, and added the fat. After boiling on the stove for about 2 hours, the water had evaporated and the solid fat was starting to melt down. It took about 8 hours to liquefy it all. I let it cool a bit (though still in liquid form), then strained the whole thing through a cheesecloth into a large bowl, added water, and stuck it in the fridge. (I know I'll probably get scolded by other lard renderers for this, but I threw away the pile of cracklings, which are the bits of meat/skin/membrane tissue that get separated during the rendering process and are basically deep fried in the melted fat for hours. Almost every article I've read on the subject agrees: cracklings are one of the most delicious treats one can indulge in, and are a just reward for the time you just spent rendering all that lard. I tasted a few and wasn't a huge fan, though, and given how much there was, I decided to spare my waistline.) After the fat had been in the fridge for hours to solidify, I removed the slab of lard from the water, dried it, cut it into pieces, and remelted it. I poured the liquid fat into Mason jars (which I had plenty of, due to my sourdough culture trials). I ended up filling 2.25 1-quart jars, so 1 pound of fat turned into approximately 16 fluid ounces, 1 pint, or 2 cups.

The method I used to render my lard came from various online sources I'd read about the matter, primarily Homesick Texan's method as well as the method of the blogger at An Obsession with Food & Wine. All the articles I read involved "wet rendering," which uses water in the rendering process. There's also dry rendering, which is done in a pan or oven without water (kind of like frying bacon). Wet rendering produces lard that is lighter in flavor and color, and has a higher smoke point, which to me makes it superior to dry rendering.

Specifically, these are the steps I took:

  1. Chop the fat up into small pieces. You want as much surface area as possible to be exposed, but don't go too crazy. Wasting too much time on this step isn't worth it. The author of this article, "Lard: The New Health Food?" ran his fat through a meat grinder, so that it resembled strands of ground beef, or "spaghetti on steroids." If you have a meat grinder, I'd recommend this method. I'm sure it took less time to render the fat because of it!
  2. Add about 1/2 cup of water per pound of fat to a large, heavy pot or Dutch oven. Add the fat, then turn the heat on to low. This is very important; too much heat will make the water evaporate too quickly and you'll just end up scorching the fat.
  3. Stir occasionally, every 15-20 minutes or so; doesn't need to be exact. At first the contents will look like a milky pot of water with bobbles of fat chunks in it. Don't worry, that will change. Depending on how much fat you're rendering, eventually the water will evaporate and the mixture will turn more of a golden color, it will be noticeably thicker, and it will resemble, well, cooking oil. With bobbles of fat in it.
  4. Coax your dog away from the kitchen, because the smell of roasting pork is simply too irresistible for him. If your dog's favorite meat is pork, you will fail as I did. If the smell of roast pork permeating your house doesn't appeal to you, open a window before you start rendering.
  5. Eventually, all the solid fat will be melted (and you'll see the cracklings at the bottom of the pot) or there won't be enough left to make it worthwhile to keep going.
  6. Let the fat cool a bit. You still want it to be in liquid form, but nowhere near boiling. You have two choices at this point. You can strain it into containers and be done. Or you can take the extra step of removing any leftover protein bits by adding water to it and refrigerating it overnight. I went with the latter. Strain the fat into a large bowl, add a lot of water, no precise amount, and stick the bowl in the fridge.
  7. After a few hours there should be a large slab of lard floating on top of the water. Remove it and dry it, then chop it into pieces and melt in a pot over low heat. Once it's all melted, ladle or pour it into containers. According to Lisa of Homesick Texan, it will keep in the fridge for about 3 months, or in the freezer for up to a year.
  8. Use the lovely stuff you just rendered and make out-of-this-world pastries or deep fry something to perfect, delicious crispness.

So should you eat lard all the time? Of course not. It should be taken in moderation like everything else. Nor is it something you need to fear or avoid, provided it's the right kind. It's a perfectly acceptable -- perhaps even preferable in some cases -- substitute for butter. You don't eat that all the time, either. Each has its place in various culinary delights.

As for what I'm going to make first? Raspberry fried pies. (The recipe is for blueberry fried pies, but I much prefer raspberries, so that's what I'm going to use.)

After that, who knows? The world is my deep-fried oyster. Mmmm.

Recommended reading:

Monday, August 4, 2008

A Tale of Yeast

This story actually begins over a decade ago, when my college roommate Emily and I were living in our first apartment. One day she decided that she would make a pizza from scratch. Never having witnessed such a thing -- or even contemplated that it could be done -- I watched the process from beginning to end, fascinated. The ball of dough rose overnight as if by magic, and it was then flattened out to a large square pizza, which was topped with cheese and veggies and promptly consumed once it was baked. It wasn't the best pizza ever created, and the crust was thicker than is my preference, but it was still good and the texture still resembled pizza. Plus we had it at a fraction of the cost of getting a 'real' pizza at BJ's down the street.

Not too long after this experience, while living on my own, I remembered Emily's pizza and the fun of making dough and waiting for it to rise, and how easy it was. I decided to make my own pizza, except with thinner crust. In my mind it was an easy thing: make dough, make pizza, eat pizza. But I ran into trouble almost right away. Why wasn't the yeast creating bubbles when mixed with water and a bit of sugar? Was the water I was using too warm? Were those few bubbles I did see from the yeast, or from me stirring? Was the yeast I'd gotten somehow defective? I plunged ahead anyway -- and the result was an inedible rock. But I was not to be deterred. I tried again, but this time I wanted to make sure that the dough had the right atmosphere to rise. It had seemed so easy and instantaneous when Emily had done it; what was I doing wrong? Maybe it was too cold where I was. So I stuck the rising dough in a warm oven ... too warm, as it turned out, as it ended up getting baked. I might have tried once or twice more, with less than ideal results, before giving up.

A few years later, my cousin and her husband had an adults-only get together where they served "gourmet" pizzas. Very thin crust, fancy toppings. I was interested to see whether their pizza dough would turn out well and truly pizza like. It did -- the pizzas were delicious. I was both disappointed and inspired. Disappointed, because it seemed that everyone could make pizza except for me, and inspired, because maybe, just maybe, if I used the recipe they had used, I could duplicate their results.

Failed. Again. The pizza I made was not thin, nor delicious. The crust more resembled a hardy bread than a good base for pizza. I decided that I was just a failure at pizza dough.

Then earlier this year, I read an article by Melissa Clark about a guy who had a successful pizza restaurant in New York, but prior to opening the restaurant had never made a pizza before. Now, of course, he was a pro. The article came with a recipe for his pizza dough, and I was inspired once more to give it a try. Surely as someone who hadn't grown up making pizzas and who had to teach himself the trade, his recipe would be more beginner friendly?

The pizza I made from this dough looked like a pizza aesthetically -- or a thicker breaded cousin of the pizza -- but taste wise it was severely lacking. I had followed the instructions precisely, and yet the results were as disappointing as they had been all the times before. No matter what, I could not get the dough thin enough to make it seem more like 'real' pizza. The dough was tough and chewy, and it was more like eating cardboard with some tomato sauce and cheese on top than eating pizza.

At this point you might wonder why I didn't just give up entirely, and simply buy my pizza. Oh, I did. Pizza can be had relatively inexpensively, and I'm a long way from my poor college days. But it always nagged at me that I had never once been successful at making pizza dough, which seemed like such an easy, simple thing. And I wasn't asking for perfection. If I couldn't make pizza like the pros, surely I could make passable pizza the way Emily had over 10 years ago?

I might not have tried again -- or it might have taken longer after the last failure -- had my best friend and I not gone to New York and discovered the wonder of New York pizza. A lot has already been said about New York pizza, all positive, and I'm not going to spend a lot of time extolling its virtues. I will just say that at first bite, while good, you may not notice the difference between a slice in New York and other pizzas you've had. You may not even notice it on the third bite, or fifteenth. But eventually you will realize: This is some damn good pizza. It's not fancy, it's not in your face; it's just something you want to eat. Constantly. In any case, we went to several pizza establishments while in the Big Apple and our favorite was Patsy's. Lombardi's was a close second, but Patsy's had won our hearts (at least for the two trips we've taken to New York). But really, you don't even need to go to a restaurant. We frequented Ray's plenty of times, and their slices were just as good if not as upscale with their ingredients. Perfect for just stopping by to grab a quick slice before heading back to our hotel room.

That said, we could not get New York pizza on the West Coast. While we have some pretty good pizza, it's just not the same. Not long after we got back from our second trip, I read an article in the New York Times about an ex-pat New Yorker who had moved down South somewhere, and it was his mission in life to duplicate Patsy's pizza in his home oven, nearly burning his house down while rigging his oven to make it get hot enough to bake true pizza, the way pizzerias are able to do. (He's able to bake a pizza in about 2 minutes.) Now this was pizza love. And I was particularly delighted by the fact that the pizza he was trying to duplicate was that of Patsy's, which was our favorite as well! His Web site gives a lot of advice on the process, and while I am nowhere near dedicated enough to go through all of them, one thing did stand out to me: He said to never use commercial yeast in the dough, but to get a sourdough starter. His came from Patsy's itself, but other starters could be made or purchased.

And suddenly it all fell into place. My enemy this whole time had been commercial yeast! (Okay, that's not true; if pressed now I could probably make decent pizza using it. But at the time I really thought I had figured out the source of all my pizza-making problems.) I ordered my first sourdough starter from www.sourdo.com (three actually), and now I have successfully baked my first sourdough loaf and made delicious pizzas besides.

It didn't happen by magic, though -- getting the sourdough cultures activated took a lot of time and patience (since they got contaminated during the initial process, which isn't uncommon, but it still takes days to "wash" the cultures and get them healthy again), and in the meanwhile I began reading up on yeast, fermentation, bread making, and other related topics. My wild yeast cultures have worked best for me, but that's also because I learned how to take care of them -- and I was much more diligent about it than I was with commercial yeast, which I could easily replace if something went wrong. I learned about gluten and how to get it to relax so it can be shaped more easily (enabling thin-crust pizzas). I learned about the best environment for yeast so they can thrive (enabling optimal volume expansion). I learned about temperature, steam, measuring by weight, and baking stones. In other words, I learned the science and the tricks to getting the results I wanted from yeast and from dough. While I am still far from being an expert, and I'm still constantly consulting books, at least I know the whys, which really helps with the hows. Now I can make pizzas that resemble pizzas!

And my days of "disobedient" yeast are over. First, I've converted to fresh sourdough for just about every baking need, though I haven't sworn off commercial yeast entirely (I know the day will come when I am too lazy to do the conversion between sourdough and commercial yeast in a recipe). Wild yeast is supposed to rise slower than commercial yeast, due to fewer yeast cells, but it's always worked like a charm for me, as long as I had the time to devote to it. Here's a picture of a sourdough starter I was keeping on my counter and feeding twice a day. At every feeding I'd discard all but about 10 grams of the starter, then add 40 grams of water and 40 grams of flour. This 90-gram mixture would sit at about where the tape-line measure is, and in 8-12 hours the yeast had eaten their fill of the flour, and expanded to nearly the top of the jar, easily more than 3 times its original volume.


Last night I was going through the final steps in baking my first successful sourdough without using a loaf pan (I'd tried once before, with so-so results), and the second-to-last proofing step, after two turns of the dough, required that I wait 4-5 hours for the dough to double in volume (from 2 cups to a full quart). It did, and then some. It actually exploded out of the plastic wrap that I'd put over the container.


I was delighted! The yeast was working overtime. This is a far cry from days of old, when my dough would barely inflate. The secret, I believe, is my proofing box (created from instructions in Ed Wood's book "Classic Sourdoughs"). In this box, the climate is always perfect for yeast to happily work away and be their most productive. This is particularly important for me, living in Seattle, where it rarely goes above 80°F even in the summer (as I'm typing this, it's around 63°F). Some bakers may need to worry about overheating, but not me. My concern is about getting it warm enough so that the yeast will be their most active. This might also be why performance from commercial yeast was lackluster in my kitchen; who knows how well my dough might have risen if only I'd had a proofing box during those attempts, where I could keep the temperature at a steady 80°F all the time?

I took the dough above and finished making the sourdough loaf (as per instructions from Rose Levy Beranbaum's "The Bread Bible"), and it turned out beautifully. Not perfect -- I still have a ways to go -- but still beautiful to me.


Unfortunately while my baking skills have improved my camera skills haven't -- I couldn't get a good shot of the crumb (with lovely holes) and this was the best I could do, even with Photoshop's help. What these photos don't show is how soft and creamy the interior is -- even now I'm daydreaming of spreading some butter on a thick slice, or noshing on a big sandwich bookended with this bread.