Showing posts with label bread. Show all posts

Wednesday, April 18, 2012

Lemon-Scented Pull-Apart Bread

This is a great bread to serve to guests. It's beautiful and fairly non-threatening in every way (unless the guest dislikes lemon). I'm not going to lie; it takes a bit of effort to prepare, as is the case with most yeast breads, and this one has the added complication of dough layering. But also like most yeast breads, it's incredibly satisfying to bask in the fruit of your labors.

lemon-scented pull-apart coffee bread

Pull-apart bread seems to be the rage these days, and this is my third attempt at one, though I think it's the first one I've posted about. I've also made cinnamon-sugar and cheese pull-apart bread, both of which were delish... but only after I picked off the top burned bits. The problem I had with all three pull-apart breads -- and this is probably particular to my oven -- is that the tops tended to brown very quickly, which meant that by the end of the required cooking time, the tops were way overdone. Because I'd had the experience with the first two breads, I managed to (mostly) avoid that fate for this lemon one. Still, do check on your bread about halfway through, in case you have an oven like mine. If it already looks nice and golden brown, cover it with foil and let it finish baking.

lemon-scented pull-apart coffee bread

So as I mentioned above, you have to cut squares of dough and stack them in your bread pan, which is what makes the bread "pull apart." It's not difficult to do; it just takes a little bit of extra time.

lemon-scented pull-apart coffee bread

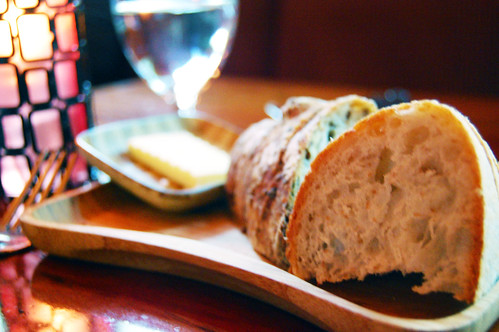
The dough is a fairly sticky dough. As long as you keep your board and hands floured, it should be fine; I did add a bit more flour to the dough itself but kept it pretty sticky. Also, I used all lemon zest rather than lemon and orange. (As you can see from this photo, I still checked on the bread a little too late and the ends came out a lot darker than I might have wanted.)

lemon-scented pull-apart coffee bread

What I wasn't too crazy about though? The cream cheese glaze. It gave the whole thing a nicer, more finished look, but flavor wise didn't add much. Next time I'll either find a different cream cheese glaze recipe to try or just leave it out altogether.

Finally, the recipe source calls this "lemon-scented pull-apart coffee cake." I'm not sure why. It's definitely not a cake. I've opted to call it by a less confusing and more accurate name!

Lemon-Scented Pull-Apart Bread (adapted from Flo Braker)

Ingredients

For the sweet yeast dough
  • About 2 3/4 cups all-purpose flour
  • 1/4 cup granulated sugar
  • 2 1/4 tsp (1 envelope) instant yeast
  • 1/2 tsp salt
  • 1/3 cup whole milk
  • 2oz unsalted butter
  • 1/4 cup water
  • 1 1/2 tsp pure vanilla extract
  • 2 large eggs, at room temperature

For the lemon paste pie filling
  • 1/2 cup granulated sugar
  • 3 tbsp finely grated lemon zest (3 lemons)
  • 1 tbsp finely grated orange zest
  • 2oz unsalted butter, melted

For the tangy cream cheese icing
  • 3oz cream cheese, softened
  • 1/3 cup powdered sugar
  • 1 tbsp whole milk
  • 1 tbsp fresh lemon juice

Method

Make the sweet yeast dough

  1. Stir together 2 cups of the flour, the sugar, yeast, and salt in the bowl of a stand mixer. In a small saucepan, heat the milk and butter over low heat just until the butter is melted. Remove from the heat, add the water, and set aside until warm (120 to 130°F), about 1 minute. Add the vanilla extract.
  2. Pour the milk mixture over the flour-yeast mixture. Using a rubber spatula, mix until the dry ingredients are evenly moistened. Attach the bowl to the mixer and fit the mixer with the paddle attachment. With the mixer on low speed, add the eggs, one at a time, mixing after each addition just until incorporated. Stop the mixer, add 1/2 cup of the remaining flour, and resume mixing on low speed until the dough is smooth, 30 to 45 seconds. Add 2 more tablespoons flour and mix on medium speed until the dough is smooth, soft, and slightly sticky, about 45 seconds.
  3. Sprinkle a work surface with 1 tbsp flour and center the dough on the flour. Knead gently until smooth and no longer sticky, about 1 minute, adding an additional 1 to 2 tbsp flour only if necessary to lessen the stickiness. Place the dough in a large bowl, cover the bowl securely with plastic wrap, and let the dough rise in a warm place (about 70°F) until doubled in size, 45 to 60 minutes. Press the dough gently with a fingertip. If the indentation remains, the dough is ready for the next step. While the dough is rising, make the filling.
Make the lemon paste filling
  1. In a small bowl, mix together the sugar and the lemon and orange zests. Set the sandy-wet mixture nearby (the sugar draws out moisture from the zests to create the consistency).
Make the coffee cake
  1. Center a rack in the oven and preheat the oven to 350°F. Lightly grease a 9x5x3-inch loaf pan.
  2. Gently deflate the dough. On a lightly floured work surface, roll out the dough into a 20-by-12-inch rectangle. Using a pastry brush, spread the melted butter generously over the dough. Cut the dough crosswise into 5 strips, each about 12 by 4 inches. Sprinkle 1 1/2 tbsp of the zest-sugar mixture over one of the buttered rectangles. Top with a second rectangle and sprinkle it with 1 1/2 tbsp of the zest-sugar mixture. Repeat with the remaining dough rectangles and zest-sugar mixture, ending with a stack of 5 rectangles. Work carefully when adding the crumbly zest filling, or it will fall off when you have to lift the stacked pastry later.
  3. Slice the stack crosswise through the 5 layers to create 6 equal strips, each about 4x2 inches. Fit these layered strips into the prepared loaf pan, cut edges up and side by side. (There should be plenty of space on either side of the 6 strips widthwise in the pan, while lengthwise it will be tight. When the dough rises it will fill in that space.) Loosely cover the pan with plastic wrap and let the dough rise in a warm place (70°F) until puffy and almost doubled in size, 30 to 50 minutes. Press the dough gently with a fingertip. If the indentation remains, the dough is ready for baking.
  4. Bake the coffee cake until the top is golden brown, 30 to 35 minutes. Transfer to a wire rack and let cool in the pan for 10 to 15 minutes.
Make the tangy cream cheese icing
  1. In a medium bowl, using a rubber spatula, vigorously mix the cream cheese and sugar until smooth. Beat in the milk and lemon juice until the mixture is creamy and smooth.
  2. To remove the coffee cake from the pan, tilt and rotate the pan while gently tapping it on a counter to release the cake sides. Invert onto a wire rack, then turn it so that it's right-side up.
  3. Slip a sheet of waxed paper under the rack to catch any drips from the icing. Using a pastry brush, coat the top of the warm cake with the icing to glaze it.
Serve the coffee cake warm or at room temperature. To serve, you can pull apart the layers, or you can cut the cake into 1-inch-thick slices on a slight diagonal with a long, serrated knife. If you decide to cut the cake, don't attempt to cut it until it is almost completely cool.

Wednesday, October 6, 2010

Acme's Herb Slabs

While the word "slab" doesn't exactly make me think of fragrant, delicious bread, these slabs are exactly that. If this is any indication, a rose by any other name would smell as sweet.

Acme Herb Slab

This is the only recipe I've ever made from instant yeast that yields results similar to artisan bread made from a sourdough starter. Usually, bread made from instant yeast is fairly flavorless, with a dense, closed-crumb texture. I thought it was impossible to create the wonderful flavor, texture, and complexity of artisan bread using instant yeast.

I was wrong. Maggie Glezer, author of Artisan Baking, has shown me the light. It is possible to make wonderful artisan bread with instant yeast -- but it's not magic. It takes time and effort, just as it does with wild yeast. To achieve the same results, long, slow fermentation is necessary with instant yeast, just as it is with wild. As Ed Wood, author of Classic Sourdoughs explains, "All bread was "sourdough" until bakers' yeast was developed to produce fast rising (short fermentation). With this fast rising yeast, the flavor of bread was essentially lost. Long fermentation is the secret to flavor in sourdough baking."

Acme Herb Slab

With Glezer's method, that long fermentation time is still there -- but using instant yeast, which saves the trouble of having to care for a living sourdough starter. Wild yeast takes a long time to do its work because there's fewer yeast cells by volume, whereas one little granule in a packet of instant yeast contains millions of yeast cells, which is why it works so quickly. BUT it's a long fermentation time that gives artisan bread its wonderful flavor -- good things do come to those who wait! The trick with using instant yeast, then, is to use very little and let what little you use have a good long time to do what those yeast cells were born to do (be fruitful and multiply).

We begin with a poolish (a spongy pre-ferment dough). This poolish is made from 1/16th of a teaspoon of instant yeast and takes 12 hours to mature. The total process to make the Acme herb slabs takes 23 hours, but only 40 minutes or so of active time (Maggie says 20, and maybe experienced bakers can do it in that time, but it took me closer to 40). Unfortunately, it's not like a slow cooker where you can set it and forget it. The active time is spread out in intervals, so you do have to plan to be around at certain points to do things. This makes it very difficult for those such as myself who work 9-5 hours at the office to make this bread on the weekdays, even with the long times between each rise.

Poolish for Acme Herb Slab

It helps to have breadmaking tools: a stand mixer, a baker's couche, a pizza stone. I don't think the first two are strictly necessary -- the dough can be mixed/kneaded in a food processor or by hand, and you can knock together a faux couche fairly easily. The pizza stone, however, may or may not be required. The crust of the bread may not turn out quite as nicely without one. There's also a spray bottle, which I find very useful to create steam, and which can be easily obtained for little investment. A thermometer is also helpful to measure the temperature of the water.

When I cut into the bread for the first time, I was delighted by the crisp crust. But I didn't want to get my hopes up too high, because I've been tricked before (an online recipe for "French bread" using instant yeast -- it was terrible, but had many rave reviews; I can only feel sorry for those who actually consider that to be good bread). I could feel my hopes rise when I saw the crumb -- a fairly open crumb (holey), resembling my favorite kinds of sourdough. I was still skeptical when I took my first bite, fearing that I would get that same bland, instant-yeast flavor from the bread. I was ecstatic that instead, I tasted nothing but wonderful, yeasty bread. I didn't use enough rosemary so that particular flavor was fairly subtle. I think these slabs can be made with or without the addition of herbs.

Acme Herb Slab

Given the time investment, I probably won't be able to make this bread very often, but store-bought bread just can't compare. It's worth the time though if you're going to be staying in anyway; there's nothing quite like fresh, home-baked bread. It's satisfying to make, and even more satisfying to eat. It's best about 10 minutes out of the oven, when the crust is crisp and the middle is warm and chewy. Once you store it, the crust will soften. Just stick it back in a toaster oven for a few minutes to crisp up the crust again before eating -- it makes a big difference. My two favorite ways of enjoying this bread -- first, by dipping it into a mixture of olive oil, balsamic vinegar, and kalamata olives, and second, by placing thin slices of white Irish cheddar on top to make open-faced sandwiches. Few things in life taste as good.

Acme's Herb Slabs (from Artisan Baking by Maggie Glezer)

[My notes are in brackets, like this.]

Yield: 2 large flatbreads, just over 1 pound each
Time: About 23 hours, with 20 minutes of active work [It took me closer to 40 minutes.]

A stylized version of focaccia, this rosemary-flecked bread has an unusual crust. Just before baking, it is stippled all over, then baked for five minutes on one side. It is then flipped over to finish baking on the other side. This keeps the bread very flat and squared off, like a stone tablet.

The dough is based on a poolish and undergoes a stately fermentation and proof, giving it a very rich flavor. It is uncomplicated to make, and if started the evening before, it can be ready for dinner the next day.


Ingredients:

Poolish

1/4 tsp instant yeast
1 cup water, 110° to 115°F
2 cups unbleached all-purpose flour, preferably organic
1 1/2 cups water, lukewarm

Whisk the yeast into the 110° to 115°F water and let it stand for 5 minutes. Add 1/4 cup of the yeasted water to the flour (to measure 1/16 teaspoon yeast), then beat in the lukewarm water. This will be a very gloppy batter. Cover the poolish with plastic wrap and let it ferment overnight for 12 hours, or until its bubbles are popping and the top is just starting to wrinkle and foam.

Dough

3 cups unbleached all-purpose flour, preferably organic
1 tbsp plus 1/4 tsp salt
1 tbsp plus 1 tsp fresh rosemary leaves, chopped
1/4 tsp instant yeast
3/4 cup water, lukewarm
2 tbsp olive oil
Fermented poolish

For the dough (by stand mixer): Combine the flour, salt, rosemary, and yeast in the mixing bowl. Add the water and oil to the poolish and stir to loosen. Pour the poolish into the flour mixture. Mix with dough hook on low speed until a rough dough forms. Cover the bowl and let it rest for 10 minutes. Mix the dough another five minutes, until very smooth.

For the dough (by hand):
By hand, combine the flour, salt, rosemary and yeast in a large bowl. Add the water and oil to the poolish, stir to loosen it, and pour it all into the flour mixture. Stir the mixture with your hand until it forms a rough dough. Turn it out onto your work surface and knead it briefly, without adding extra flour, until it is well combined. Cover the dough with a bowl and let it rest for 10 minutes to allow the yeast to rehydrate. Knead the dough, without adding extra flour, until it is very smooth, about 10 minutes.

For the dough (by food processor):
Combine the flour, salt, and yeast in the workbowl fitted with the steel blade. Add the water and oil to the poolish, stir to loosen it, and pour it all into the flour mixture. Process the dough just until it forms a ball, about 30 seconds. Remove the dough from the workbowl, set it on your work surface, cover it with a large bowl, and let it rest for 10 minutes to allow the yeast to rehydrate. Process the dough in four or five 30-second intervals, hand kneading it to cool it off between intervals. Remove the dough from the workbowl and knead in the rosemary by hand.

Fermenting and turning the dough:
Place the dough [it will be rather wet and sticky] in a container at least 3 times its size and cover it tightly with plastic wrap. Let the dough ferment until light and doubled in bulk, about 6 hours. Turn the dough [This means: take the dough out of the bowl and put it on a work surface dusted with flour. Sprinkle flour on top of the dough. Spread it into a rectangle. Fold the left side to the center, then the top, then the right, then the bottom, then flip it over so that the seam side is down, and place it back in the bowl.] 3 times in 20-minute intervals, that is, after 20, 40, and 60 minutes of fermenting, then leave the dough undisturbed for the remaining time. [Since the dough is so wet/sticky, be sure to be pretty generous with the extra flour when you're handling it.]

Shaping and proofing the dough:
Cut the dough in half. Round the pieces and let rest for about 20 minutes. Lightly press one piece of the dough into a rectangle. Loosely fold it into thirds like a business letter by folding the bottom short edge up and the top down. Place it seam side down on a couche [this is a sheet of linen that dough resists sticking to] and cover it with a flap of the couche. Repeat with the other piece. Let them proof for about 1 1/2 hours.

Cover a peel or rimless baking sheet with a large piece of parchment paper. Remove the dough from the couche and gently press each piece into a 12 x 6 inch rectangle with your hands (the workers in the bakery use a small wooden ruler to get the dimensions just so). Press your fingertips deeply into the dough to stipple it all over. [Since the dough is so wet and sticky, I found it MUCH easier to do this by putting some olive oil in my hand and rubbing it all over my fingers, so that I could sink my fingers in the dough w/o it sticking to me.] Move the rectangles of dough to the parchment paper and resquare them. Cover them with plastic wrap and let proof until very soft and well expanded, about 2 hours more. The total proof time is about 3 1/2 hours.

Preheat the oven: About 45 minutes before the bread is fully proofed, arrange a rack on the ovens second-to-top shelf and place a baking stone on it. Clear away all racks above the one being used. Preheat the oven to 450°F.

Poke the dough all over with a toothpick or a skewer, pushing all the way through. If desired, just before baking, fill the oven with steam. [I did this by spraying the oven with water every time I had to open the door. It's not a requirement but steam helps give the bread a crisp crust.] Slip the breads, still on the paper, onto the hot stone and bake for 5 minutes. Carefully flip the breads over onto the stone and remove the paper. Continue baking until they are well browned, about 20 minutes more, rotating them after 10 minutes. Let the breads cool on a rack.

Monday, August 2, 2010

Cocoa-Nana Bread

A few days ago I found myself in a position that people who buy bananas from time to time find themselves in: with having a few overripe bananas on hand that weren't appetizing to eat on their own.  My first inclination was to make regular banana bread, but after perusing my baking books I decided to try Dorie Greenspan's cocoa-nana bread instead.

Cocoa-nana Bread

On first glance at the recipe, I thought I read coco-nana bread, and figured coconut was involved (a coconut-banana bread still sounds yummy to me).  However, I soon realized that we were talking about a dark and rich chocolate banana bread, dotted with small chunks of chocolate.  Well, that sounded pretty darn good, too.

Cocoa-nana Bread

The only change I made to the recipe was to use 1/2 cup of granulated sugar rather than 3/4 cup (the amount of light brown sugar was unchanged).  Oh, and I used dark chocolate rather than bittersweet.  Also, it should be noted that when I was searching for this recipe online, I realized that someone had posted a mis-transcribed copy of the recipe, which then got disseminated over and over.  I don't know if my posting this "correct" version (as double checked with the book) will do any good to help with the misinformation out there, but I'll try.  Basically, the recipe calls for unsweetened cocoa powder, not semisweet cocoa powder (I've never even heard of such a thing, which might all be for the good, as people can't use something they can't find).

Cocoa-nana Bread

I loved how moist and soft this bread was.  It has a very intense flavor, so chocolatey that it's possible some would want more of the banana flavor to come through.  Next time I'm going to try it with 3 bananas.  Also, for me, one slice goes a long way.  Dorie suggests eating it for breakfast, and it is great with a hot cup of strong coffee (if you're sensitive to caffeine this combo might be too much for you!) or a glass of cold milk.  But I also find that it's a lovely late afternoon pick me up as well.

Cocoa-Nana Bread (recipe from Dorie Greenspan's Baking: From My Home to Yours)

Ingredients
  • 2 cups all-purpose flour
  • 1 cup unsweetened cocoa powder
  • 1 1/2 tsp baking powder
  • 1/2 tsp salt
  • 1/4 tsp baking soda
  • 8 tbsps (1 stick) unsalted butter, softened
  • 3/4 cup sugar
  • 1/2 cup packed light brown sugar
  • 2 large eggs
  • 2 ripe bananas, mashed
  • 3/4 cup buttermilk
  • 3 oz bittersweet chocolate, coarsely chopped (or 1/2 cup store-bought chocolate chips)
Method
  1. Preheat oven to 350°F. Butter a 9x5-inch loaf pan and place it on an insulated baking sheet or on two regular baking sheets stacked on top of the other. (This extra insulation will keep the bottom of the bread from over baking.)
  2. Sift together the flour, cocoa, baking powder, salt and baking soda.
  3. Working with a stand mixer, preferably fitted with a paddle attachment, or with a hand mixer in a large bowl, beat the butter at medium speed for about a minute, until softened. Add the sugars and beat for 2 minutes more. Add the eggs one at a time, beating for a minute after each addition. At this point, the batter may look a little curdled. Reduce the mixer speed to low and mix in the mashed bananas. Add the dry ingredients in 3 additions, mixing only until they disappear into the batter. Still on low speed, add the buttermilk, mixing until it is incorporated. Stir in the chopped chocolate. Scrape the batter into the pan.
  4. Bake for 30 minutes. Cover the bread loosely with a foil tent to keep the top from getting too dark, and continue to bake for another 40 to 45 minutes (total baking time is between 70 to 75 minutes) or until a thin knife inserted into the center comes out clean. Transfer the pan to a rack and cool for at least 20 minutes before running a knife around the edges of the bread and unmolding. Invert and cool to room temperature right side up.

Wednesday, June 16, 2010

Homemade Breadcrumbs

Breadcrumbs have always been a conundrum for me.  They are undeniably delicious, adding body and flavor to many dishes, but frankly, they also not very convenient.  Or so I thought.  Inevitably, I'd make a recipe that called for breadcrumbs, which either meant one of three things: 1) I'd have to make fresh breadcrumbs, which was sort of like having to make a whole other dish; 2) I'd have to use the store bought kind, which was bland, frighteningly uniform, and never lasted once opened; or 3) skip the breadcrumbs entirely.  Depending on how critical it was to the dish, I usually opted for option #3.  It was preferable to facing the other two options, but obviously not ideal.  Many a dish would have benefited from the addition of some breadcrumbs, but I did without.

Homemade Breadcrumbs

Why I didn't want to use the stuff that comes from the grocery store in a cannister is pretty obvious.  But why did I consider having to make breadcrumbs like making a whole other dish?  Well, it seemed to me that it was a lot of effort.  First, I'd have to make sure I had the right kind of bread on hand, and recipes everywhere said that it was preferable if the bread was a bit stale.  So that took the spontaneity out.  I'd have to plan in advance to first wait for the bread to get stale, then make the breadcrumbs, then make the actual dish.  I'm not good at that much advanced planning.  Then there was the process of actually making the breadcrumbs, which to me also seemed strangely complicated for such a seemingly simple thing.  Many recipes talked about drying out the stale bread in the oven, for xx minutes at a low temperature, then crumbling or processing it afterward.  Other recipes spoke of grating stale bread using a cheese grater to create breadcrumbs, which seemed like a lot of effort to me.  Then after all that effort, you'd have breadcrumbs enough for the dish you were making, but then you'd have to do it all over again the next time.

Except it turns out that breadcrumbs freeze really well.  That being the case, I could conceivably make a lot of breadcrumbs at one time, freeze it, then use a bit at a time as necessary.  The effort to make the breadcrumbs, in that case, becomes more worthwhile.  Except it also turns out that there's actually a very simple and easy way to make breadcrumbs, that doesn't discriminate against fresh bread (though stale still is better because it takes less time).  Hallelujah!  How has it taken me this long to discover this?

Start with artisan or homemade bread if possible -- something hearty.  Basically, not white sandwich bread.  That would probably work as well, but it would probably be as tasteless as the stuff you buy in cannisters -- in which case, save yourself the trouble and just buy it.  Slice off the crust; it keeps the breadcrumbs from browning evenly.  Slice up the loaf or a few slices, however much breadcrumbs you want to make (keep in mind the volume shrinks by about half once toasted), to 1/2-1 inch cubes.  Put those in a food processor.  In this case, I'm definitely a fan of embracing technology.  Process until the bread has turned uniformly into large crumbs (it'll never get as powdery as cannister breadcrumbs).  Spread the breadcrumbs in a large, shallow baking dish.  Drizzle olive oil over the breadcrumbs -- figure about 1 tbsp per cup of fresh breadcrumbs.  Use a wooden spoon or spatula to mix well, distributing the oil over all the breadcrumbs as best as you can.  Spread out the breadcrumbs in the baking dish again.  Place in a 350°F oven on the second highest rack.  Every 4-5 minutes (more often toward the end), use your wooden spoon/spatula to stir the breadcrumbs and re-spread them out, so that they toast evenly.  How long it takes depends on how many breadcrumbs you have and how thick the layer of them are in the pan.  Here I've made about 3 cups of fresh breadcrumbs, and it took about 30 minutes, but your oven and experience may vary.  When browned to your liking -- be careful toward the end, it will easily get burnt if you're not paying attention -- remove the pan from the oven, give the breadcrumbs another stir, and let cool right in the pan.  I like to keep stirring every once in awhile, because the pan's still hot and I imagine that the breadcrumbs are continuing to toast, but I'm probably just being over cautious.  When completely cooled, use immediately or transfer to a freezer bag or other tightly sealable container.  (If you do it even when the breadcrumbs are even just warm, the condensation will moisten them and they'll lose that lovely crunch.)  They'll keep in the freezer for about a month.

You can obviously get fancy with this; what I describe above is the most basic of breadcrumbs.  You could add salt, herbs, etc.  You could use butter instead of olive oil, or a combination of both.  You could use plain sourdough bread, or you could use a loaf of onion rye.  The bread I used to make the breadcrumbs pictured above was a rosemary olive.  So really, there's no limit on what kind of bread or flavor comination you want to use for your breadcrumbs.  Now that I know they're so easy to make and can be conveniently kept in the freezer, I'll be enjoying breadcrumbs in a wider variety of dishes!  It's been awhile since I added breadcrumbs to my mac and cheese, for instance... >.>

Thursday, April 29, 2010

Dahlia Lounge

I always enjoy dining at Dahlia Lounge. It's upscale but not stuffy, and the food is great. A friend and I had dinner there last night (as part of Seattle's Restaurant Week), and it was great, even if it wasn't one of my favorite meals that I've had there.

I don't always take a picture of a restaurant's bread selection, but this one turned out well so here it is. We both went for the plain sourdough first, but it turned out that the walnut and olive (?) bread was excellent.
Bread Selection

Here's the appetizer "salad" I started out with. Shrimp and octopus, mmm. I don't remember what the "sauce" was.
Shrimp & Octopus Appetizer

My entree: Pan seared Alaskan halibut, la ratte fingerling potato, ham hock, collard blossoms, with ramp vinaigrette. Very good, but if I could go back in time I might not have selected it. It's halibut season now, so every restaurant's serving it, and it's just not that interesting. Still, the server recommended it so I felt that I would regret it if I didn't order it.
Pan-seared Alaskan Halibut

J.'s dessert, Tom's World Famous Creme Caramel. I've never understood why this dessert has this name. I suppose it must have some culinary history I'm ignorant of, because as far as I've seen, when people talk about a Tom Douglas restaurant's dessert, it's always the triple coconut cream pie. Plus, I like custard and this is good, but it's basically flan and flan isn't my favorite dessert.
Creme Caramel

And here's the star of the show, the triple coconut cream pie. I love the flavor of coconut, but I'm not a fan whatsoever of the shavings. I happily put up with them in this pie, however. It's wonderful. The recipe for it is in one of the Tom Douglas cookbooks that I actually own, but I haven't gotten around to making it myself yet.
Triple Coconut Cream Pie

Saturday, May 16, 2009

Failed Kalamata Olive Loaf

I've made a number of things over the past week or so, some of which are worth repeating and others ... not so much. But I've always said that I wanted to chronicle my failures as well as my successes, so I will.

This first one is a very disappointing failure, because I so wanted it to turn out well. It was a kalamata olive bread. I'm going to my cousin's this weekend to cook a meal, and I wanted to offer the loaf at the same time, because her husband has expressed interest in the past for olive bread. I found a recipe online that I thought looked promising, and set to work. Initially things were going really well.

I took some starter from the fridge and fed it -- the recipe called for 100% hydration starter, so I fed 1 ounce of starter 5 ounces of water and 5 ounces of flour and set the yeast to working in my proofing box. I checked on it after about 6 hours, but it was looking pretty lethargic, so I left it in the box for 2-3 more hours. At that point, the yeast was bubbly and active. See evidence:


I mixed the starter with the dough ingredients and placed it into a large greased bowl. At this point the dough was tacky but not insanely sticky. Witness:


And a close up:


This was the brand of kalamata olives that I used. It's from Trader Joe's, and I chose it with Trix's advice because it was stored in a solution that did not include vinegar.


This is when things began to go wrong. It was about 9pm, and I figured it would take 6-8 hours for it to double. However, that meant 3-5am, which I didn't relish. It seems insane to me to get up at insane hours just for bread. At midnight I checked on the dough, hoping against hope that it would have worked at a magically speedy pace and would have doubled in 3 hours. No such luck. It looked like it had barely risen at all. I decided that since the starter had struggled to get going in the first place, wild yeast take longer in general to work, and the dough currently seemed rather lethargic, I'd be safe if I got up at 6am to punch it down and get it ready for its final proofing step. After all, 6am wasn't that far off from the higher end of my estimation.

When my alarm went off at 6am, I thought about staying in bed for another hour (as I always do), but an early morning meeting compelled me to get up. I then considered taking a shower to wake myself up before tackling the bread, but decided that I should probably at least check on the dough.

Oh, the horror I felt when I saw that the yeast had gone into overdrive, filling the bowl and then some. That's right, it overflowed right onto the floor (first time that's ever happened to me). Here's a photo to show you how diligently the yeast had been working:


Keep in mind that at this point I had removed the plastic covering, onto which was stuck lots of the dough, and had thrown away all the stuff that had oozed onto the ground. Obviously, the dough was WAY overproofed. Still, I thought that maybe it wasn't such a horrible thing, maybe bread could still be salvaged from this.

That's when I made my second mistake. I blame the fact that it was 6am in the morning and my brain was barely awake. I dragged out the large cutting board that I use to work dough, and plopped the dough onto it. That's right, without flouring it first. Now, in my minor defense, the recipe didn't specify flouring the surface where I'd be kneading the dough -- but knowing that the dough was way overproofed, I should've anticipated that it would be gooey and wet. Which it was. It was gluey and just completely unmanageable. I plopped half of it back into the bowl, and attempted to "shape" the other half, but it just wasn't happening. It was basically liquid, not solid, and I probably used an extra cup of flour, possibly more, to get it into some semblance of a ball and placed into my makeshift basket.

I learned my lesson from the first half, so I heavily floured the surface before pouring -- yes, that's what I was doing -- the second half out. Due to the preemptive flouring I was able to "form" -- as much as a glob of glue can be formed -- the second "loaf" -- if a blobby thing can be considered a loaf -- at a fraction of the time it had taken me to form the first one. However, that also meant that a lot less flour was going into it. That was a concern because the next step required a slow retardation of the dough in the fridge, for 12-18 hours. Since the dough had been overproofed, there was probably no more flour for the yeast to eat, which meant that the loaves probably wouldn't do much in the fridge except get cold.

I'm just not comfortable enough with baking bread yet to salvage a situation like this. Should I have added a bunch more flour, even though the recipe at this point specified no additional flour? Should I have just scrapped the whole thing?

I decided to press forward as I was supposed to had the dough proofed the correct amount. I placed the shaped loaves into the fridge. About 12 hours later, I removed them so that they could warm to room temperature (about 2 1/2 hours). I slashed them while they were cold, because it's easier that way. I baked them as specified, though I did use the hot water/cast iron pan steaming method. Still, they never got very brown.

The results? Well, see for yourself. This was the one that had a bunch of flour added to it:


This was the one that was shaped quickly with very little additional dough:


Obviously, I'd been right in my assumption -- the yeast had no more to eat, and thus the bread did not rise very much during the final proof. Additionally, neither loaf rose very much while in the oven, especially the second, which looks more like a flatbread. :/ Flavor wise, the bread is VERY sour. That's rather appealing in its own way; I just wish I could achieve that level of sourness without creating mutant bread.

I'm still eating both, they're quite edible, just not pretty. Toasted, the texture is normalized (to toast), which improves it. And it has a very strong kalamata olive flavor, which is nice.

This experience was particularly disappointing because I recently made a regular sourdough loaf that also had extremely sticky/wet dough -- though that time I didn't overproof it -- and I was hoping that this would make up for that experience. Oh well. One thing is for sure ... I'm not going to give up on this recipe until I've made it the way it should be made, and then we'll see if it's a keeper. I'm not really convinced that the method is that great, but right now I don't have much room to talk. :P

Monday, May 4, 2009

Chinese Bakery Style Hot Dog Buns

I love hot dogs. I wish I didn't, but I do. My favorite kind are the ones sold in an outdoor setting, whether it be a sporting event or a street cart vendor in D.C. or New York. The polish sausage at Costco is good too. Sanitation and health issues aside (after all, if you're eating a hot dog, you're eating it for the pleasure of eating it and nothing else), it's a wonderful treat. I like my hot dogs grilled, and prepared two ways: served in a fresh bun with regular yellow mustard, ketchup, and sauerkraut and/or diced onion; or with chili and cheese. The first way is sour and mouth puckering, while the second way is hearty and rich. The one thing I will not eat on a hot dog is relish. I'm just not a relish girl.


One of my favorite snacks growing up was hot dog buns from Chinese bakeries. That might sound a little strange -- what's so good about a plain bun? Ah, but a "hot dog bun" in a Chinese bakery isn't just a long, cushiony hammock for a sausage, as you might buy in packs of 8 from a grocery store. No, these come with the hot dogs in them, neatly wrapped inside a soft, sweet bread. They're really handy as snacks or a quick meal on the go.


I recently read a couple of posts where people have made their own Chinese bakery-style hot dog buns, and being that it's now warmer and I love working with dough, I had to try it out for myself. I wasn't sure how my first results would turn out, so I lazily did not capture a lot of the in-process dough formation on camera, but next time I definitely will. I tried out two shapes, one that required a bit of braiding, and another in which you looped the dough around the hot dog. For the latter, I find that the shape comes out better when the loops aren't rolled super thin, so that they touch each other even before the rise (a tip for myself for next time). In this batch, I used some shredded cheese in the braided version -- next time I'll use more cheese, as you can barely tell it's there.


The recipe for this dough isn't quite as sweet as what I'm used to getting in Chinese bakeries, so I'll play with the amount of sugar next time. I don't like to adjust first-time recipes too much.

Chinese Bakery Style Hot Dog Buns (recipe adapted from here)

Ingredients
  • 300g bread flour
  • 1 package active dry yeast (about 7.4g)
  • 10g sugar
  • 6g salt
  • 2 large eggs, lightly beaten and divided
  • 170g milk, at about 90°F (egg + milk should equal about 220g)
  • 30g unsalted butter, softened
  • 8 hot dogs
  • sesame seeds

Method

  1. In a stand mixer bowl, stir together the flour, yeast, sugar and salt. Add in 1 of the lightly beaten eggs and the milk, stirring until it starts to come together. Attach the bowl to the stand mixer.
  2. Using the dough hook attachment, knead on medium-low speed (#4 on my KitchenAid) for 5 minutes. Add the softened butter and knead another 3 minutes or until the butter has been completely and thoroughly absorbed into the dough. The dough should feel smooth, satiny, and not sticky. If it's sticky, add more flour in tablespoon increments until you reach the right texture. The dough should pass the windowpane test (you can stretch it out very thinly without it breaking). Knead until it does.
  3. Spray a good size bowl with cooking spray. Take the dough out of the mixing bowl and form into a ball, pulling the sides down so that it becomes taut. Place the ball of dough in the greased bowl, cover it, and let it rise in a warm area for about 90 minutes, until about doubled in size.
  4. Take the dough out of the bowl and divide into 8 equal pieces, about 72g each (deflating the dough is fine).
  5. To form the braided rolls, roll out one of the pieces into a rectangle, with the longer side about the length of your hot dogs. Slash both sides of the rectangle into about 7 strips, without actually cutting through to the other side. Spread shredded cheese down the center if you wish, then place the hot dog on top. To seal, fold the strips down in an alternating pattern. (See detailed instructions here.)

    To form the poofy rolls, roll out one of the dough pieces between your hands until it's about 2 to 2 1/2 times the length of the hot dog. If you want the center to be bigger than the ends, make sure you roll your dough accordingly, so that the middle of your long piece of dough is bulkier than the ends. Wrap the length of dough around a hot dog; it should be enough to make 3 loops, with the tapered ends at the bottom of the hot dog. (See detailed instructions here.)
  6. Line a baking sheet with parchment paper. Place the shaped buns on the paper, leaving enough room in between each for the dough to have a place to go while it's rising.
  7. Cover the buns loosely with plastic wrap or a clean cloth (you don't want to ruin the rise by having to peel anything off them). Let the dough rise again for another 90 minutes or so, until it's about doubled in volume and look nicely plump.
  8. Meanwhile, preheat your oven to 400°F.
  9. When the buns have risen, gently brush egg wash (the remaining egg) generously onto each, making sure to get the sides as well, and sprinkle sesame seeds on top, if desired.
  10. Bake in the preheated oven for 8 minutes. Lower the temperature to 350°F and bake for another 5-8 minutes, until the buns are an attractive golden brown.

Sunday, April 19, 2009

Hot Cross Buns

So apparently, hot cross buns are an Easter tradition. Who knew? Certainly not I, heathen than I am. ;) All I knew of hot cross buns were from the nursery rhyme. I might have eaten one at some point some years back, but if I did, it was obviously forgettable. But I've seen several recipes for them lately -- probably because it was just Easter -- and it made me want to eat them. Which meant I'd have to make them. But before I could do that, I had to decide if I was going to try to make a sourdough version from my starter ... which I decided against, both because it was going to be more trouble than it was worth (in my humble opinion), and because the sourdough might flavor it in a way that would detract from the final product.

I ended up using two recipes to make these, one for the dough and another for the crosses. I also went my own way when it came to the fruit used in the dough. For the dough, I used this recipe from Wild Yeast. I used active dry yeast rather than instant yeast, but it worked just fine (from what I understand of the difference in the two, instant should work faster, but at all the specified times my dough expanded exactly the amount it should have), possibly because I used my proofing box. For the fruit I used golden raisins and chopped dried mango from Trader Joe's. For the crosses, I used the one from this recipe, which uses a sourdough starter for its dough. The reason I did this was because I liked how the crosses looked in their final product, and because I wanted them to be a bit sweet (which the powdered sugar provided). I also used the method of having the buns touch one another in a baking pan, rather than be spread apart individually. The buns came out beautifully!

When they first came out of the oven, I wanted to wait until they were cool to pull them apart, as I wanted them to be aesthetically pleasing ... but then I thought, "Wait a minute! These are supposed to be hot cross buns." I wanted to eat them as you're "supposed" to, so I pulled them apart while hot, which did make them pull apart a bit messily, and they were so soft that some of them got smooshed, but all in all it didn't go too badly. And they were delicious eaten hot, so there's that.

And now for the pictorial...

Here the final dough has gone through its first rise with folds at 30 minutes.

These have been individually shaped into balls then flattened, and placed in a parchment-lined glass baking pan, evenly spaced apart:

After an hour, they've poofed out nicely and are now snuggling next to one another comfortably, like old buddies:

Here they are with the crosses piped on top (using a plastic baggie with a small hole cut in one corner):

Right out of the oven, after the glaze has been applied on top. Since I used a glass baking dish I lowered the temperatures suggested in the recipe by 25°F:

Close up of the crosses:

A lone hot cross bun, awaiting its fate:

A shot of the interior -- so soft and warm and filled with light spices and hints of sugar (but not too sweet):

Submitted to YeastSpotting.

Wednesday, April 1, 2009

Sourdough Starters Come Out of Hibernation

I've been a fan of making sourdough using wild yeast since about August of last year. This is the post I made about my discovery of wild yeast and all the trials and tribulations I had making bread until self-made sourdough came into my life.


One of the most difficult things about living in the Pacific Northwest is that we have good weather 3 months out of the year -- if we're lucky. In the summer, it often doesn't get much hotter than 85°F, and in my house, often not even that. This means that the ideal temperature for yeast activity isn't just "room temperature" for me. I have to use a proofing box. But even with a proofing box, when the air is cold yeast simply doesn't perform as well. And there's also the fact that I don't want to be in my kitchen dealing with dough, when it's that cold.

That's why my sourdough starters have been languishing in the fridge for many months now. This week it started to get warmer (though ironically it snowed today), and technically it's spring, so I pulled them out and started the process to get them out of hibernation. On the first day I made the tough decision to throw out one of the starters -- Italy (Ischia Island). Maintaining 3 starters is a pain, and it was always my least favorite starter. I had held on to it for so long because in the beginning it was my best performer, and because my starters are like pets and deciding to let one of them go is a hard decision. It was easier when I could make it after not seeing them for awhile. After the first day or two, Italy (Camaldoli) was bubbling and lively, while France was still languishing. It sometimes takes 4-6 days to bring a starter back to full activity after it's been in hibernation as long as mine has, but I took the opportunity to cull my 3 starters down to 1. I got rid of France also. I've read that after awhile, all starters start to take on your region's bacteria/yeast anyway, so having 3 starters of essentially the same thing is kind of a waste. I don't have the laboratory equipment to actually tell if my Italian yeast has actually turned into Seattle yeast, but at this point it doesn't matter.


Since my remaining starter was so active already, I resolved to feed it and put it back in the fridge, and use the discard to make 3 things: 1) English muffins; 2) the tried-and-true sourdough loaf from The Bread Bible; and 3) this roasted garlic bread from Wild Yeast. I was browsing Yeast Spotting when that recipe jumped out at me. It seemed like a great plan, except preparing 3 different things, all with different rising times and slightly different recipes? A little more complicated than I really bargained for.

The English muffins were a disaster. I don't know what I'm doing wrong. I've tried making them 3-4 times now, and each time, they come out super dense, without any nooks and crannies, and basically just not like English muffins at all. I ran out of bread flour (you can tell I wasn't really prepared to bake so soon) and time so the sourdough loaf didn't get made until today (in fact, I'm on step 2 of the rising stage).

However, I did get a chance to make the roasted garlic bread, and it came out spectacularly. Well, for me. I know the bread is an adaptation of a recipe from a book, but I wish the name indicated that there's parmesan cheese stuffed inside along with the roasted garlic. It's an important part of the bread, imo!


These are probably two of the best loaves of bread I've made yet. Susan's step-by-step recipe/photos helped a great deal. I followed the recipe she posted almost exactly. The two changes I made were: 1) Rather than using 3 whole heads of garlic, which seemed like too much garlic even for me, I used 2 1/2, as I happened to have a half of a head lying around; and 2) During the final proofing phase after the loaves had been shaped, I proofed them for 3 hours instead of 4, then them in the fridge, because I knew I wasn't going to be able to bake them right away. Many recipes call for dough to be retarded in the fridge like this, so I figured it would be okay. They were in the fridge for about 4-5 hours. I took them out and let them sit at room temperature while I preheated the oven and prepared the steam, which took about 40 minutes. I slashed the dough while they were still cold with my new lame, which probably made them easier to slash. (I am THRILLED with the lame, by the way. Slashing has always been difficult for me, and while my use of the lame still requires more practice, it already worked 100 times better than the box cutter/knives I used before.) As usual I used Peter Reinhart's method of steaming with hot water and a cast iron pan.

Here are the proofed loaves right out of the fridge:


Right after baking, and before brushing off the excess flour:


Cooling on a wire rack:


Here's a shot of the crumb. You couldn't tell in any of the other pictures, but the loaves were stuffed with a mixture of garlic paste and parmesan cheese. Mmmm. You can see how that turns out once you slice into the bread. I ate almost half a loaf today, just plain. The other I'm freezing for later!

Tuesday, September 30, 2008

Norwich Sourdough and Chicken Enchiladas

This last weekend was truly the last week for the red gold nectarines that are, as my cousin put it, "what ambrosia must taste like." The particular farm that grows these confirmed that they wouldn't have anymore until next season. :( Luckily we managed to snag a box of seconds, and I came away with 14 nectarines.

I'm thrilled to report that I've gotten comfortable enough with wild yeast starters and bread making that I successfully made Norwich Sourdough -- without following exact amounts, even (amazing for me!). The first time I made this, it didn't turn out well at all, and I was really disheartened. I REALLY need to improve my dough slashing, which probably involves both technique and instrument. I baked two 800g loaves, and ONE slash came out nearly perfectly, which is progress. On top of that though, I'm still having a little trouble with my oven browning bread far too quickly. :/ I'd like to get a little more open crumb, but otherwise the taste and texture were great. I tried using the lava rock steaming technique that Susan at Wild Yeast recommends, but I've personally found Peter Reinhart's method of steaming (with hot water and a cast iron pan) more effective for me personally.

I also baked a whole chicken the other day, but had a ton of it left. I could have easily reheated it plain or made sandwiches with the leftovers, but I wanted to eat something a little more interesting. I'd just had a friend over and served chili, so I had the perfect ingredients left over from that to make enchiladas! I adapted a few recipes that I found here and it came out great! If you don't want to make your own enchilada sauce, they (and I) recommend the bottled kind you can get from Trader Joe's.

Chicken Enchiladas

Ingredients:

  • 8-10 corn tortillas
  • 2 cups shredded or chopped chicken
  • 1 onion, chopped
  • 1 large clove garlic, minced
  • 1 7 oz. can green chilies, chopped and drained
  • 1 12 oz. package of cheese, shredded (your preference; I used cheddar and Swiss)
  • enchilada sauce (I made this one)
  • olive oil to stir fry
  • 1 cup vegetable oil

Method

  1. On medium-high heat, saute the onion in some olive oil for 2 minutes. Lower the heat to low and continue to saute for another 20 minutes, to brown (but not burn) the onion. During the last couple of minutes, add the minced garlic (don't burn it).
  2. Add the green chilies and chicken to your onion and garlic. Stir well and cook for a few minutes.
  3. Remove from heat, then add 1/2 cup of the cheese and fold it into the chicken/ sauce mixture.
  4. Heat vegetable oil in a pan large enough to hold a corn tortilla. When the oil is hot, use tongs to pick up a tortilla and place it in the oil until it bubbles (about 3-5 seconds -- if it doesn't bubble in that amount of time or less, the oil's not hot enough). Lift and dip the tortillas in and out of the oil 3 times fairly quickly. The goal is to make them soft and easy to roll. Place the tortillas on a plate or tray covered with paper towels and blot excess oil from them. Repeat with however many tortialls you're using.
  5. When you're ready to assemble the tortillas, add a generous amount of chicken mixture on top of the tortilla. It should be distributed down the middle, from one end to the other.
  6. Take the end of the tortilla closest to you and draw it up and over the chicken, using the other end to meet it and place it gently, seam down, into your baking dish. They don't need to be tightly wrapped; a loose configuration is fine.
  7. After the chicken enchiladas are in the baking dish, spoon or pour enchilada sauce over the top of the enchiladas. Be generous with the sauce; it should pretty much cover everything.
  8. Sprinkle cheese on top of the chicken enchiladas. (A mix of white and yellow cheeses make for a nice presentation.)
  9. Baked uncovered in a 400°F oven for 10-12 minutes or until the cheese melts and the sauce is bubbling around the edges.
  10. Serve immediately, with sour cream and guacamole.

Monday, August 4, 2008

A Tale of Yeast

This story actually begins over a decade ago, when my college roommate Emily and I were living in our first apartment. One day she decided that she would make a pizza from scratch. Never having witnessed such a thing -- or even contemplated that it could be done -- I watched the process from beginning to end, fascinated. The ball of dough rose overnight as if by magic, and it was then flattened out to a large square pizza, which was topped with cheese and veggies and promptly consumed once it was baked. It wasn't the best pizza ever created, and the crust was thicker than is my preference, but it was still good and the texture still resembled pizza. Plus we had it at a fraction of the cost of getting a 'real' pizza at BJ's down the street.

Not too long after this experience, while living on my own, I remembered Emily's pizza and the fun of making dough and waiting for it to rise, and how easy it was. I decided to make my own pizza, except with thinner crust. In my mind it was an easy thing: make dough, make pizza, eat pizza. But I ran into trouble almost right away. Why wasn't the yeast creating bubbles when mixed with water and a bit of sugar? Was the water I was using too warm? Were those few bubbles I did see from the yeast, or from me stirring? Was the yeast I'd gotten somehow defective? I plunged ahead anyway -- and the result was an inedible rock. But I was not to be deterred. I tried again, but this time I wanted to make sure that the dough had the right atmosphere to rise. It had seemed so easy and instantaneous when Emily had done it; what was I doing wrong? Maybe it was too cold where I was. So I stuck the rising dough in a warm oven ... too warm, as it turned out, as it ended up getting baked. I might have tried once or twice more, with less than ideal results, before giving up.

A few years later, my cousin and her husband had an adults-only get together where they served "gourmet" pizzas. Very thin crust, fancy toppings. I was interested to see whether their pizza dough would turn out well and truly pizza like. It did -- the pizzas were delicious. I was both disappointed and inspired. Disappointed, because it seemed that everyone could make pizza except for me, and inspired, because maybe, just maybe, if I used the recipe they had used, I could duplicate their results.

Failed. Again. The pizza I made was not thin, nor delicious. The crust more resembled a hardy bread than a good base for pizza. I decided that I was just a failure at pizza dough.

Then earlier this year, I read an article by Melissa Clark about a guy who had a successful pizza restaurant in New York, but prior to opening the restaurant had never made a pizza before. Now, of course, he was a pro. The article came with a recipe for his pizza dough, and I was inspired once more to give it a try. Surely as someone who hadn't grown up making pizzas and who had to teach himself the trade, his recipe would be more beginner friendly?

The pizza I made from this dough looked like a pizza aesthetically -- or a thicker breaded cousin of the pizza -- but taste wise it was severely lacking. I had followed the instructions precisely, and yet the results were as disappointing as they had been all the times before. No matter what, I could not get the dough thin enough to make it seem more like 'real' pizza. The dough was tough and chewy, and it was more like eating cardboard with some tomato sauce and cheese on top than eating pizza.

At this point you might wonder why I didn't just give up entirely, and simply buy my pizza. Oh, I did. Pizza can be had relatively inexpensively, and I'm a long way from my poor college days. But it always nagged at me that I had never once been successful at making pizza dough, which seemed like such an easy, simple thing. And I wasn't asking for perfection. If I couldn't make pizza like the pros, surely I could make passable pizza the way Emily had over 10 years ago?

I might not have tried again -- or it might have taken longer after the last failure -- had my best friend and I not gone to New York and discovered the wonder of New York pizza. A lot has already been said about New York pizza, all positive, and I'm not going to spend a lot of time extolling its virtues. I will just say that at first bite, while good, you may not notice the difference between a slice in New York and other pizzas you've had. You may not even notice it on the third bite, or fifteenth. But eventually you will realize: This is some damn good pizza. It's not fancy, it's not in your face; it's just something you want to eat. Constantly. In any case, we went to several pizza establishments while in the Big Apple and our favorite was Patsy's. Lombardi's was a close second, but Patsy's had won our hearts (at least for the two trips we've taken to New York). But really, you don't even need to go to a restaurant. We frequented Ray's plenty of times, and their slices were just as good if not as upscale with their ingredients. Perfect for just stopping by to grab a quick slice before heading back to our hotel room.

That said, we could not get New York pizza on the West Coast. While we have some pretty good pizza, it's just not the same. Not long after we got back from our second trip, I read an article in the New York Times about an ex-pat New Yorker who had moved down South somewhere, and it was his mission in life to duplicate Patsy's pizza in his home oven, nearly burning his house down while rigging his oven to make it get hot enough to bake true pizza, the way pizzerias are able to do. (He's able to bake a pizza in about 2 minutes.) Now this was pizza love. And I was particularly delighted by the fact that the pizza he was trying to duplicate was that of Patsy's, which was our favorite as well! His Web site gives a lot of advice on the process, and while I am nowhere near dedicated enough to go through all of them, one thing did stand out to me: He said to never use commercial yeast in the dough, but to get a sourdough starter. His came from Patsy's itself, but other starters could be made or purchased.

And suddenly it all fell into place. My enemy this whole time had been commercial yeast! (Okay, that's not true; if pressed now I could probably make decent pizza using it. But at the time I really thought I had figured out the source of all my pizza-making problems.) I ordered my first sourdough starter from www.sourdo.com (three actually), and now I have successfully baked my first sourdough loaf and made delicious pizzas besides.

It didn't happen by magic, though -- getting the sourdough cultures activated took a lot of time and patience (since they got contaminated during the initial process, which isn't uncommon, but it still takes days to "wash" the cultures and get them healthy again), and in the meanwhile I began reading up on yeast, fermentation, bread making, and other related topics. My wild yeast cultures have worked best for me, but that's also because I learned how to take care of them -- and I was much more diligent about it than I was with commercial yeast, which I could easily replace if something went wrong. I learned about gluten and how to get it to relax so it can be shaped more easily (enabling thin-crust pizzas). I learned about the best environment for yeast so they can thrive (enabling optimal volume expansion). I learned about temperature, steam, measuring by weight, and baking stones. In other words, I learned the science and the tricks to getting the results I wanted from yeast and from dough. While I am still far from being an expert, and I'm still constantly consulting books, at least I know the whys, which really helps with the hows. Now I can make pizzas that resemble pizzas!

And my days of "disobedient" yeast are over. First, I've converted to fresh sourdough for just about every baking need, though I haven't sworn off commercial yeast entirely (I know the day will come when I am too lazy to do the conversion between sourdough and commercial yeast in a recipe). Wild yeast is supposed to rise slower than commercial yeast, due to fewer yeast cells, but it's always worked like a charm for me, as long as I had the time to devote to it. Here's a picture of a sourdough starter I was keeping on my counter and feeding twice a day. At every feeding I'd discard all but about 10 grams of the starter, then add 40 grams of water and 40 grams of flour. This 90-gram mixture would sit at about where the tape-line measure is, and in 8-12 hours the yeast had eaten their fill of the flour, and expanded to nearly the top of the jar, easily more than 3 times its original volume.


Last night I was going through the final steps in baking my first successful sourdough without using a loaf pan (I'd tried once before, with so-so results), and the second-to-last proofing step, after two turns of the dough, required that I wait 4-5 hours for the dough to double in volume (from 2 cups to a full quart). It did, and then some. It actually exploded out of the plastic wrap that I'd put over the container.


I was delighted! The yeast was working overtime. This is a far cry from days of old, when my dough would barely inflate. The secret, I believe, is my proofing box (created from instructions in Ed Wood's book "Classic Sourdoughs"). In this box, the climate is always perfect for yeast to happily work away and be their most productive. This is particularly important for me, living in Seattle, where it rarely goes above 80°F even in the summer (as I'm typing this, it's around 63°F). Some bakers may need to worry about overheating, but not me. My concern is about getting it warm enough so that the yeast will be their most active. This might also be why performance from commercial yeast was lackluster in my kitchen; who knows how well my dough might have risen if only I'd had a proofing box during those attempts, where I could keep the temperature at a steady 80°F all the time?

I took the dough above and finished making the sourdough loaf (as per instructions from Rose Levy Beranbaum's "The Bread Bible"), and it turned out beautifully. Not perfect -- I still have a ways to go -- but still beautiful to me.


Unfortunately while my baking skills have improved my camera skills haven't -- I couldn't get a good shot of the crumb (with lovely holes) and this was the best I could do, even with Photoshop's help. What these photos don't show is how soft and creamy the interior is -- even now I'm daydreaming of spreading some butter on a thick slice, or noshing on a big sandwich bookended with this bread.