Showing posts with label mexican. Show all posts

Sunday, February 6, 2011

Pico de Gallo, Guacamole, and n-Layer Dip

Just because I don't care about the Super Bowl, especially this year, doesn't mean I can't enjoy Super Bowl food, right? Right.

Pico de Gallo

I took the opportunity that this fine American tradition afforded to make something I've been too intimidated to make before (though in retrospect, I have no idea why): pico de gallo. Maybe it was all the chopping involved that I thought I wasn't up to; I don't know.

Pico de Gallo Ingredients

But it actually didn't take that long, and the best thing about pico de gallo, other than it being quite delicious on its own, is that it can be easily used in two other delicious items: guacamole, and what I'm calling n-layer dip.

Guacamole Ingredients

Pico de gallo is a simple combination of tomatoes, onion, jalapenos, cilantro, and lime juice. Take that combination and mix it with some buttery avocado and you've got guacamole. And my friends -- there is absolutely nothing like homemade guacamole.

Guacamole

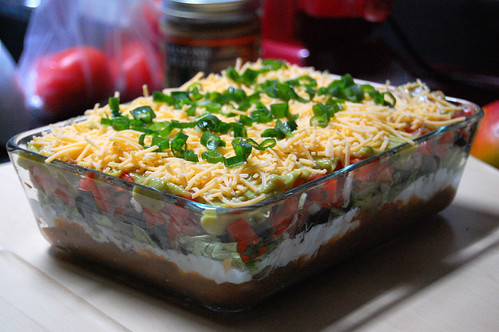
Or if you're really in Super Bowl mode, make an n-layer dip (n because you can add or subtract as many as you like from the traditional 7-layers).

n-Layer Dip

This one has 10 layers.  Really!  Doesn't really look like there's 10 layers in there, does it? It can be easily cut in half and will be delicious just the same. Just make sure you eat it with sturdy tortilla chips that won't break apart when you're scooping up the dip.

n-Layer Dip

There's no hard and fast rule about the order in which you layer, but some would argue that order matters, that when done properly it makes a significant textural (and aesthetic) difference.  You decide what works best for you.  My preferred order is listed below.

Pico de Gallo

Ingredients
  • 5 firm Roma tomatoes, diced
  • 1/2 onion, diced
  • 1 jalapeno pepper, seeded and diced
  • 1/2-1 cup cilantro, chopped
  • 1 tbsp lime juice
  • salt, to taste
Method
  1. Combine all the ingredients in a large bowl.  Enjoy the same day; pico de gallo doesn't keep very well.
Gucamole

Ingredients
  • avocados
  • pico de gallo
  • lime juice
  • salt
Method
  1. Mash up your desired quantity of avocados.  Mix in a generous amount of pico de gallo.
  2. Add another tbsp of lime juice for every 2 avocados you use.  Add salt to taste.
n-Layer Dip (based on the one photographed above)

Ingredients (ordered from bottom to top)
  1. refried beans
  2. thin layer of shredded cheese
  3. sour cream
  4. thinly shredded lettuce
  5. sliced black olives
  6. chopped cilantro
  7. pico de gallo or salsa
  8. guacamole
  9. shredded cheese
  10. thinly sliced scallions

Monday, September 6, 2010

The Pioneer Woman's Restaurant-Style Salsa

I loved this salsa, as did those who tasted it.  It's very, very good.  I won't say it's the definitive way to make salsa, since salsa's one of those wonderful things that has many variations, and it's hard to make a salsa I won't eat.  BUT, there are some salsas that definitely rise above others, and I'd say this is one of those.  It's a blended salsa, no big chunks, so if you only like chunky salsa this may not be for you.  I like both.  Of the blended salsa variety, this one is excellent.

Homemade Salsa

The recipe comes from Ree Drummond.  I halved her recipe, which makes nearly 2 quarts.  While I'm sure I could eat 2 quarts of salsa given enough time, I'd rather make a fresh quart every time I feel like having some.  Since I'm one of those people easily susceptible to suggestion, well at least when it comes to food, I also couldn't help but make simple nachos to eat the salsa with.  I also had it plain with chips and in a bean and cheese burrito.  It was wonderful in every case.

I'm one of those people who doesn't like cilantro.  But when it's been pulverized, and if I use the leaves only, I find that I can not only tolerate it, but even enjoy it.  If you're also someone who doesn't normally like cilantro, don't shy away from using it here; put less into the salsa, perhaps, but don't omit it entirely -- I do think it adds a unique flavor that makes salsa and guacamole taste as good as they do.

Nachos with Homemade Salsa

As for spiciness level, I'd call this mild to medium, but that's because I kept the jalapeno seeds in; if you prefer mild salsas, seed the jalapeno.

Restaurant-Style Restaurant (adapted from The Pioneer Woman)

Ingredients
  • 1 14.5oz can of whole or diced tomatoes, undrained
  • 1 10oz can of diced tomatoes with green chilies (like Rotel), undrained
  • 1/8 cup chopped onion
  • 1 small clove garlic, minced
  • 1 small jalapeno, quartered and thinly sliced
  • 1/8 tsp sugar
  • 1/8 tsp sea salt
  • 1/8 tsp ground cumin
  • 1/4-1/2 cup cilantro
  • juice from 1/4 of a lime, or about 1 tsp
Method
  1. Combine all ingredients in a food processor or blender.  Blend until you get the consistency you desire.  I probably let mine go for about 10 seconds.  Taste the salsa and adjust the seasoning if needed to your preference.

Friday, July 23, 2010

Tres Leches Cake

The first time I ever had tres leches cake was a couple of months ago, when my cousin and I went to Mistral Kitchen. The piece of cake was tiny, about the size of half a candy bar, and we had to SHARE it. Obviously it wasn't enough!  It was incredibly good, served with a small scoop of strawberry sorbet (which complemented the sweet, moist cake wonderfully). Since then, I've been wanting to make this traditional Mexican cake myself.

Tres Leches Cake

There are a lot of tres leches cake recipes out there, but I decided to use one by Ree Drummond (aka The Pioneer Woman). As she rightly points out, there's actually FOUR kinds of milk used in the cake, so it should arguably be called cuatro leches cake. The three milks name probably comes from the fact that after the cake is made, it's then soaked in three milks (the fourth is in the batter).

Tres Leches Cake

What are the three milks? It's not health food, it's yummy food. Heavy cream, sweetened condensed milk, and evaporated milk. What's the difference, you might ask? Heavy cream, at least in the U.S., has at least 36 percent fat, and is the stuff typically used in ice cream and to make whipped cream. Sweetened condensed milk (also sometimes known just as condensed milk) is cow milk that's had its water content removed and sugar added, which makes it a thick, creamy substance that's awesome just stirred into hot coffee or tea. When buying condensed milk, look at the label. There should be as few ingredients as possible (in fact, 2 is best: milk, sugar), with sugar instead of high fructose corn syrup. Evaporated milk (aka dehydrated milk) is shelf-stable milk that's had about 60 percent of its water removed. Since you'll be making more of the cream mixture than you actually need for the cake, don't throw away the remainder; save to use in coffee or tea (unless, of course, you don't like milk or sugar in your hot beverages).

Tres Leches Cake

The cake is light and airy, due to the batter requiring meringue. There are lots of little air pockets in the cake, all the better to soak up the three milks. Right after pouring you might notice that some of the milk hasn't soaked in yet -- don't worry, the cake is a greedy sponge and the milk will eventually get absorbed while it's sitting.  TPW suggests letting the cake absorb the milk mixture for 30 minutes. This is not, in my opinion, nearly enough time. I served the cake after about 40 minutes of soaking and it was disappointingly dry. The next day, however, the milk had totally soaked through and it was as moist as can be. So I recommend letting it soak for several hours or overnight before frosting, to really get every bit of the cake soaked. This is actually good in terms of convenience, because it means you can make the cake the day before and the only thing you need to do day of is make whipped cream to spread on the cake.

Tres Leches Cake

The dry milk in the 'frosting' is optional; it's just a way to stablize the whipped cream (which I find more necessary when it's being used as a cake frosting).

Tres Leches Cake (adapted from The Pioneer Woman)

Ingredients

For the cake

  • 1 cup all-purpose flour
  • 1 1/2 tsps baking powder
  • 1/4 tsp salt
  • 5 eggs, separated
  • 1 cup sugar, divided
  • 1 tsp vanilla
  • 1/3 cup whole milk
  • 1 12oz can evaporated milk
  • 1 14oz can sweetened condensed milk
  • 1/4 cup heavy cream
For the 'frosting'
  • 1 pint heavy cream
  • 2 tbsps sugar
  • 1 tsp vanilla
  • 1 tsp dry nonfat milk (optional)
Method

  1. Preheat oven to 350°F.  Spray a 9 x 13 inch baking pan with cooking spray.
  2. Combine flour, baking powder, and salt in a large bowl.
  3. Beat egg yolks with 3/4 cup sugar on high speed until yolks are pale yellow. Stir in the milk and vanilla.
  4. Pour the egg yolk mixture over the flour mixture and stir very gently until combined.
  5. Beat egg whites in a clean bowl on high speed until soft peaks form. With the mixer on, pour in remaining 1/4 cup sugar and beat until egg whites are stiff but not dry.
  6. Fold the egg white mixture into the batter very gently until just combined.
  7. Pour the batter into the prepared pan and spread into an even layer.
  8. Bake for 35-45 minutes or until a toothpick comes out clean. Turn the cake out onto a rimmed baking sheet or serving platter and allow to cool.
  9. Combine the condensed milk, evaporated milk, and heavy cream, preferably in a container that has a spout. When the cake is cool, carefully pierce the surface all over with a fork. Drizzle all but about 1 cup of the milk mixture, including the edges of the cake.
  10. Allow the cake to absorb the milk mixture for several hours or overnight in the fridge.
  11. Right before serving, whip heavy cream with sugar, vanilla, and dry milk (if using) until thick (though don't overwhip or you'll have butter).  Spread over the cake.  Best served with something tart and fruity, like strawberry sorbet.

Friday, March 20, 2009

Friday Dinner: Fish Tacos

You know what I loved about this Friday Dinner? Well, actually, I loved a few things. But you know what was the best thing? The fact that Trix and I both made fish tacos, and yet almost everything about them was different. We both used tortillas, salsa, and fish, but none were the same. The other things I loved: 1) it's a healthy meal; and 2) it was delicious, yet fast and easy to prepare.


Trix used corn tortillas; I used flour. She used regular cabbage; I used Napa cabbage. She added shredded carrot to hers; I didn't. (The recipe we were basing this meal off of used shredded carrot and jicama -- I didn't feel like using carrot and I couldn't find jicama at the store, even though I've bought it before.)

I pan "grilled" my fish (flounder) using my new Le Creuset grilling pan:


She broiled her fish (halibut) in the oven:


I made a traditional tomato salsa while Trix adapted an avocado and mango salsa to an avocado and pineapple salsa. Mine was OK; she said hers was excellent. I think when mangoes are in season I'm definitely going to be trying that salsa!


We both warmed our tortillas -- she in the oven, me in the microwave -- then piled on the goodies. Since there isn't much of a recipe for this, the recipes I'll share are the two salsas!


Mango Avocado Salsa

Ingredients
  • 1 ripe and firm mango, peeled and chopped
  • 1 red pepper, diced
  • 1 tomato, diced
  • 2 avocados, peeled and chopped
  • 1/4 red onion, diced
  • 1 dash garlic salt (optional)

Method

  1. Combine all the ingredients in a medium bowl. Cover and chill 20-30 minutes before serving.

Tomato Salsa

Ingredients

  • 1 14.5oz can petite diced tomatoes
  • 1/3 cup diced red onion (about half a small-sized one)
  • 2 tbsp lime juice
  • 1 tbsp extra virgin olive oil
  • 1 tbsp chopped cilantro
  • 1 tbsp fresh jalapeno, diced (about half a medium-sized one)
  • 2 tsp garlic, minced (about 2 cloves)
  • 1 tsp sugar
  • 1/4 tsp kosher salt
  • 1/4 tsp ground black pepper

Method

  1. Combine all ingredients in a medium bowl.

Monday, February 16, 2009

Friday Dinner: Mexican Breakfast

This week Trix and I seemed to have one of those brain-melding moments in which we had very similar thoughts about what we should do for dinner on Friday, even though it wasn't necessarily the exact same thing. I don't even know how we came to the conclusion we did, how it was raised in the first place: that's a blur. All I know is, we brought up the topic of dinner, and about 5 minutes later we had decided on Mexican breakfast.

I have to admit from the outset that I was at a disadvantage, having never actually eaten what I was proposing to make in a restaurant. Due to a recipe I'd seen at Homesick Texan, I was very eager to try making my own chorizo -- and one of the classic ways of eating chorizo is with scrambled eggs. It sounded easy enough.

Trix decided on huevos rancheros, which was more complicated than chorizo and scrambled eggs, particularly because she wanted to find an authentic ranchera sauce. She eventually found one here.

I marinated the ground pork for the chorizo overnight. I was excited about using my new Mini-Prep food processor for the first time. There are many times when I want to use a food processor to make a bit of something, but my normal food processor is simply too large to be effective. Especially as I'm usually just cooking for myself, I don't need a big batch of sauce that a normal-sized food processor effectively makes. Just some photos to illustrate:


As you can see, it was the perfect amount for the Mini-Prep, which worked great. The marinade consisted of guajillo chiles, onion, garlic, and apple cider vinegar. It was then mixed into the ground pork along with some seasoning:


This mixture was marinated overnight. To prepare, I simply browned it in a cast iron pan until fully cooked. I then spooned some into another pan and added some beaten eggs with milk. I scrambled it well (how I prefer) and served with some fried potato coins. The finished product:


The following day, I had the same thing, but dressed it up a bit -- I added pickled jalapenos and cheddar cheese to the dish and ate the chorizo and eggs with flour tortillas.

Trix began her efforts by chopping up green bell pepper for the ranchera sauce:


When that was cooking away she also heated up some black beans and rice (the latter not pictured):


And the delicious finale, with fried eggs, the ranchera sauce, black beans, rice, and white corn tortillas.

Tuesday, October 28, 2008

Tu Casa Es Mi Casa?

Tu Casa is one of my favorite standbys. It's good, it's inexpensive, and they bring your meal out in a jiffy. At lunch, $7.75 gets you a huge plate featuring an enchilada, a taco, rice, and beans, with melted cheese strewn liberally about.


And of course, there's the requisite all-you-can-eat chips and salsa (with a decent amount of heat).


It's always way too much food for one person, but then, that's part of the experience. I like knowing when I walk in that I'm going to walk out totally stuffed, with a box of food that's filled with enough food for an entire second meal.

With every entree you're able to choose between cheese, chicken, ground beef, and shredded beef picadillo (which is what I recommend). Some call it Mexican, though others contend that it's more accurately called Tex Mex, it's comfort food in a comfortable setting. And sometimes, that's all you need.


Tuesday, September 30, 2008

Norwich Sourdough and Chicken Enchiladas

This last weekend was truly the last week for the red gold nectarines that are, as my cousin put it, "what ambrosia must taste like." The particular farm that grows these confirmed that they wouldn't have anymore until next season. :( Luckily we managed to snag a box of seconds, and I came away with 14 nectarines.

I'm thrilled to report that I've gotten comfortable enough with wild yeast starters and bread making that I successfully made Norwich Sourdough -- without following exact amounts, even (amazing for me!). The first time I made this, it didn't turn out well at all, and I was really disheartened. I REALLY need to improve my dough slashing, which probably involves both technique and instrument. I baked two 800g loaves, and ONE slash came out nearly perfectly, which is progress. On top of that though, I'm still having a little trouble with my oven browning bread far too quickly. :/ I'd like to get a little more open crumb, but otherwise the taste and texture were great. I tried using the lava rock steaming technique that Susan at Wild Yeast recommends, but I've personally found Peter Reinhart's method of steaming (with hot water and a cast iron pan) more effective for me personally.

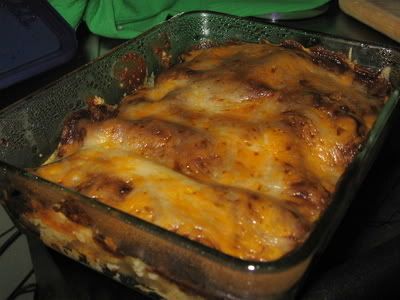
I also baked a whole chicken the other day, but had a ton of it left. I could have easily reheated it plain or made sandwiches with the leftovers, but I wanted to eat something a little more interesting. I'd just had a friend over and served chili, so I had the perfect ingredients left over from that to make enchiladas! I adapted a few recipes that I found here and it came out great! If you don't want to make your own enchilada sauce, they (and I) recommend the bottled kind you can get from Trader Joe's.

Chicken Enchiladas

Ingredients:

  • 8-10 corn tortillas
  • 2 cups shredded or chopped chicken
  • 1 onion, chopped
  • 1 large clove garlic, minced
  • 1 7 oz. can green chilies, chopped and drained
  • 1 12 oz. package of cheese, shredded (your preference; I used cheddar and Swiss)
  • enchilada sauce (I made this one)
  • olive oil to stir fry
  • 1 cup vegetable oil

Method

  1. On medium-high heat, saute the onion in some olive oil for 2 minutes. Lower the heat to low and continue to saute for another 20 minutes, to brown (but not burn) the onion. During the last couple of minutes, add the minced garlic (don't burn it).
  2. Add the green chilies and chicken to your onion and garlic. Stir well and cook for a few minutes.
  3. Remove from heat, then add 1/2 cup of the cheese and fold it into the chicken/ sauce mixture.
  4. Heat vegetable oil in a pan large enough to hold a corn tortilla. When the oil is hot, use tongs to pick up a tortilla and place it in the oil until it bubbles (about 3-5 seconds -- if it doesn't bubble in that amount of time or less, the oil's not hot enough). Lift and dip the tortillas in and out of the oil 3 times fairly quickly. The goal is to make them soft and easy to roll. Place the tortillas on a plate or tray covered with paper towels and blot excess oil from them. Repeat with however many tortialls you're using.
  5. When you're ready to assemble the tortillas, add a generous amount of chicken mixture on top of the tortilla. It should be distributed down the middle, from one end to the other.
  6. Take the end of the tortilla closest to you and draw it up and over the chicken, using the other end to meet it and place it gently, seam down, into your baking dish. They don't need to be tightly wrapped; a loose configuration is fine.
  7. After the chicken enchiladas are in the baking dish, spoon or pour enchilada sauce over the top of the enchiladas. Be generous with the sauce; it should pretty much cover everything.
  8. Sprinkle cheese on top of the chicken enchiladas. (A mix of white and yellow cheeses make for a nice presentation.)
  9. Baked uncovered in a 400°F oven for 10-12 minutes or until the cheese melts and the sauce is bubbling around the edges.
  10. Serve immediately, with sour cream and guacamole.