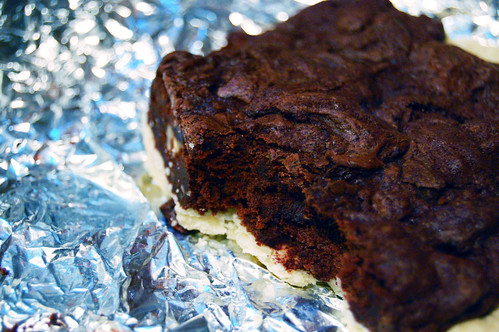
Showing posts with label chocolate. Show all posts

Saturday, February 19, 2011

Pioneer Woman's Best Chocolate Sheet Cake Ever

Pioneer Woman calls this sheet cake "the best chocolate sheet cake, ever." While I can't confirm that with 100% certainty (there are a lot of chocolate sheet cakes out there, and I think it is my duty -- YES, DUTY -- to reserve judgment until I have tasted all of them so I can make an informed decision), I can't imagine this cake isn't at least in the running for the title.

Chocolate Sheet Cake

The cake is moist and chocolatey, with a wonderful frosting that's dotted with pecans (to be honest, the pecans were so good that next time I'd double the amount used). What I can say with some certainty is that this was one of the easiest, most rewarding cakes I've ever made. It's really ridiculously easy, and if you're someone who thinks that something easy can't be all that good, I'm here to tell you you're very wrong.

Chocolate Sheet Cake

First of all, this cake uses melted butter, instead of softened. I don't know about you, but softened butter is the bane of my existence when it comes to baking. Oh, I understand the importance of it -- it's just having some handy when I want it that's the problem. With softened butter, you have to plan in advance, and more often than not my baking is a spontaneous thing. Anyway, you mix your wet ingredients, you mix your dry ingredients, and you mix them together. Nothing tricky about it. Same goes for the frosting (which is a little sweet for me, but has a wonderful flavor, and as I said, the pecans really add something) -- you mix the ingredients together, let it cool a bit, then spread over your cake.

Chocolate Sheet Cake

The one kind of fussy thing about this recipe is that it requires buttermilk. If you don't have buttermilk on hand (and I know very few people who have buttermilk on hand on a regular basis), I have two suggestions. One is to buy Bob's Red Mill dry buttermilk. I keep some in the freezer. It's so convenient, when I need buttermilk I just whip some up, rather than having to go out and buy a carton, only part of which gets used, so then I have to think of where else to use it. The only thing is that this is a sweet buttermilk rather than sour. Which leads me to the suggestion Pioneer Woman has, which is to fill your measuring cup almost to the required amount of buttermilk with regular milk, then add white vinegar until it reaches the right amount. I haven't tried this myself, but she says it works.

Chocolate Sheet Cake

I only have photos of the whole finished sheet cake because despite the fact that immediately after it was done I wanted to cut into it -- it smelled sooooo good -- I had to resist as I'd made it for a coworker's birthday and I didn't want to ruin his cake (or at least, couldn't figure out a way to do it without the embarassment of someone noticing that there was a piece missing). Then once it got to my workplace the cake sort of evaporated.

Pioneer Woman's Best Chocolate Sheet Cake Ever (adapted from Pioneer Woman)

Ingredients

For the cake:
  • 2 cups flour
  • 2 cups sugar
  • 1/4 tsp salt
  • 4 tbsp (heaping) unsweetened, natural cocoa powder
  • 1 cup (2 sticks) salted butter
  • 1 cup boiling water
  • 1/2 cup buttermilk
  • 2 eggs, beaten
  • 1 tsp baking soda
  • 1 tsp vanilla

For the frosting:
  • 1/2 cup finely chopped pecans
  • 14 tbsp (1 3/4 sticks) salted butter
  • 4 tbsp (heaping) unsweetened, natural cocoa powder
  • 6 tbsp milk
  • 1 tsp vanilla
  • 1 lb (minus 1/2 cup) powdered sugar
Method
  1. In a mixing bowl, combine the flour, sugar, and salt.
  2. In a saucepan, melt the butter, then add cocoa (don't be shy with the amount). Stir together.
  3. Add boiling water, allow mixture to boil for 30 seconds, then remove from heat. Pour this into the flour mixture, stirring gently just until combined.
  4. In a measuring cup, pour the buttermilk and add beaten eggs, baking soda, and vanilla. Stir buttermilk mixture into butter/chocolate mixture.
  5. Pour into ungreased sheet cake pan and bake at 350°F for 20 minutes.
  6. While the cake is baking, make the frosting. Chop the pecans finely. Melt butter in a saucepan. Add the cocoa, stir to combine, then remove from heat. Add the milk, vanilla, and powdered sugar. Stir together. Add the pecans once the frosting has cooled a bit (you don't want to cook the nuts), stir together, and pour over the warm cake.

Sunday, September 19, 2010

Espresso-Chocolate Shortbread Cookies

These. cookies. are. AWESOME.

Espresso-Chocolate Shortbread Cookies

This is a bit embarrassing to admit, considering I write a food blog, but I'm out of granulated sugar at the moment.  I haven't needed to go to the store recently, and I try to avoid going for just one item.  Yet I've been craving cookies.  When I saw the recipe for these sables (shortbread in French), which called for confectioner's sugar, I saw it as a sign that I had to make them.

And boy am I glad I did.  I halved the recipe, both because I wasn't sure I'd like the cookies and because I don't need to be eating that many cookies, period.  They were fantastic, though -- flaky, crisp, not too sweet, and full of coffee flavor and chunks of dark chocolate.  If you want to make the full batch, simply double the recipe below.

The recipe calls for instant espresso powder, but I don't usually keep that around and I don't use it enough to warrant buying it.  Instead, I ground up some espresso beans really fine and used that instead.  Once incorporated into the dough, the grounds disappear texture wise, but flavor wise they're unmistakeable.

Espresso-Chocolate Shortbread Cookies

Dorie Greenspan has some tips for making successful shortbread.  First, use softened butter, but not too soft and definitely not melted.  You want to avoid oily greasiness.  Second, you don't want fluffy batter.  Thus, do not overbeat the butter and sugar.  Third, once you add in the flour, do not overmix the dough.  Mix until just incorporated, and don't handle the dough too much.  Fourth, chill the dough for a good long time, preferably overnight.  And finally, no matter how good they might smell (and they will smell really, really good), do NOT eat the cookies until they have cooled completely.

When I was a little girl, my favorite cookies were Girl Scout shortbread cookies -- but these cookies are decidedly for adults.

Espresso-Chocolate Shortbread Cookies (recipe adapted from Dorie Greenspan's Baking: From My Home to Yours)

Ingredients
  • 1/2 cup butter (1 stick), softened
  • 1/3 cup confectioner's sugar
  • 1/2 tbsp finely ground espresso beans (or instant espresso powder)
  • 1/2 tbsp boiling water
  • 1/4 tsp vanilla extract
  • 1 cup flour
  • 2oz dark or bittersweet chocolate, chopped
Method
  1. Combine the boiling water and ground espresso beans and let sit.
  2. In a stand mixer with the paddle attachment, cream the butter and sugar together until very smooth, 2-3 minutes.
  3. Beat in the vanilla extract and espresso mixture, scraping down as necessary.
  4. Add the flour and mix just until it disappears into the dough.
  5. Gently fold in the chocolate pieces.  Don't overwork the dough.
  6. Scrape the soft and sticky dough into a gallon-sized plastic bag.  Do not seal, and use a rolling pin to roll the dough into a rectangle 1/4-inch thick.  Seal and chill in rthe efrigerator for a minimum of 2 hours or overnight; longer is better.
  7. When ready to bake,  preheat the oven to 325°F.
  8. Cut the plastic bag away from the chilled and hardened dough.  Using a sharp knife, cut the dough into 1 1/2-inch squares.
  9. Place the cookies on a baking sheet lined with Silpat or parchment paper about an inch apart (they shouldn't spread while baking).  Use a fork and pierce each cookie twice all the way through the dough.
  10. Bake for 18-20 minutes, turning the baking sheet about halfway through.  The shortbread will stay fairly pale and will not change color much if at all.
  11. Transfer the cookies to a wire rack and serve when completely cooled.

Saturday, September 11, 2010

Cheesecake Brownies

These cheesecake brownies are a sure crowd pleaser. After all, they're brownies! They're cheesecake! They're two great tastes in one! Plus, they have that fanciful swirlyness going on that people can't help but be drawn to. And when you're trying to avoid eating every bit of the sinful things you make yourself, it's a good thing when people want to eat them for you.

Cheesecake Brownies

These brownies talk a good talk, but in reality they are quite easy to make. There's a brownie layer, followed by a cheesecake layer, followed by another brownie 'layer.' Two batters, and they're both very simple.

I ran into a little trouble with the brownie batter being very thick while the cheesecake batter was very thin. But that could also be because I softened the cream cheese by nuking it in the microwave for 30 seconds rather than waiting for it to soften to room temperature. In any case, the final step of dolloping on some reserved brownie batter onto the cheesecake layer, then making the swirl patterns was a bit challenging, as the brownie batter didn't want to move much, and I didn't want to over mix it with the cheesecake.

Cheesecake Brownies

I also used the microwave for the brownie batter step of melting the butter and chocolate together. You can, of course, use a double boiler if you like, but after discovering how I can bend technology to my culinary will, I can't resist the convenience. In this case, I broke the chocolate into pieces, put them into a bowl along with a stick of butter, and nuked it for 1 minute. It was long enough to melt the butter entirely, while softening up the chocolate. You don't want to microwave too long and risk burning the chocolate. At this point, I stirred until all the chocolate was melted and the resulting mixture was glossy and smooth.

I think I've mentioned this before, but I don't like my desserts super sweet. I adapted the recipe to use less sugar, and substituted some brown sugar for the white in the brownie batter. I thought this made the chocolate flavor stand out more. The resulting brownies are very moist, somewhere between cakey and fudgy. The cheesecake adds a bit of tang, but the brownie flavor definitely overwhelms it. In my view the cheesecake layer adds more aesthetic appeal than flavor appeal, but others may disagree.

Cheesecake Brownies

Part of the ease of making these is because there isn't any special equipment required (unless you count the double boiler -- but I really recommend using the microwave) -- just a couple of handy bowls and a trusty wooden spoon. It's nice to know that great desserts can be made the old-fashioned way.

Cheesecake Brownies (adapted from Cookies and Brownies by Alice Medrich)

Ingredients:

For the brownie batter
  • 1/2 cup (8 tbsp or 1 stick) unsalted butter, cut into pieces
  • 4oz dark or unsweetened chocolate, coarsely chopped
  • 1/2 cup granulated white sugar
  • 1/2 cup brown sugar
  • 1 tsp vanilla extract
  • 2 large eggs
  • 1/2 cup all-purpose flour
  • 1/4 tsp salt
For the cheesecake batter
  • 8oz cream cheese, softened
  • 1/3 cup granulated white sugar
  • 1 tsp vanilla extract
  • 1 large egg
Method
  1. Preheat the oven to 325°F. Place a rack in the center of the oven.
  2. Prepare a 9-inch square baking pan. Create a foil sling (the idea is to help you lift the brownie out of the pan after baking) and fit it into the pan. Spray with cooking oil.
  3. Melt the butter and chocolate together, either by using a double boiler or in the microwave. Stir until glossy and smooth.
  4. Stir in the sugar and vanilla extract.
  5. Add the eggs one at a time, beating well after each addition.
  6. Add the flour and salt, stirring for about a minute, until the ingredients are well incorporated and the batter is smooth.
  7. Reserve 1/2 cup of the brownie batter and set aside. Pour the rest of the brownie batter into the reserved pan and spread it out as evenly as you can; it's not super critical.
  8. Process the cream cheese until smooth (you can use a hand mixer or food processor if you like, but I just used a fork after softening the cream cheese in the microwave). Add the sugar, egg, and vanilla and stir until just incorporated.
  9. Carefully pour the cheesecake mixture over the brownie mixture in the pan.
  10. Next, place small dollops of the reserved brownie batter over the cheesecake layer. Use a table knife to swirl the two without overmixing.
  11. Bake in the preheated oven for about 25 minutes, or until the brownies have started to pull away from the pan and the edges are starting to brown.
  12. Cool the brownies until firm enough to cut (cool completely to room temperature, or after cooling a bit after taking them out of the oven, place the pan in the fridge to cool), then lift them out using the foil sling. Cut them into the desired number of squares with a sharp knife.

Monday, August 2, 2010

Cocoa-Nana Bread

A few days ago I found myself in a position that people who buy bananas from time to time find themselves in: with having a few overripe bananas on hand that weren't appetizing to eat on their own.  My first inclination was to make regular banana bread, but after perusing my baking books I decided to try Dorie Greenspan's cocoa-nana bread instead.

Cocoa-nana Bread

On first glance at the recipe, I thought I read coco-nana bread, and figured coconut was involved (a coconut-banana bread still sounds yummy to me).  However, I soon realized that we were talking about a dark and rich chocolate banana bread, dotted with small chunks of chocolate.  Well, that sounded pretty darn good, too.

Cocoa-nana Bread

The only change I made to the recipe was to use 1/2 cup of granulated sugar rather than 3/4 cup (the amount of light brown sugar was unchanged).  Oh, and I used dark chocolate rather than bittersweet.  Also, it should be noted that when I was searching for this recipe online, I realized that someone had posted a mis-transcribed copy of the recipe, which then got disseminated over and over.  I don't know if my posting this "correct" version (as double checked with the book) will do any good to help with the misinformation out there, but I'll try.  Basically, the recipe calls for unsweetened cocoa powder, not semisweet cocoa powder (I've never even heard of such a thing, which might all be for the good, as people can't use something they can't find).

Cocoa-nana Bread

I loved how moist and soft this bread was.  It has a very intense flavor, so chocolatey that it's possible some would want more of the banana flavor to come through.  Next time I'm going to try it with 3 bananas.  Also, for me, one slice goes a long way.  Dorie suggests eating it for breakfast, and it is great with a hot cup of strong coffee (if you're sensitive to caffeine this combo might be too much for you!) or a glass of cold milk.  But I also find that it's a lovely late afternoon pick me up as well.

Cocoa-Nana Bread (recipe from Dorie Greenspan's Baking: From My Home to Yours)

Ingredients
  • 2 cups all-purpose flour
  • 1 cup unsweetened cocoa powder
  • 1 1/2 tsp baking powder
  • 1/2 tsp salt
  • 1/4 tsp baking soda
  • 8 tbsps (1 stick) unsalted butter, softened
  • 3/4 cup sugar
  • 1/2 cup packed light brown sugar
  • 2 large eggs
  • 2 ripe bananas, mashed
  • 3/4 cup buttermilk
  • 3 oz bittersweet chocolate, coarsely chopped (or 1/2 cup store-bought chocolate chips)
Method
  1. Preheat oven to 350°F. Butter a 9x5-inch loaf pan and place it on an insulated baking sheet or on two regular baking sheets stacked on top of the other. (This extra insulation will keep the bottom of the bread from over baking.)
  2. Sift together the flour, cocoa, baking powder, salt and baking soda.
  3. Working with a stand mixer, preferably fitted with a paddle attachment, or with a hand mixer in a large bowl, beat the butter at medium speed for about a minute, until softened. Add the sugars and beat for 2 minutes more. Add the eggs one at a time, beating for a minute after each addition. At this point, the batter may look a little curdled. Reduce the mixer speed to low and mix in the mashed bananas. Add the dry ingredients in 3 additions, mixing only until they disappear into the batter. Still on low speed, add the buttermilk, mixing until it is incorporated. Stir in the chopped chocolate. Scrape the batter into the pan.
  4. Bake for 30 minutes. Cover the bread loosely with a foil tent to keep the top from getting too dark, and continue to bake for another 40 to 45 minutes (total baking time is between 70 to 75 minutes) or until a thin knife inserted into the center comes out clean. Transfer the pan to a rack and cool for at least 20 minutes before running a knife around the edges of the bread and unmolding. Invert and cool to room temperature right side up.

Monday, March 22, 2010

Rustic Chocolate Pie

When I say the name Alice Medrich, what do you think of? Most people would say "chocolate." I wish my name were synonymous with something so highly regarded and beloved, but that's another blog. This one is to celebrate Alice and her magic with that ingredient so close to many people's hearts. I have nearly all of her cookbooks, but I was intrigued when I was thumbing through February's issue of Better Homes & Gardens and saw that she had featured some chocolate and vanilla recipes. Initially my interest was in her vanilla recipes, since she's so well known for her chocolate ones. However, of course what ended up capturing my attention and holding on to it was her recipe for rustic chocolate pie.

Rustic Chocolate Pie

See, the other thing about Alice Medrich is that her desserts are typically elegant, beautiful, and (somewhat) time consuming. This was the first recipe I'd seen of hers that was "quick and dirty" (but sounded delicious all the same). That's not to say that there aren't others; I've just never seen them. So, of course, I had to make it.

I'm not going to lie... the crust was not fun. I haven't perfected my crust-making yet, and I found this one to be rather trying. I know enough about making crust to know that the trick to flaky crust is to use very cold ingredients, and to handle the final dough as little as possible. Also, you should use as little moisture as you can -- just enough to make the dough come together. Well, I used the maximum allowed in the recipe and the dough was still flaking all over the place, even after chilling overnight. So that wasn't fun. I've had more success with other crusts, and may use those in the future when making this pie.

The pie overall, however, was great. I ate a piece of it warm, right out of the oven, and it was gooey and rich. I also ate it cold, after it was in the refrigerator, and it was like eating a chilled, fudgy brownie on top of a very light, almost-not-there pie crust. I actually preferred the latter, but your mileage may vary.

Note: The recipe calls for 1/4 cup of sugar, but I cut that in half to 1/8 cup. I'm not big on overly sweet desserts, and the more I cut down the sugar in my desserts, the better they seem to taste. Again, your own experience may differ from mine. I didn't bother with the optional serving suggestion. The chocolate I used was Trader Joe's dark chocolate, which as a minimum of 54% cacao.

Rustic Chocolate Pie (recipe by Alice Medrich, from February 2010 issue of Better Homes & Gardens)

Ingredients
  • 3/4 cup unbleached all-purpose flour
  • 1/4 tsp salt
  • 5 tbsp cold, unsalted butter
  • 1 1/2-2 tbsp cold water
  • 6 oz bittersweet or semisweet chocolate (not to exceed 62% cacao), coarsely chopped
  • 2 eggs whites, at room temperature
  • 1/8 tsp cream of tartar
  • 1/2 tsp vanilla extract
  • 1/4 cup sugar
  • 1/8 tsp salt
  • 3/4 cup chopped pecans or walnuts
  • 3 tbsp pine nuts, toasted (optional)
  • chocolate shavings (optional)

Method

  1. To make crust, in bowl thoroughly mix flour and 1/4 tsp salt. Cut butter in chunks and add to bowl. With two knives or pastry blender, cut butter into flour, tossing to coat with flour until largest pieces are size of pine nuts and remaining resemble coarse bread crumbs. As you work, scrape flour up from bottom of bowl, and scrape butter from knives or pastry blender. Do not let butter melt or blend completely into flour. Drizzle 1 1/2 tbsp cold water over flour mixture while tossing and mixing, until just moist enough to hold together when pressed. Add remaining water if needed. Turn out on plastic wrap. Gather into flat disk, pressing in any loose pieces. Wrap in plastic; refrigerate 30 minutes or up to 3 days.
  2. Position rack in lower third of oven. Preheat oven to 400°F. Let dough stand 30 minutes at room temperature, or until pliable enough to roll without cracking. On lightly floured surface, roll dough to 14x9-inch oval, about 1/8 inch thick, rotating and dusting with flour to prevent sticking. Brush excess flour from dough; fold in half to transfer to a piece of parchment slightly larger than dough. Unfold dough. Loosely fold and roll edge, without pressing, to form rimmed crust. Place parchment with pastry on baking sheet. Bake 10 to 12 minutes, or until light golden brown (crust edge will be a little raw inside).
  3. Meanwhile, for filling, melt chocolate in microwave on 50% power (medium) about 2 minutes. Stir frequently until chocolate is almost completely melted. Remove from microwave. Stir until melted; set aside.
  4. In bowl beat egg whites with cream of tartar and vanilla until soft peaks form. Gradually add sugar and 1/8 tsp salt. Beat until whites are stiff but not dry. Pour pecans and melted chocolate over whites; fold with spatula until batter is uniform color.
  5. Remove crust from oven. Reduce oven to 350°F. Dollop filling on crust. Spread to 1/2 inch thick. Bake 10 minutes, or until surface looks dry and slightly cracked (fudgy inside). Cool on baking sheet on rack. Serve warm or cool. Cover and refrigerate after 2 hours or up to 24 hours. To serve, sprinkle pine nuts and chocolate shavings.

Saturday, August 8, 2009

Stracciatella, or Chocolatey Flakey Ice Creamy Deliciousness

I have a good reason for making ice cream today, even though it's cloudy and rather cold (cold enough to bring out long pajama pants, which, let's face it, I love wearing). I ordered the darn ice cream machine, it arrived, and I needed to make sure it was working properly right? Right. Never mind that I ordered it a week and a half ago, when Seattle broke our all-time record high, reaching 103°F (with hardly anyone having air conditioning, mind you). The point is that I was trying to be a responsible consumer. And also that ice cream is delicious.


I resisted getting an ice cream machine for a long time, I'm not quite sure why. I think it always felt like one of those extraneous kitchen appliances that would gather dust after one or two uses, because it's so incredibly easy to buy ice cream (and if you're not picky, quite inexpensively), so who wants to bother with the mess of making your own at home? Well, time passed, technology got better, and now the 'mess' part is pretty minimal since they've come up with machines that don't require any ice or rock salt. Then my excuse was that my not-large freezer was jam-packed with things and I simply didn't have the will to clean it out, when the rest of my house was in shambles (have I mentioned what a crappy summer it's been?). My mom took that excuse away when she visited and cleaned my place from top to bottom, so I actually did have time to clean out my freezer (found a giant bag -- unopened -- of Trader Joe's frozen strawberries ... from 2004).

And since I have a food blog, and it was hot as Hades, I ran out of reasons for not getting an ice cream maker.

Now I'm going to state the obvious. IT'S AWESOME. I don't regret waiting to get one, but now that I have it, I'm so glad I do. It's easy to use, and making the ice cream itself is pretty cinchy also. Naturally for my first foray into ice-cream making I chose to turn to David Lebovitz's The Perfect Scoop. :D I wanted to make something simple and traditional, a flavor I enjoy immensely, but is often overlooked for something more flashy: vanilla. It's no coincidence that it's also the first recipe in the book. I also wanted to make vanilla because I've been saving this one vanilla bean for just the right recipe, and this was definitely the moment.


Because this recipe is made with egg yolks, thus making a custard, it may also be more commonly known as "French vanilla," which is, of course, richer than regular vanilla (and gives it a yellowish hue). Confession: I couldn't resist making things a little more interesting, so I turned it into stracciatella, which is a fancy Italian way of saying "chocolate chip ice cream." Although it's more like chocolate flakes than chips, really. It has a vanilla ice cream base, but at the last moment of churning you add a thin stream of bittersweet chocolate, which gets broken up into little flakes in the ice cream, and is so very much better than actual whole chocolate chips (in my humble opinion).

It took my ice cream maker 25 minutes to churn the ice cream to a consistency I liked (I like it thicker, almost hard, rather than soft serve/frozen yogurt-like). I packed it into a plastic container and let it freeze for a few hours to harden even more. I was a bit concerned that the ice cream would be icy or too hard to scoop, but it was absolutely perfect. Creamy, firm yet with a lot of give, it was the perfect texture, and of course the flavor was fantabulous.


Stracciatella (Chocolate Flake Ice Cream) adapted from The Perfect Scoop by David Lebovitz

Ingredients
  • 2 cups heavy cream, divided
  • 1 cup whole milk
  • 6 large egg yolks
  • 3/4 cup sugar
  • 1 vanilla bean, split lengthwise
  • 3/4 tsp vanilla extract
  • Pinch of salt
  • 4.5 oz bittersweet chocolate, melted

Method

  1. In a medium saucepan, gently warm 1 cup of heavy cream, milk, sugar, and salt, until the sugar has dissolved. Scrape the seeds from the vanilla bean into the warmed mixture and stick the bean itself in there as well. Cover the saucepan, remove from heat, and let steep at room temperature for 30 minutes.
  2. Meanwhile, pour the remaining cup of heavy cream into a large bowl and set a strainer on top. Prepare an ice bath by filling a large bowl (one that can fit the bowl with the 1 cup of heavy cream in it) with ice and water.
  3. In a medium bowl, whisk together the egg yolks.
  4. Slowly (especially at the beginning) pour the warm mixture into the egg yolks, whisking constantly. Then carefully pour the mixture back into the saucepan.
  5. Set the saucepan over medium heat and stir constantly with a wooden spoon. Heat until the custard thickens. You'll know it's ready if it coats the back of the wooden spoon (it won't be super thick), and when you draw your finger across it, it should leave a definitive trail.
  6. Pour the custard through the strainer, into the heavy cream. Stir the cream and custard to incorporate. Take the bean from the strainer and add it to the final mixture. Add the vanilla extract.
  7. Put the bowl into the ice bath, and stir until the mixture has cooled.
  8. Cover the bowl with plastic wrap and chill thoroughly in the refrigerator. (I let it sit overnight.)
  9. When you're ready to churn the ice cream, remove the vanilla bean and rinse it. Let it dry out, then use it for another purpose (such as sticking it in your sugar container to make vanilla sugar).
  10. Freeze the ice cream according to your ice cream machine's instructions.
  11. Melt the chocolate in the microwave or by a double-boiler method.
  12. About 5 minutes before the ice cream is done, pour the chocolate in a thin stream directly onto the ice cream (not the mixer arm).

Saturday, February 28, 2009

Chocolate Valentino -- Daring Bakers Challenge February 2009

I wish I were more of a chocolate lover, as I might have appreciated this month's Daring Bakers challenge much more. It's not that I didn't enjoy it -- I did! But I'm not one of those all chocolate, all the time type people, and this month's challenge was really catered to the ultimate chocolate lover.

Info for February:

The February 2009 challenge is hosted by Wendy of WMPE's blog and Dharm of Dad ~ Baker & Chef.

We have chosen a Chocolate Valentino cake by Chef Wan; a Vanilla Ice Cream recipe from Dharm and a Vanilla Ice Cream recipe from Wendy as the challenge.


The recipe itself could not be simpler (and I made it even more simple), which was perfect for someone coming back from a 2-month hiatus. It uses 3 -- count 'em -- 3 ingredients: chocolate, eggs, and butter. As you can imagine, the quality of your ingredients matter a lot in this flourless cake; if one things tastes off, the whole thing is off. The original challenge stated that the finished cake would taste exactly like the chocolate used, and that cannot be emphasized enough. If you're a chocolate connoisseur, you'll probably need to use the super pricey stuff -- but you'll be amply rewarded.

Rather than go through the whole double boiler scenario, I melted my chocolate and butter by microwaving. I was very careful about this, only microwaving for 30-40 seconds at a time, and mixing after each time, to make sure the chocolate wouldn't burn and to fully incorporate the butter. I found that this also made the chocolate just warm, rather than hot, just enough so that it's melted. That was very helpful when adding the egg yolk, as I didn't have to worry about them curdling.


I loved the "batter," so creamy and gorgeously brown. I even loved it after folding in the egg whites and it looked grainier. I'm normally not a fan of licking the spoon or tasting batter (I know, I'm weird right? But I can usually taste the flour in it, and that's just kind of yucky), but that wasn't the case with this cake.


It was optional to use a heart-shaped pan (though if I'd been making this for anyone than just me, I might have tried to go find and buy such a pan), so I opted to bake mine as little cakes in ramekins -- a good choice actually, as right out of the oven, they had risen like little soufflés. And in fact, they sink with time just like soufflés as well.


I probably should have eaten them right in the ramekin, but mindful that this was supposed to be a cake, I tried to remove them from their baking dish and plate them ... not my best idea. It all fell apart (though that didn't make it any less tasty).

It's so cold here right now that I really could not imagine making ice cream (plus I have one of those tiny freezers that's already packed with all the stuff I freeze and forget about), so I also opted to make the suggested alternative of whipped cream, warmed up some strawberry rhubarb jam, and topped the cake with that. The cream, the tang from the jam, and the chocolate combination was wonderful.


The cake was so rich and so chocolatey, however, that I could not eat more than two of them (hence my wish that I were more of a chocolate lover -- or at least that I had a roommate or something who could have helped me finish).

Chocolate Valentino from Sweet Treats by Chef Wan of Malaysia

Preparation Time: 20 minutes

Ingredients
  • 16 ounces (1 pound) (454 grams) of semisweet chocolate, roughly chopped
  • ½ cup (1 stick) plus 2 tablespoons (146 grams total) of unsalted butter
  • 5 large eggs separated

Method

  1. Put chocolate and butter in a heatproof bowl and set over a pan of simmering water (the bottom of the bowl should not touch the water) and melt, stirring often. (Or you can do what I did; place the chocolate and butter in a microwafe-safe bowl and microwave 30-40 seconds at a time, stirring each time, until the mixture is fully melted and incorporated. If you do this correctly the chocolate will be just melted and won't be super hot, which is good for the egg step.)
  2. While your chocolate-butter mixture is cooling, butter your pan and line with a parchment circle then butter the parchment.
  3. Separate the egg yolks from the egg whites and put into two medium/large bowls.
  4. Whip the egg whites in a medium/large grease free bowl until stiff peaks are formed (do not over-whip or the cake will be dry).
  5. With the same beater beat the egg yolks together.
  6. Add the egg yolks to the cooled chocolate.
  7. Fold in 1/3 of the egg whites into the chocolate mixture and follow with remaining 2/3rds. Fold until no white remains without deflating the batter.
  8. Pour batter into prepared pan, the batter should fill the pan 3/4 of the way full, and bake at 375°F/190°C
  9. Bake for 25 minutes until an instant read thermometer reads 140F/60C. (Note – If you do not have an instant read thermometer, the top of the cake will look similar to a brownie and a cake tester will appear wet.)
  10. Cool cake on a rack for 10 minutes then unmold.

Monday, October 6, 2008

Coq au Vin, Chocolate Pumpkin Brownies

I love French cuisine, and Coq au Vin (pronounced CŌKE oh-VANH) is one of my favorite dishes (though "coq" refers to a rooster, it's commonly prepared with hen). It's a combination of tender chicken and a rich, flavorful sauce that French cuisine is known for. It's easy to prepare, though moderately time consuming. If you have a couple of hours to spare though, it's totally worth it. And it makes your house smell divine!

The original recipe is adapted from MarthaStewart.com.


Here all the ingredients have been set up, ready for cooking! I sort of forgot that the garlic was supposed to be sliced and made a little more work for myself by mincing, but the end result was just as good.


Check out the awesome purple chicken after marinating overnight in the wine.


Fresh out of the oven and de-fatted (that should be a word).


Close up shot, mmmm. My plating skills still leave something to be desired, so that's not shown.

Ingredients

  • 4 chicken thighs
  • 4 chicken legs
  • 2 cups full-bodied red wine, such as Cabernet Sauvignon
  • Coarse salt and freshly ground pepper
  • 8 ounces slab bacon, cut into 1/2-inch dice
  • 3 tablespoons extra-virgin olive oil, if needed
  • 1 medium onion, finely chopped
  • 8 garlic cloves, thinly sliced
  • 10 white pearl onions, peeled (or frozen)
  • 1/2 pound small cremini mushrooms
  • 3 tablespoons all-purpose flour
  • 1 tablespoon tomato paste
  • 2 tablespoons Cognac
  • 1 chicken liver, coarsely chopped
  • 2 bay leaves
  • 5 fresh thyme sprigs (or 1 tsp dried thyme)

Method

The night before:

  1. Place chicken in a large bowl, and add wine. Cover, and refrigerate overnight.

2-3 hours before serving:

  1. Remove chicken from wine, and pat dry; reserve wine. Season chicken with salt and pepper.
  2. Cook bacon in a Dutch oven over medium-low heat until crisp, about 20 minutes. Transfer bacon to a plate, leaving drippings in pot. (You should have about 3 tablespoons; you may need to add oil.)
  3. Raise heat to medium-high. Working in batches, cook chicken, flipping once, until golden, 4 to 5 minutes per side. If you find that it's browning very quickly, lower the heat -- you don't want it to burn. Transfer chicken to a plate.
  4. Preheat oven to 325°F. (You can do this earlier, but I usually do it after browning the chicken.)
  5. Add onion to pot and cook 4 to 5 minutes.
  6. Add garlic and cook 2 minutes.
  7. Add pearl onions and mushrooms and cook until brown, 3 to 4 minutes.
  8. Stir in flour and tomato paste, and cook 2 minutes. At this point, the mixture will be well blended but dry.
  9. Add Cognac, and cook, stirring, 1 minute. The mixture will still be on the dry side.
  10. Return bacon and chicken to pot. Pour in reserved wine, and add chicken liver and herbs. Bring to a simmer.
  11. Cover the pot and place it in the oven until chicken has cooked through and vegetables are tender, 45 minutes to 1 hour.
  12. Discard herbs, and skim fat from surface. Serve hot.

When I made this before, I lamented that there wasn't enough of the delicious sauce. So when I made it this time, I doubled the sauce ingredients (wine, flour, tomato paste, Cognac). Also, the bacon drippings have always been enough to cook the chicken and the rest; I've never had to add the extra oil. Alternatively, if using bacon drippings is too rich/decadent for you, you could drain it after the bacon's cooked and use olive oil for the rest of the steps.

Really wonderful served with vegetables (especially potatoes, as you can liberally spoon the sauce over them), rice, and/or pasta. And of course, crusty bread is a must.

For dessert, I made Chocolate Pumpkin Brownies, first introduced by LJer dictumsibylla. The recipe is here. Since I love the flavor of pumpkin I could use even more of it. Maybe next time I'll double the pumpkin portion.

Pictures:

Tuesday, September 2, 2008

Chocolate Eclairs -- Daring Bakers Challenge August 2008

This was my first Daring Bakers challenge, and I lucked out because it was the perfect thing to bring to a barbecue/potluck, which we happened to be having in August for work. Though the challenge allowed us a bit of freedom in personalizing the recipe, I decided to make them just as the recipe suggested -- with chocolate pastry cream and chocolate glaze. My coworkers are chocolate fiends, and I was depending on them to eat all or at least most of the eclairs, as I didn't want to have to eat them all myself!


The barbecue was on a Friday, and I don't have the luxury of being able to take a day off from work just to bake (more's the pity), so I made of the components (the chocolate sauce and chocolate pastry cream) in advance, as suggested by the recipe. I didn't find that doing so detracted from their flavor at all.

Even though there are seemingly a lot of steps to eclair making, it's actually quite simple and not that time consuming (except for having to wash everything afterward, of course). The part I was most nervous about was the cream puff dough, which The first snag I had on that front was that I wasn't able to find a 2cm tip. That's fairly large, and all the stores carry are decorating tips, which are a fraction of that size. I even went all the way to freaking Sur la Table! I ended up having to improvise with a regular plastic food bag.

Step-by-Step Pictorial: Chocolate Eclairs


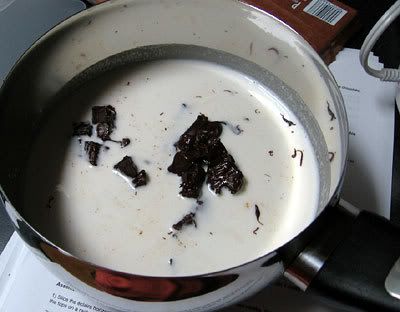
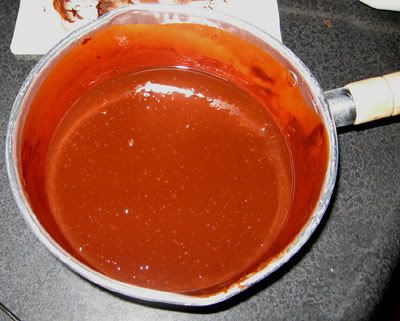
I made the least "important" component first, because it was the easiest. Here's the prep for the chocolate sauce, which is an ingredient that goes into the glaze. Here's heavy cream, sugar, chocolate, and water added together in a pot, about to be boiled.


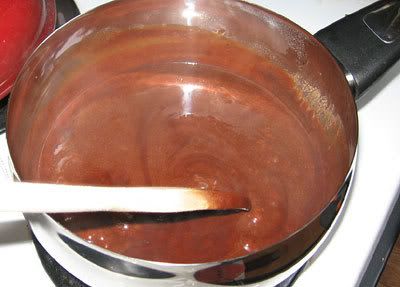
Here it is after the first boil + 15 minutes. It's thickened enough that it should be ready now.


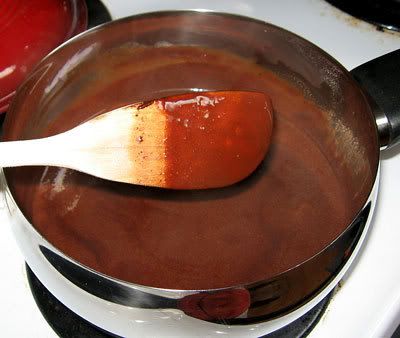
It's coating the back of my wooden spoon, as the instructions say, so yep, it's ready! At this point I poured it into a large mug to cool. I kept it in the fridge for about 3 days, after which time I warmed up a bit to use in the final glaze.


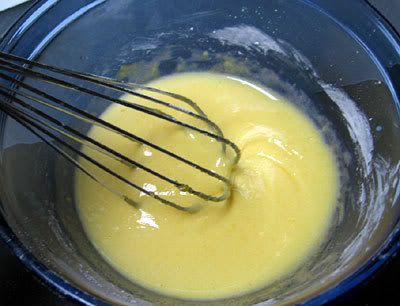
Here's a mixture of 4 egg yolks, sugar, and corn starch while 2 cups of whole milk are heating up on the stove. This will eventually become pastry cream.


A couple of spoonfuls of boiling hot milk have been added to the egg mixture to "temper" it. This raises the temperature slowly and will prevent the eggs from curdling (and making scrambled eggs!), as would probably happen if you just added all the hot milk at once.


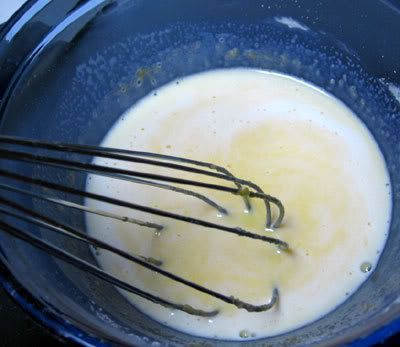
All the hot milk has been added to the yolk mixture.


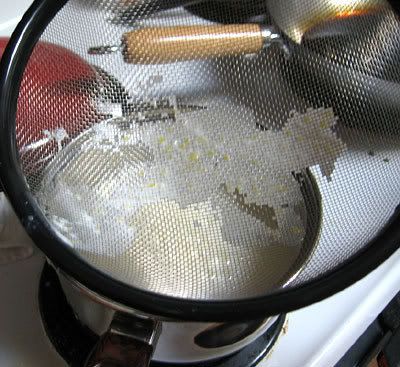
The milk/yolk mixture is strained into the saucepan to remove any bits of egg that's been curdled. I actually think I managed to avoid that. The bits in the strainer are unmelted yolk/sugar I think. Or... okay, maybe it's tiny pieces of scrambled egg, who knows.


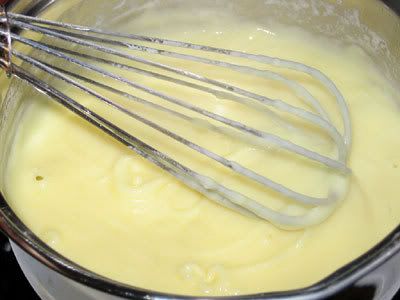
After bringing the milk/yolk mixture to a boil, this lovely pastry cream is what it becomes. I was amazed to see it happen so quickly and beautifully.


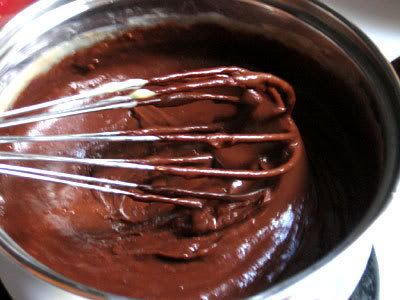
Here I've added melted chocolate to the pastry cream, thus making it chocolate pastry cream. Wild, I know.
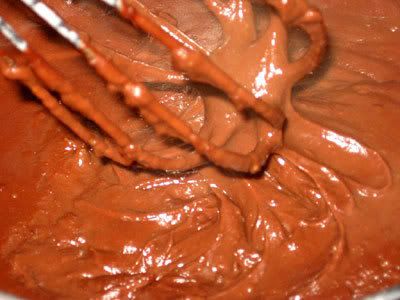

EXTREME CLOSE UP!!!


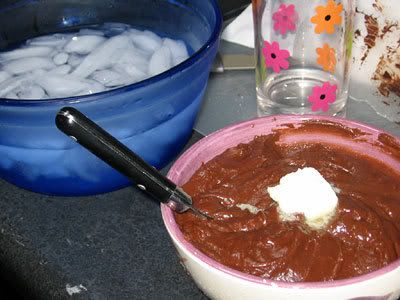
Here the pastry cream has been cooled to 140°F with an ice water bath (which you see pictured), and I'm mixing butter into it.


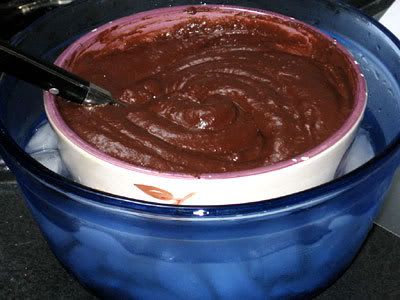
After adding the butter, the pastry cream cools to room temperature via the ice water bath. At this point it's going to be stored in the fridge until it's time to fill the eclairs with it. I was 'forced' to eat a spoonful when I had to take the spoon out and it was delicious.


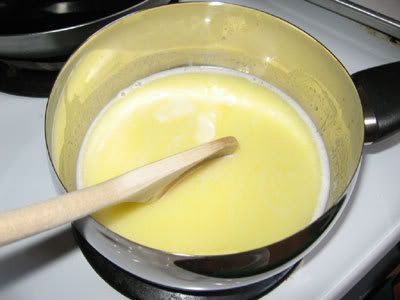
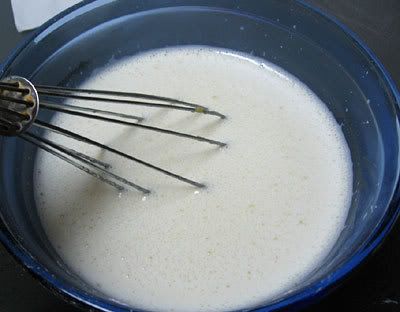
So the morning of the BBQ, I prepared the cream puff dough and the chocolate glaze, and suffered through a conference call that was more than an hour long. But I digress. Here I've brought some whole milk, water, sugar, salt, and butter to a boil.


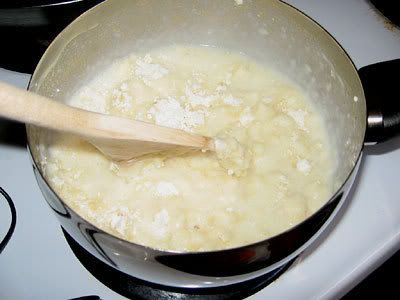
Added 140g of flour to the boiling mixture, resulting in this clumpy, unappetizing mess. Just a note that I weighed my ingredients where weight measurements were provided. It's much more accurate than volume measurements, and I need all the help I can get.


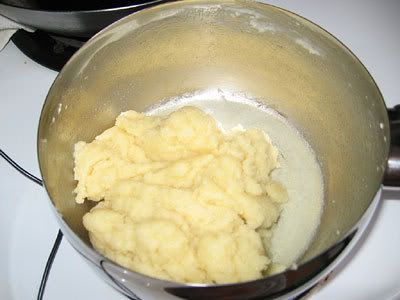
After 3 minutes of stirring, the dough has come together and is ready to be placed in the mixer for the addition of the eggs. A slight crust forms at the bottom of the pan during this step, which is to be expected.


Here's the dough after the addition of 1 egg. It separates a bit, as you can see.


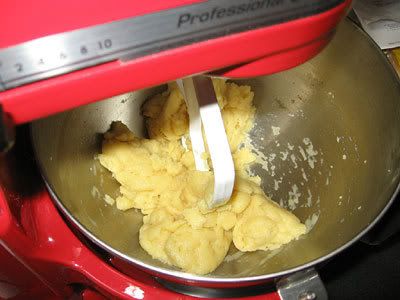
After 3 eggs, it's starting to come together a little more.


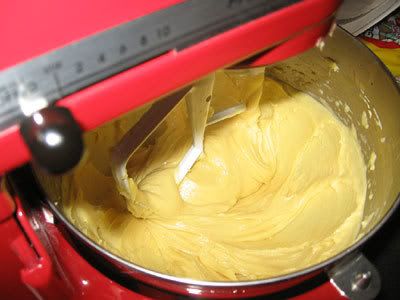
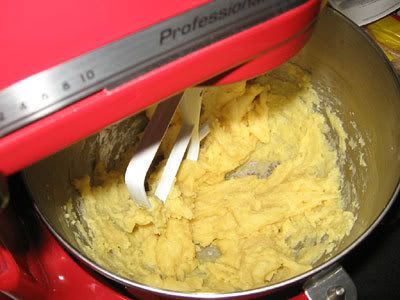
Here's the dough after the 5th and final egg, and a couple minutes of extra mixing (to get the consistency to match what the instructions say, that the dough should fall back into the bowl in a ribbon when lifted).


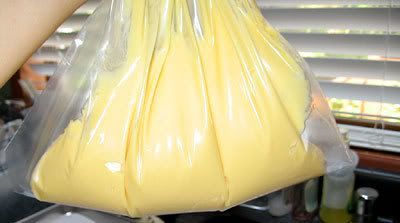
I then scraped the still-warm dough (very important) into my makeshift pastry bag, which was just a large freezer bag with a hole cut into one of the corners.


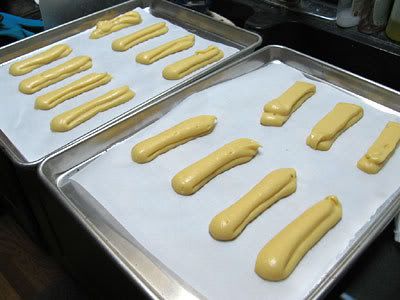
I lined two baking sheets with parchment and made notations on each for 4 1/2-inch sections where the eclairs would be. The piped dough came out more like a ribbon instead of a chubby finger, so what I did was just go back over the first layer of piped dough with another layer. It worked decently well for being a makeshift thing.


Baked as instructed. There was one part where the instructions weren't clear though. You're supposed to put them in the oven and let them bake for 7 minutes, then stick a wooden spoon in the oven door to keep it slightly open for another 5 minutes for a total of 12 minutes. After that you're supposed to switch the trays from top to bottom and front to back, then bake for an additiona 8 minutes, but it doesn't say whether you're supposed to keep the door slightly ajar as you were doing right before, or go back to having the oven door fully closed. I learned from my bread experiments that doing so dries out the bread (or in this case pastry), and since eclairs/cream puffs are generally drier from what I recall, plus there would be pastry filling, I opted to keep the door ajar. At the first switch, the eclairs that were on the upper shelf had puffed much more than the ones on the bottom. After the full baking time, the ones that had been switched to the top were puffy while the ones on the bottom were flat. I'm not sure what I could have done to prevent this.


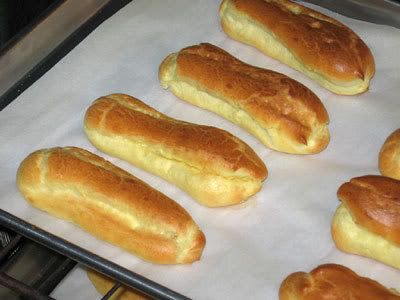
It didn't matter that much though, because after awhile even the puffy ones deflated quite a bit. I also don't know what to do to prevent that either! Also, I don't know if you can tell from the pictures, but they weren't that big. They were like, mini-eclairs. Also, I ended up piping around 14 eclairs at a length of 4 1/2-inches each. The instructions say that there should be enough dough for 20-24 eclairs. So I don't know if those eclairs puff up much bigger than mine did, or if they're meant to be small.


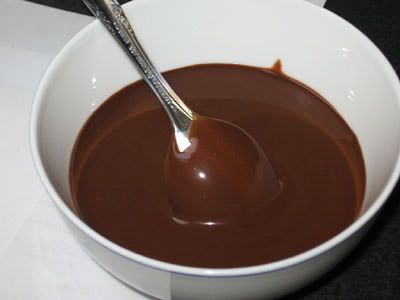
Here's the chocolate sauce I made in advance.


I added the chocolate sauce to some more chocolate, butter, and heavy cream, and that created this glaze. The flash kind of ruined this shot. ><


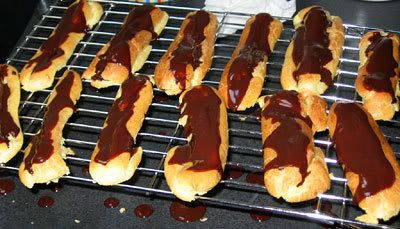
Hmm, I guess I should have used parchment paper on the wire rack as suggested in the recipe, as the glaze was really ... drippy.


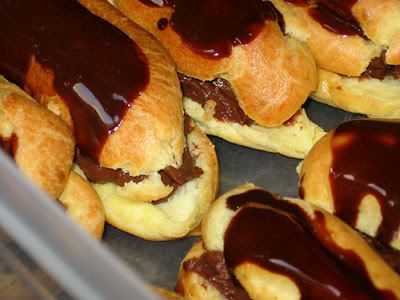
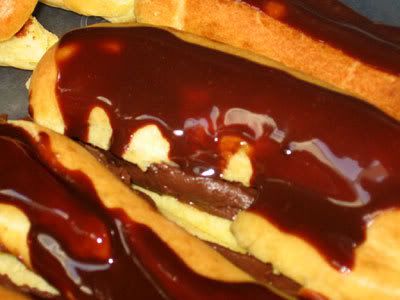
Filled the bottoms with previously made chocolate pastry cream and gingerly dropped the still-wet tops on them.


It would have been helpful if the instructions had said how long it would take the glaze to cool, because it definitely took awhile. The tops were still wet when I put them together. However, it took me about an hour to get to the BBQ, so they were drier by then.

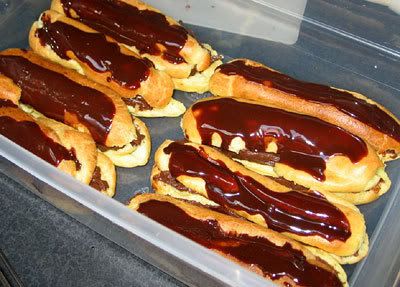
I tried one to make sure it was edible and wouldn't be subjecting people at the barbecue to eclair rocks. The cream puff dough I thought tasted a bit eggy, but the chocolate covered that up pretty well. The chocolate pastry cream/glaze were both very good. And I was actually glad that they were miniature size, because eating a mini-eclair is much more acceptable than eating a normal-sized one.

They were a hit at the party (or everyone was being very polite). They all pretty much disappeared, and my manager even asked if I had made the dough myself and how I'd done it. Yay for chocolatey baked goods!