Showing posts with label salad. Show all posts

Friday, September 10, 2010

Fresh and Refreshing

I love this very simple salad.  It takes no time at all to pull it together, and it's delicious, with the crisp crunch of English cucumber and the biting tang of fresh tomatoes.  There are two ways to dress this salad.  My favorite method involves fragrant sesame oil and seasoned rice vinegar.  Another good method is to add a bit of feta cheese and dress the ingredients with a light vinaigrette.  Both are quick and easy to prepare, but have very distinctive flavors -- one with Asian notes, while the other has a Mediterranean flair (especially if you also add kalamata olives).

Tomato and Cucumber Salad

I like to use English cucumbers.  They're the long ones wrapped in plastic.  Their skins are thinner and less waxy, so they don't need to be peeled.  They also have fewer seeds.  Tomatoes fresh from the garden are best to use, but as an alternative firm, ripe tomatoes on the vine from the store are just fine.  Sweet cherry tomatoes would work as well.  This isn't a fussy recipe.

Ingredients for Tomato and Cucumber Salad

The brand of seasoned rice vinegar my mother likes to use in this recipe (I know it from her) is Marukan, so that's what I use, but I'm sure other seasoned rice vinegars would work as well.  If you choose to use unseasoned rice vinegar, just know that you'll have to add your own sugar, salt, mirin, etc., in order to achieve the same flavor, otherwise it'll be rather bland.

Tomato and Cucumber Salad

Because of the tomatoes, this salad is best consumed the same day it's made.  Refrigeration makes the tomatoes mealy and the whole salad becomes unpleasantly watery.  Besides, the vegetables taste their best at room temperature.

I don't have a specific recipe, because there are so few ingredients and the amount of vegetables used as well as preference dictates the seasoning.  Use more tomatoes, use fewer tomatoes.  Add a little rice vinegar or add a lot.  Use a whole cucumber or only use half.  Drizzle the seasonings over the vegetables modestly, then taste it.  If it needs more of anything, add it.  Serve and enjoy -- I guarantee you will eat a lot more than you think you will!

Monday, May 3, 2010

My First-Ever Korean Table

I have long enjoyed Korean cuisine, but have never attempted to make it myself. Like Indian cuisine, it always seemed rather daunting, even though the ingredients are fairly common (unlike Indian spices). Recently, I decided to make a full-Korean meal for members of my family, including banchan and dessert. I was somewhat trepidatious, as I generally like to test recipes on myself before inflicting them on others. :-)

It was a long, arduous undertaking, but I did it, and most everything was well received. I waffled between making little dishes of banchan myself or buying it, but in the end the things I wanted were simple enough, and only ended up buying the kimchi (I'm not sure I'll ever come to a point where I'll feel I need to make THAT myself).

One learning that came from this experience is that it's well worth taking the time to make the main courses, but maybe not so much the banchan unless I'm feeding a lot of people over the course of several days. The banchan dishes I chose, while very simple to prepare, are nevertheless time consuming, especially when preparing a bunch of other dishes, as I did.

Here, then, are the various dishes I made, along with a few cooking notes and how each was received.

Kimchee
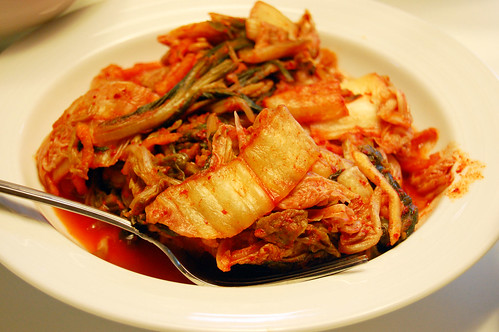
Kimchi, the only dish not made from scratch. It was okay.  I have yet to find a brand of store-bought kimchi that I really like. The kind served at Korean restaurants tend to be much better than what I can find at the grocery store (even H-Mart, a Korean grocery store).

Seasoned Spinach
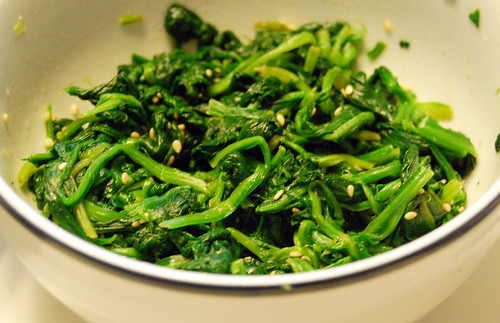
Sigeumchi Namul, or seasoned spinach, made by dropping the spinach into hot water for 1 minute, then seasoning with sesame seeds, sesame oil, and salt. Very good and simple, but quite a bit of work due to all the washing that's required.

Seasoned Mung Bean Sprouts
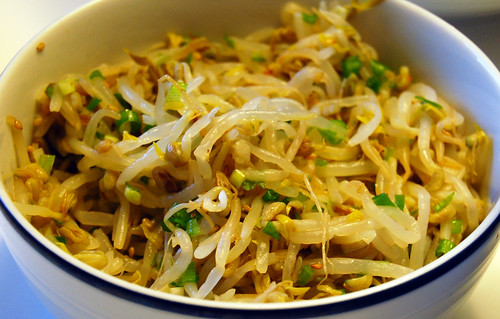
Kong Namul, or seasoned bean sprouts, made by steaming the sprouts (in this case, mung bean sprouts, though traditionally it is made with soy bean sprouts) for a few minutes, then seasoning with scallions, sesame seeds, sesame oil, and salt. Very good and simple, but a bit time consuming.

Seasoned Spicy Cucumbers
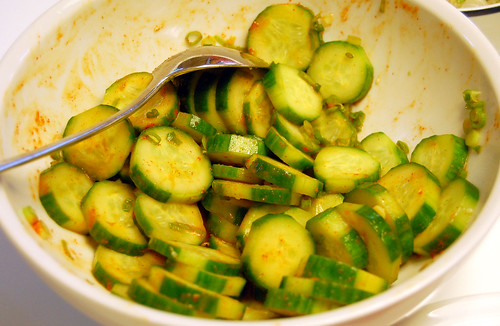
Oi Muchim, or spicy cucumber salad. Small Persian or Kirby cucumbers are sliced, then mixed with scallions, sesame oil, cider vinegar, and gochujang. This was only okay, even though it's usually one of my favorite banchan. The problem was that the gochujang I used was WAY too spicy, so that I wasn't able to put much of it in. That made the cucumbers under-seasoned.

Korean Mixed Simple Salad
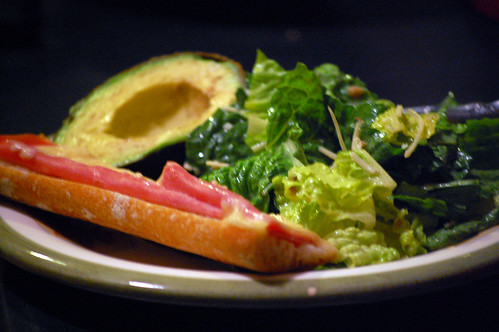
Sangchu Kutjuri, or mixed simple salad, which I've found to be ubiquitous during Korean barbecue meals. However, I'm not sure how traditional it actually is, as it was actually difficult to find a Korean cookbook that had a recipe for it. It's red-leaf lettuce, hand shredded, with thinly sliced scallions and a simple dressing that's sweet, savory, and sour all at once. It's wonderful. My version was pretty good, but not nearly as good as I've had at restaurants. More experimentation is a must!

Jap Chae
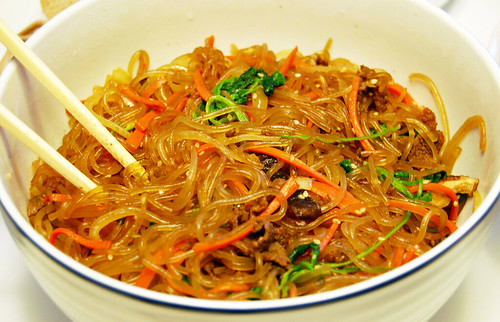
Jap Chae, or glass noodles with beef and vegetables. This went down like gangbusters. Everyone loved it. It was delicious, and very authentic tasting. The glass noodles are made from sweet potato starch, and turn translucent when stir fried. The noodles are mixed with seasoned beef, matchstick carrots, onion, shitake mushrooms, and spinach (which I added a bit late, so it's kind of clumpy in the dish). Really wonderful, well worth the time it took to make.

Bulgogi
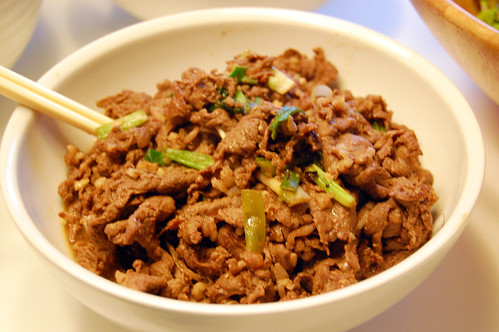
Bulgogi, or the well-known sweet and savory "barbecued" beef that's thinly sliced. This was an incredibly simple and delicious dish -- all that's needed is for the beef to mature in the marinade. Also a hit with everyone.

Ginger Jelly Dessert
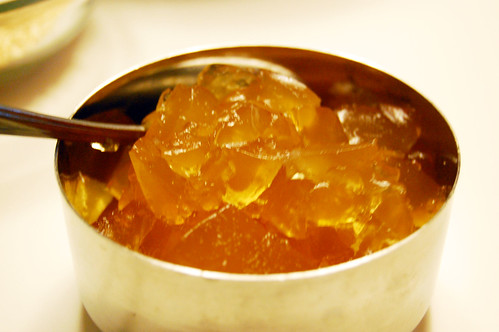
Saenggang Jelly, or ginger jelly. Most decidedly NOT a hit with everyone. First you have to really, REALLY enjoy the taste of ginger. Then you have to enjoy the heat in your mouth after a few mouthfuls of this super strong dessert. It creeps up on you, and just isn't very pleasant. Even those among us who enjoy ginger a lot couldn't handle eating all of it. Granted, we didn't drizzle it with dark corn syrup as the recipe indicated (because we didn't have any), so I don't know if that would have made a big difference. Honestly though, I can't remember EVER having a Korean dessert in a restaurant setting, and recipes for them in cookbooks seem very sparse; maybe dessert just isn't a forte of the cuisine.

I also made something else that I neglected to take a picture of, that everyone absolutely loved: Kom Tang, or beef bone soup. I actually don't even know how Korean it was, since I made a lot of adjustments, especially toward the end when I was running out of time. The recipe calls for beef knuckles, but I couldn't find it at either H-Mart nor 99 Ranch, so I ended up using beef neck bones instead. That right there might make it un-Korean, I don't know. I was also supposed to cut the meat and cartilage from the bones and drop the former but not the latter back into the soup; I skipped this step entirely. We're used to eating meat from bones in soup, after all. I also did not remove the carrot and onion, again due to time contraint. I used daikon, which I had on hand, which I'm not sure if that can be considered "Korean radish" (the recipe does not get more specific than that). Finally, I neglected to add all of the ingredients that I was supposed to at the end, because I just plain forgot, lol. Yet, as I said, everyone LOVED the soup!

I wanted to make "purple rice," which seems to be pretty standard at Korean restaurants, but it turns out that you have to soak black rice (a bit of black rice mixed with white rice is what turns the rice violet in color) for hours and hours before it softens enough to be cooked with white rice, which I didn't realize. So we just had regular sticky white rice.

All in all, a big success, and a few of these dishes will likely find themselves in my permanent repertoire!

Jap Chae (recipe adapted from The Korean Table)

Ingredients:
  • 1 tbsp Sweet Soy Base Sauce (recipe follows)
  • 1 tbsp minced green onion
  • 1 tsp dark sesame oil
  • 1/4 lb sirloin tips or ribeye steak, cut into matchstick strips
  • 5 oz dried Korean vermicelli noodles
  • 1/2 lb spinach
  • 2 tbsp canola or other neutral oil
  • 1 small onion, sliced
  • 1 carrot, peeled and cut into matchstick strips
  • 8 dried shitake mushrooms, reconstituted in water and cut into matchstick strips
  • 1 tbsp dark sesame oil
  • 5 tbsp Sweet Soy Base Sauce
  • 1 tbsp roasted sesame seeds
  • salt and pepper to taste
Method
  1. In a small bowl, add the beef and the first 3 ingredients to make the marinade. Toss the beef strips until thoroughly coated. Let the beef marinate while preparing the other ingredients.
  2. Place the dried noodles in a large heatproof mixing bowl. Pour about 4 cups of boiling water over the noodles and let soften, about 8 minutes. Drain the noodles. If they get sticky just give them a quick rinse with warm water.
  3. Fill a medium saucepan halfway with water and bring to a boil. Add the spinach and cook for 1 minute. Drain and set aside.
  4. In a large skillet, add 1 tbsp of canola oil and place over medium heat. Stir-fry the onion, carrot, and mushrooms separately, seasoning each with a pinch of salt. Add additional oil to the skillet as needed. Place each vegetable, when done, into a large serving bowl.
  5. In the same skillet, add the beef and stir-fry for 3 minutes. Add to the serving bowl.
  6. To the skillet, add the 1 tbsp of sesame oil and the 5 tablespoons of Sweet Soy Base Sauce. Bring to a boil. Add the softened cellophane noodles and mix well. The noodles will become transparent over the heat.
  7. Add the noodles to the serving bowl along with the cooked vegetables and beef. Toss until the ingredients are evenly distributed. Taste and season with salt and pepper if needed.
Sweet Soy Base Sauce
Ingredients
  • 1/2 cup water
  • 4 cloves garlic, thinly sliced
  • 6 thin slices of fresh ginger, peeled
  • 1 tsp black peppercorns, crushed
  • 1 cup low-sodium soy sauce
  • 1/2 cup light brown sugar
  • 1/4 cup red or white wine
Method
  1. Combine water, garlic, and peppercorns in a medium saucepan and bring to a boil. Lower the heat and simmer for 10 minutes.
  2. Add the soy sauce, brown sugar, and wine. Turn the heat to high and boil for 2 minutes.
  3. Remove from the heat and let it cool to room temperature.
  4. Strain the sauce through a sieve into a large mixing bowl. Discard the solids.
Bulgogi (recipe adapted from The Korean Kitchen)
Ingredients
  • 1 1/2 lbs boneless rib steak, cut into very thin slices 5-6 inches long by 2 inches wide
  • 4 tsp sugar
  • 1/4 cup soy sauce
  • 3 garlic cloves, crushed or chopped fine
  • 3 scallions, cut into 1-inch pieces
  • 1/4 tsp pepper
  • 1 tsp Korean sesame oil
Method
  1. Mix the beef and sugar together. Let it rest for 2 minutes, then add the soy sauce, garlic, scallions, pepper, and sesame oil. Toss the mixture well to integrate all the flavors, and let it stand at room temperature for a minimum of 1 hour (or overnight in the refrigerator) to allow the meat to mature.
  2. Preheat a large, heavy skillet over moderate heat for 2 minutes. Add the beef slices, along with any remaining marinade, to the skillet. Stir fry, without oil, for 2-3 minutes, until done.
Kom Tang (original recipe; my notes on what I changed, after)
Ingredients
  • 8 cups water
  • 3-5 beef knuckles with meat and cartilage attached, well rinsed
  • 1 carrot, halved lengthwise
  • 1 medium-size onion, halved
  • 1 Korean radish, peeled and cut into a 4-inch piece
  • 1 tsp salt, or to taste
  • 5 scallions, sliced thin
  • 1 tsp toasted sesame seeds
  • 1 tsp hot chili powder
  • 1 tsp chopped fresh ginger
Method
  1. Bring the water, bones, carrot, onion, and radish to a boil over high heat for 20 minutes. Skim off and discard the foam. Reduce the heat to low and simmer, covered, for at least 2 hours, which should be sufficient to tenderize the ingredients.
  2. Remove the bones from the broth; cut off the meat and cartilage and cut into 1/2-inch cubes. Discard the carrot and onion.
  3. Slice the radish into thin 1-inch squares. Add to the hot broth with the meat pieces, salt, scallions, sesame seeds, hot chili powder, and ginger. Mix briskly and serve immediately.
My Changes
  1. I used beef neck bones.
  2. I used Daikon radish, and sliced it into 1-inch pieces from the outset.
  3. I skimmed the foam at the beginning and at the end.
  4. I did not remove the meat/cartilage from the bone and instead served with the bones intact.
  5. I did not remove the carrot or onion.
  6. I did not add the ingredients from the scallions onward, at the end.
  7. I ended up simmering the soup for 4-5 hours, as I was preparing the rest of the meal.

Tuesday, January 19, 2010

A Simple Meal

I recently saw the movie "It's Complicated." This is not a movie review blog so I won't go in depth about it, but food-wise, it made two big impressions on me: 1) One day I'd like to have a vegetable garden as amazingly awesome as that of the heroine; and 2) I needed to find out what croque monsieur was, and then I needed to make it and eat it.

Croque Monsieur & Caesar Salad

It turns out that croque monsieur is a very simple, no-fuss affair, easy to prepare and even better to eat. It's what the French consider fast food. You really can't go wrong with a croque monsieur, unless you don't like bread. Or cheese. Or ham. But how could that possibly be?

Putting it together is simple. There's some debate about whether the croque monsieur is made with two slices of bread (similar to a grilled cheese sandwich, sometimes with additional cheese melted on top) or one. In the movie, from which I derived my inspiration, it was served as an open-faced sandwich, so that's how I made it. I used part of a baguette from the best bakery I know (West Seattle's Bakery Nouveau), slicing that in half to make two croque monsieurs, but any thick, hearty bread would work. I placed a slice of ham on each half, and topped with Beecher's Reserve (a very sharp white cheddar). Traditional croque monsieur is made with gruyere or emmenthal, but I wanted to use what I had on hand. The two halves were then baked until the cheese was melted and starting to brown. Next time I'll have to use the broiler instead; I think that would have browned the cheese much faster and with better results.

You can play with ingredients. Rub a garlic clove on the bread before adding the other ingredients. Place a fried egg on top and you have a croque madame. Include some tomato slices and you've got yourself a croque provencal. The sky is the limit! Though I think simplicity is really the key.

Finally, I had to have something to accompany the heavy bread/cheese/ham meal. A Caesar salad sounded just right. The recipe I used made a dressing that was tangy and light and flavorful -- and very unlike most restaurants' Caesar dressing. Paired together with the Croque Monsieur, it was a simple meal, but packed with delightful flavor explosions that made me look forward to the next time I could have it again.

Croque Monsieur (open faced)

Ingredients

  • 2 slices of thick, hearty bread (such as a portion of baguette sliced on the horizontal then in half on the vertical)
  • 2 slices of ham
  • 2 slices of cheese (gruyere, emmenthal, or cheddar)

Method

  1. Preheat broiler, or oven to as high as it will go, with a rack placed on the top shelf.
  2. Layer ham on top of the bread, followed by the cheese. Place on a baking sheet, preferably lined with foil, to catch cheese drips.
  3. Broil or bake for 5-10 minutes, or until the cheese has melted and has started to brown.

Caesar Salad (adapted from Mark Bittman's How to Cook Everything)

Ingredients

  • 1/2 garlic clove
  • 2 eggs
  • 2 tbsp freshly squeezed lemon juice
  • 2 tbsp minced anchovies
  • 6 tbsp extra virgin olive oil
  • dash of Worcestershire sauce
  • salt & pepper
  • 1/2-1 cup shredded parmesan cheese
  • 1 heart of romaine lettuce, washed, cut, and dried*
  • croutons, if desired
  • additional protein, if desired (chicken, steak, shrimp, etc.)

Method

  1. Rub the inside of your salad bowl with the garlic (discard when done). Seems like a waste of perfectly good garlic to me; next time maybe I'll just crush it into the dressing.
  2. Bring a small pot of water to boil. Pierce the broad side of the eggs with a pin/needle. I don't know why that's necessary but I did it ... and let me tell you, piercing an egg shell with a pin/needle without breaking the whole thing open is more time consuming than it should be!
  3. Boil the eggs for 60-90 seconds. Crack the eggs into the salad bowl -- they'll have only just started to firm up. Scoop out the white clinging to the shell. Beat well with a fork.
  4. Gradually add the lemon juice, then the olive oil, whisking with the fork the whole time.
  5. Add the anchovies and combine. You could also skip them entirely ... apparently the original Caesar salad didn't have anchovy in it; it only had that slight flavor from the Worcestershire sauce. I didn't have any W. sauce on hand and I do like anchovies, so I used them and skipped the W.
  6. Add W. sauce, then add salt and pepper to taste (be pretty generous with the pepper).
  7. Put the romaine lettuce into the bowl and toss well. Add the parmesan cheese over the top. I like mine totally incorporated so I tossed it again once I added the cheese.
  8. Top with croutons, chicken, steak, shrimp, etc., if you're making this into a substantial meal.

* I found that there was actually way more dressing than needed, so next time I'll either double the amount of lettuce or cut the recipe in half. I prefer my salads to be lightly dressed.

Tuesday, February 10, 2009

Hodge Podge Salad

Today I'm going to talk about salad. No, not the kind involving greens with some other stuff thrown on top along with a drizzle of dressing. That's not difficult for most people to put together (though it can be very time consuming, depending on what you like to have in your salad). The kind of salad I'm talking about is the kind where you mix together bite-sized ingredients that's held together by mayonnaise (or mayonnaise-like substance). Think potato salad, egg salad, chicken salad, etc.


In fact, I'm currently reading Two for the Road by Jane and Michael Stern, and this is the kind of salad that would fit quite nicely in salad bars in Iowa: "Salad bars in Iowa do not hold a shred of lettuce. Instead they carry things such as multicolored Jell-O, fruits and vegetables slathered with Miracle Whip or sour cream, and chocolate, tapioca, and vanilla puddings."

The recipe I'm sharing today may not look very fancy. It may not sound very fancy. It doesn't even have a name -- my grandmother just called it "salad" -- so I've given it one. But it has the most important quality I look for in food: it's delicious. And it's a dish near and dear to my heart, as it's something my grandmother used to make when I was a little girl. I don't know how she got it into her head to make this, or if she got the recipe from somewhere, but I'm glad she did.

A quick review of the ingredients may turn some people off. Believe me, I'd be one of those people had I not already tried it without any biases. I am specifically referring to, of course, Miracle Whip. Those who don't like mayonnaise-type dressings are already gagging, and even those who DO like mayonnaise are gagging, because a majority of people, I've found, prefer 'real' mayonnaise. In fact, I don't think I have ever heard of anyone stand up for Miracle Whip, and yet the product is still on the shelves, so someone must be buying it.

I am not here to defend Miracle Whip in a general sense. If I'm eating a sandwich or making ranch dressing, or probably 99% of other uses for mayonnaise, I prefer 'real' mayonnaise (homemade, if possible). But I've tried using mayonnaise in this dish. It doesn't work. The resulting product tastes bland, boring, unappetizing. Using Miracle Whip makes it delicious every time. Why that is, I don't know. But it works. And you don't have to fear -- using Miracle Whip in this salad not only transforms the salad, but transforms the Miracle Whip. You don't actually taste the dressing, but the combination of salad ingredients. It's as if you used mayonnaise, but added a few other undefinable seasonings as well. Make this for a potluck. It'll get rave reviews and it'll look so simple that people will go home and try to make it themselves. But somehow it won't taste the same as yours; it won't be the same as yours. And they'll be befuddled, because it's just 4 ingredients and some mayo; what did they do wrong? And only you and I will know that the difference was Miracle Whip.

There was something special about the way my grandmother made it that imitators find difficult to duplicate. I think the secret is its simplicity. My mom tried various ways of 'improving' on it, only to be told that it wasn't as good as grandma's. The ingredients that go into the salad, as well as the way in which they are cooked, are very particular in that they create the perfect texture that this salad is supposed to have. Nothing should stand out. When you're eating it, it should be a mouthful of yummyness, with no single ingredient distinguishing itself from the rest (such as the time my mom tried using raw carrots).

I don't have a precise recipe to share. I make it a little different every time. The quantities of the ingredients you use also depend on personal preference and how much you're making. There are 5 primary ingredients to this salad: ham (the Oscar Mayer kind), eggs, carrots, celery, and the aforementioned Miracle Whip. You can add peas, maybe some corn, maybe finely diced potato, without changing it too much. Anything else and it becomes a different salad entirely. In fact, if you add too much potato, it becomes a glorified potato salad. I recommended just sticking with the 5 primary ingredients for the best flavor and texture.


Now, how to go about putting it all together? Get a large bowl. The ham is the easiest part. All you need to do is chop it up into little bite-sized squares (it's conveniently already in the shape of a square, so I just slice it into rows on the vertical, then the horizontal) and place it in the bowl. The eggs need to be hard boiled. Then they too are sliced into bite-sized pieces and placed in the bowl. Include as much or as little egg yolk as you like. It has great nutritional value, but also a lot of cholesterol. The carrots should be peeled, then boiled to the point that they aren't crunchy anymore, but aren't mushy. They should still give a slight resistance to the tooth. The same goes for the celery. Celery in particular cooks very quickly, so all you need to do with them is basically blanch them for a minute in hot water. Both the carrots and celery should then be diced into -- you guessed it -- bite-sized pieces.

Now scoop out some Miracle Whip and add it to the bowl. (If you MUST use regular mayonnaise, you'll need to add some salt at the very least to bring out the flavor of the salad.) Mix well and add more dressing if needed. Since mayo and its ilk are all calorie fests, I like to add a bit at a time to make sure I'm using the minimum needed to make the salad come together. It shouldn't be gloopy with dressing, but the mixture should be well coated. Here's another important step: put it in the fridge. It will be very tempting to eat it straightaway, but it won't be as good. This salad needs to be given the time for the different flavors to mingle and served cold.

When I told my mom I was making it, she was like, but I thought you didn't really like mayo. And I said, yes, that's true, but I LOVE this salad, I don't know why. And she said, "Well, everybody likes it." That's really all that needs to be said.

Wednesday, December 3, 2008

A Post-Thanksgiving Thanksgiving

This year for Thanksgiving, I went to have hot pot with my cousin. The rest of our family is in Los Angeles, and without them, it wouldn't have felt like a real Thanksgiving anyway. We considered doing the turkey and fixings and the whole bit, but with just two of us, it just didn't seem worth the bother. Plus having turkey or poultry of any kind just hadn't particularly appeal to me for some time.

Then came post-Thanksgiving, with everyone posting pictures from their Thanksgiving feasts. Everyone's food looked so good. On top of that, I finished a writing project I'd been working on, the reward for which was being able to crack open The Zuni Cafe Cookbook, which had arrived a couple weeks before. I was just flipping through it when I came across a recipe for buttermilk mashed potatoes. I thought about the 15-lb bag of russet potatoes I had sitting in my kitchen. I thought about how good a piece of roasted chicken would taste with mashed potatoes. Uh oh. I was hooked.

The next day, I went to the store and bought a cooked rotisserie chicken (that's right -- I wanted instant gratification), canned pumpkin, and some salad fixings. Then I went home and made myself a truly satisfying post-Thanksgiving meal, including chicken, buttermilk mashed potatoes, garlic Brussels sprouts, salad, and even pumpkin pie.


The chicken was a little cold by the time everything else was ready, but that was okay. It wasn't the star. It provided some lovely contrast and texture (nothing replaces meat when it comes to making my mouth and stomach satisfied), but it was all the components working together that made the meal great. I of course did not have room for pumpkin pie after everything else, but it was still cooling anyway.

Speaking of the pie, I was pretty happy with the way it came out. On Thanksgiving day my cousin had given me a generous slice of pumpkin pie that her "dessert slave" had made, and it was probably the best pumpkin pie I've ever had. It had a candied ginger and walnut topping on it, and was made with fresh roasted pumpkin. Maybe one day I'll have the energy/will to roast my own pumpkin then make a pie out of it, but that day was not yesterday. Until my cousin can track down the recipe for that one, I found a similar one online that I adapted to my own preferences (less sugar, and hazelnuts instead of walnuts -- I'm just not a big fan of walnuts).


The mashed potatoes were excellent, even though I used russet potatoes rather than the yellow potatoes Judy Rodgers suggests (as much as I love yellow and red potatoes, well, I had 15-lbs of russets!). She also claims that the buttermilk in them helps them keep really well, so since I love mashed potatoes, I went ahead and doubled her recipe.


The Brussels sprouts were a revelation. I'm fairly new to Brussels sprouts, and I've given several recipes a try, but this very simple method using olive oil, garlic, and salt was by far my favorite. They were so good I could have eaten them as a meal all on their own. Well, on any day but post-Thanksgiving day. Granted I'm not very experienced with buying Brussels sprouts, but I had never actually seen them on the stalk before. When I saw a beautiful stalk of them for only $2.50 each, I nabbed one. The sprouts were much fresher/cleaner than the ones I've purchased before off the stalk.


As for the salad, I used red-leaf lettuce and after making the potatoes, Brussels sprouts, and pie, I was too beat (and eager to start eating) to add anything else, though normally I would have included diced tomato (or halved cherry tomatoes), thinly sliced radishes, etc. I did, however, make the delicious yet simple balsamic vinaigrette that my cousin introduced me to awhile ago.

Perhaps best of all was getting to eat the leftovers of everything. I even busted out some of my stored bacon grease to make a cream gravy for the potatoes. Dipping bites of rotisserie chicken in mashed potatoes and gravy = heaven.


And now, onto the recipes! There are quite a few of them, but hopefully it won't be hard to find the one you're interested in.

Buttermilk Mashed Potatoes paraphrased from The Zuni Cafe Cookbook

Ingredients


  • 1 1/2 lbs potatoes (preferably yellow, but russets will work fine), peeled and chopped into 1 1/2" chunks
  • 2-3 tbsp milk, heavy cream, or half and half, heated
  • 2-3 tbsp buttermilk, room temperature
  • 3 tbsp butter, just melted so it's still warm
  • parsley or chives, to garnish (optional)
  • salt
  • water

Method

  1. Place potato chunks in a pot, then cover with cold water by about an inch. Add salt -- about 1 tsp per quart -- and mix, until you can just taste it in the water.
  2. Heat until boiling, then simmer for 8-15 minutes, until the potatoes are tender.
  3. Drain water. Put the potato chunks in a large bowl and mash. Add the heated milk/cream, mash. Add the buttermilk, mash. Finish with the melted butter. Whip/mash well.
  4. Salt the mashed potatoes to taste.
  5. Garnish with parsley or chives, if desired.

Judy Rodgers says it's good to have the cream and butter heated so that their addition doesn't cool down the potatoes too much. Buttermilk can't really be heated or it will separate. (I put it in the microwave for about 10 seconds, to at least take the chill off.) It seems so obvious now, but I can't tell you how many years I've been making mashed potatoes and just adding cold milk and cold butter, then wondering why it was impossible to keep mashed potatoes hot.

Cream Gravy from Homesick Texan

Ingredients:

  • 2 tbsp pan drippings, bacon grease or vegetable oil
  • 2 tbsp flour
  • 1 1/2 cups milk
  • 1 tsp cracked black pepper
  • salt to taste

Method

  1. Combine fat with flour in a hot skillet, continuously stirring, cook on medium for a couple of minutes until a dark roux is formed.
  2. Add milk slowly to skillet, and mix with roux using either a whisk or wooden spoon (be sure and press out any lumps).
  3. Turn heat to low and continue stirring until mixture is thickened, a couple more minutes.
  4. Add pepper and salt to taste.
  5. If gravy is too thick for your taste, you can thin it by adding either more milk or water a tablespoon at a time.

Garlic Brussels Sprouts

Ingredients

  • 8-10oz Brussels sprouts, washed, stemmed, trimmed, and halved
  • 3 large garlic cloves, minced
  • 2-3 tbsp extra virgin olive oil
  • salt to taste

Method

  1. Heat oil on medium-low heat in a saucepan large enough to hold the Brussels sprouts in one layer. (I used my wok.)
  2. When oil is hot, carefully add the Brussels sprouts -- the water droplets clinging to them from their wash will probably make the oil sizzle and crackle, possibly violently.
  3. Stir fry a bit, then turn each sprout onto its flat side.
  4. Cover the pan, turn the heat down a little lower, then cook until the sprouts are tender and their flat sides are nicely browned (about 10-12 minutes).
  5. Add the garlic and stir fry for about 30 seconds.
  6. Add salt to taste, stir fry a few seconds more, then serve.

My notes: You don't want to use heat that's too high because they'll brown too quickly without having enough time to get cooked by the steam. Also, I find that salt greatly enhances Brussels sprouts. It won't save them if they're cooked beyond hope, but salting them a bit more generously than you might salt other foods is highly recommended by me!

Pumpkin Pie with Hazelnut and Ginger Streusel

Ingredients:

  • 1 pie shell, frozen or homemade

For the Pie Filling

  • 3 eggs
  • 1 can (15 ounces) solid-pack pumpkin
  • 1 cup heavy whipping cream
  • 1/3 cup packed brown sugar
  • 1 1/2 teaspoons ground cinnamon
  • 1/2 teaspoon salt
  • 1/4 teaspoon ground allspice
  • 1/4 teaspoon ground nutmeg
  • 1/4 teaspoon ground cloves

For the Streusel

  • 1/2 cup all-purpose flour
  • 1/4 cup packed brown sugar
  • 4 tbsp cold butter
  • 1/4 cup chopped hazelnuts
  • 1/3 cup finely chopped candied or crystallized ginger

Method

  1. Preheat oven to 350°F.
  2. In a large bowl, whisk together the eggs, pumpkin, cream, sugar, salt, and all the spices.
  3. Pour the mixture into a prepared pie shell.
  4. Bake at 350° for 40 minutes.
  5. To make the streusel, in a small bowl combine the flour and brown sugar. Using a pastry blender or fork, cut in the butter until crumbly. Mix in the hazelnuts and ginger.
  6. Remove the pie from the oven, and gently sprinkle the streusel over the filling.
  7. Bake for an additional 20-30 minutes longer or until a knife inserted near the center comes out clean. Cool on a wire rack.


Here's the pie, pre-streusel topping.


A messy, but delicious slice of pie.

My notes: This pie is plenty sweet, even though I cut the sugar in the filling from 3/4 cup to 1/3 cup, and the streusel topping from 1/2 cup to 1/3 cup (from the original recipe). I can't imagine how cloyingly sweet it would have been if I hadn't made those adjustments. When I make this again, whether for this recipe or the one my cousin finds, I'll probably toast the hazelnuts ahead of time and skin them as well. I already cut down on the liquid some since I cut down the sugar, but if I made this again I would probably cut it down even further.

Balsamic Vinaigrette Salad Dressing

Ingredients

  • 1 small shallot, sliced or diced (about 1 tbsp)
  • 1 tsp red wine vinegar
  • 2 tsp balsamic vinegar
  • 2-3 tbsp extra virgin olive oil

Method

  1. Soak shallot in a small bowl with the vinegars for 10-15 minutes.
  2. Add the olive oil and mix well, then toss with salad.

My notes: I usually use 2 tbsp of olive oil, but that's because I like my dressing a little more acidic. My cousin prefers using 3 tbsp of oil for a milder taste.