Showing posts with label spinach. Show all posts

Saturday, January 21, 2012

Homemade Spinach Pasta

It's been snowing... and snowing... and snowing in Seattle. I've pretty much been shut in my house for the last 5 days or so, which I suppose is what inspired me to finally do something I've been meaning to do for ages... make my own pasta. I guess it's always been an intimidating concept, despite having the pasta roller/cutter attachments to my KitchenAid mixer for years. And like so many things that seem daunting, in practice it wasn't at all. It was easy and fun.

Homemade Spinach Pasta

You start with some basic ingredients: flour and eggs. My first batch of pasta was just a plain egg pasta; couldn't have been easier. It took 2 eggs and 1 cup plus of flour. I'm blogging about my second attempt, which was basically just like egg pasta, except you add spinach to create a lovely green pasta. Anyway, you start with a mound of flour, creating a well in the center, where you add the eggs. Start beating the eggs (and spinach) as you would scrambled eggs, adding flour from the sides of the well as you beat. Keep adding flour slowly, because depending on numerous factors you may not need the full amount of flour. You may also need more. If the dough is still sticky even after you've used up all the flour you began with, keep adding flour a bit at a time as you knead until the dough no longer sticks to your hand.

I based the recipe and method that I used on Marcella Hazan's Essentials of Classic Italian Cooking and Canal House Cooking Volume No. 7: La Dolce Vita. They're both wonderful and I recommend them highly. I particularly enjoy how Hazan flat out states her honest opinions on various ingredients and methods.

If you want to use spinach, you'll need about 10 ounces. Clean it thoroughly so that no trace of dirt remains, and remove the stems (or use baby spinach, as I did). Get a pot and place the clean, wet leaves inside, and cook over medium heat with 1 tbsp of salt. No other water is needed. Cook for about 5 minutes or until the leaves are tender, then rinse with cold water. Using your hands, squeeze as much water out of the spinach as possible, then chop it up. It should be added to the flour well at the same time as the eggs.

DSC 8771

Although I am a fan of using my mixer to knead dough, Hazan recommends doing it by hand, so I did. Immediately after incorporating all the starting ingredients, this is what I had. I continued to knead for about 8-10 minutes, in that time adding more flour. I started with 1 1/2 cups of flour; in the end I used about 2 cups. It all depends on the temperature and humidity of your kitchen, what kind of day it is, etc. You may use more or less.

DSC 8774

What you want is a final ball of dough that's smooth and tacky but not sticky. The biggest mistake that people make when they make pasta at home is a dough that's too wet. A too-wet dough will be difficult to handle, and will also stick to your rollers/cutters, creating a mess to clean up.

DSC 8776

What you need a lot of when you make pasta at home is -- space. Particularly if you're using a machine to roll and cut your pasta (which, unless you desire wider noodles such as tagliatelle or shapes such as orecchiette, I highly recommend -- you get a much more uniform result, and the pasta is thinner than a normal home cook would be able to create by hand), you're going to end up with some very long, thin sheets of pasta that need to be kept separate from one another.

First, you have to roll the pasta. Divide your dough into six parts (or three parts for every egg you used). Start the roller on the widest setting. Flatten out one of the portions of dough, then run it through the roller. Fold it into thirds as you would a letter, then press the dough around the folds so as to remove as much air as possible. Run it through again on the narrow end, fold into thirds again, and run through again, a total of three times. Lay the dough onto some dry paper towels and repeat with each portion of dough.

DSC 8777

When all the portions of dough have gone through the widest setting, set the roller to the next setting up (narrowing the rollers). Run each sheet through. Keep going to the next setting until each sheet of pasta is the desired thickness (I stopped at the second to last setting). You'll notice as you run each sheet through the roller at the next-narrowest setting that they'll get longer and longer and longer, so make sure you have the space for them -- let them hang off the edge of your table if need be! For the ones that got really long (my dough portions weren't even), I ended up cutting in half with a sharp knife.

DSC 8780

Once you've got your sheets of pasta at the desired thickness, wait for them to dry a bit -- this is particularly important if you want to store your pasta rather than using it right away. Hazan recommends waiting at least 10 minutes, but again it depends on your house/kitchen. I waited for about half an hour, flipping the sheets occasionally. You want the pasta to still be pliable, but dry enough that the strands/shapes won't stick together once they're cut.

DSC 8783

Once you've reached that point, you're ready to cut! I made fettuccine. Because the dough wasn't too wet, it slid easily through the cutter, leaving no extra bits of dough behind. At this point, you can cook the pasta. Fresh pasta requires less time to cook than dry, and cook times depend on the cut. For my fettuccine, I cooked it for about 4-5 minutes to get it al dente.

DSC 8784

For storing long noodles, Hazan recommends creating "nests" from several strands, so that they can be easily stored in an airtight container. Just let the pasta sit out at least 24 hours for the pasta to become completely dry -- otherwise it'll develop mold once you put it in storage. If you let it dry out properly, it will keep in your cupboard for months, just like store-bought dried pasta.

DSC 8786

Be careful with the pasta once it's dry... it will be extremely brittle. According to Hazan, air drying is a natural process and the pasta will retain its original nutritional value and flavor once reconstituted (unlike what is marketed today as "fresh pasta" in the grocery stores, using artificial means to keep it soft and pliable). Fully dried pasta will take a little longer to cook than when using it fresh.

Monday, May 3, 2010

My First-Ever Korean Table

I have long enjoyed Korean cuisine, but have never attempted to make it myself. Like Indian cuisine, it always seemed rather daunting, even though the ingredients are fairly common (unlike Indian spices). Recently, I decided to make a full-Korean meal for members of my family, including banchan and dessert. I was somewhat trepidatious, as I generally like to test recipes on myself before inflicting them on others. :-)

It was a long, arduous undertaking, but I did it, and most everything was well received. I waffled between making little dishes of banchan myself or buying it, but in the end the things I wanted were simple enough, and only ended up buying the kimchi (I'm not sure I'll ever come to a point where I'll feel I need to make THAT myself).

One learning that came from this experience is that it's well worth taking the time to make the main courses, but maybe not so much the banchan unless I'm feeding a lot of people over the course of several days. The banchan dishes I chose, while very simple to prepare, are nevertheless time consuming, especially when preparing a bunch of other dishes, as I did.

Here, then, are the various dishes I made, along with a few cooking notes and how each was received.

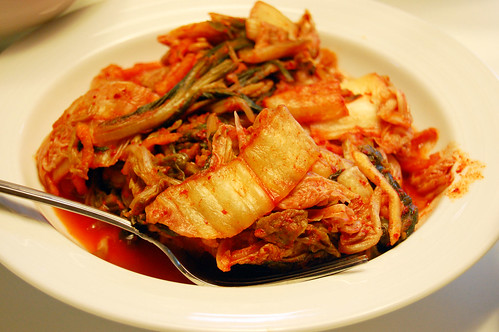
Kimchee
Kimchi, the only dish not made from scratch. It was okay.  I have yet to find a brand of store-bought kimchi that I really like. The kind served at Korean restaurants tend to be much better than what I can find at the grocery store (even H-Mart, a Korean grocery store).

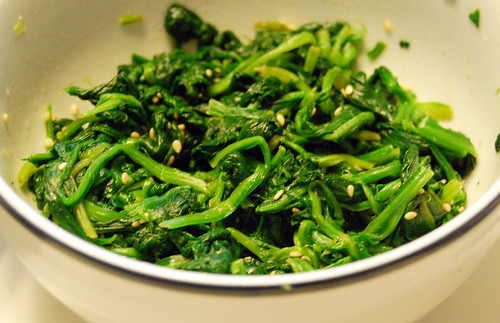
Seasoned Spinach
Sigeumchi Namul, or seasoned spinach, made by dropping the spinach into hot water for 1 minute, then seasoning with sesame seeds, sesame oil, and salt. Very good and simple, but quite a bit of work due to all the washing that's required.

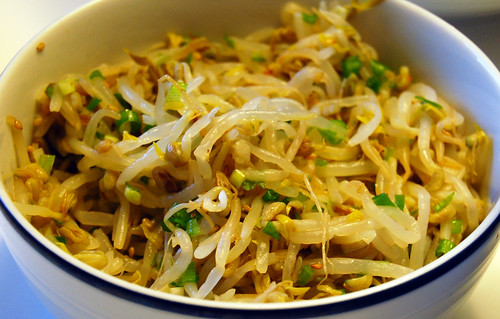
Seasoned Mung Bean Sprouts
Kong Namul, or seasoned bean sprouts, made by steaming the sprouts (in this case, mung bean sprouts, though traditionally it is made with soy bean sprouts) for a few minutes, then seasoning with scallions, sesame seeds, sesame oil, and salt. Very good and simple, but a bit time consuming.

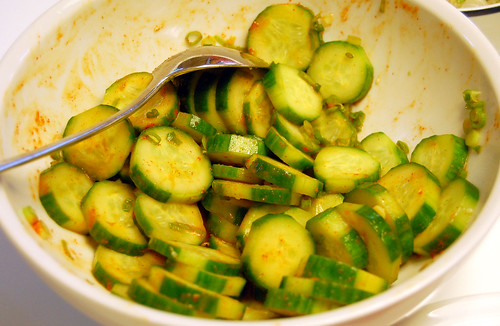
Seasoned Spicy Cucumbers
Oi Muchim, or spicy cucumber salad. Small Persian or Kirby cucumbers are sliced, then mixed with scallions, sesame oil, cider vinegar, and gochujang. This was only okay, even though it's usually one of my favorite banchan. The problem was that the gochujang I used was WAY too spicy, so that I wasn't able to put much of it in. That made the cucumbers under-seasoned.

Korean Mixed Simple Salad
Sangchu Kutjuri, or mixed simple salad, which I've found to be ubiquitous during Korean barbecue meals. However, I'm not sure how traditional it actually is, as it was actually difficult to find a Korean cookbook that had a recipe for it. It's red-leaf lettuce, hand shredded, with thinly sliced scallions and a simple dressing that's sweet, savory, and sour all at once. It's wonderful. My version was pretty good, but not nearly as good as I've had at restaurants. More experimentation is a must!

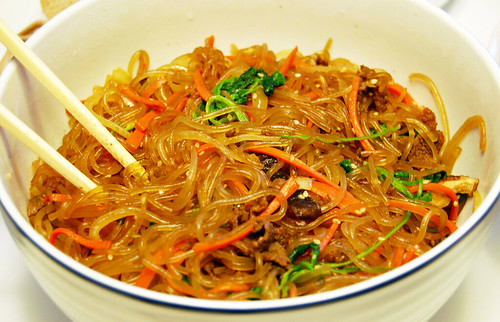
Jap Chae
Jap Chae, or glass noodles with beef and vegetables. This went down like gangbusters. Everyone loved it. It was delicious, and very authentic tasting. The glass noodles are made from sweet potato starch, and turn translucent when stir fried. The noodles are mixed with seasoned beef, matchstick carrots, onion, shitake mushrooms, and spinach (which I added a bit late, so it's kind of clumpy in the dish). Really wonderful, well worth the time it took to make.

Bulgogi
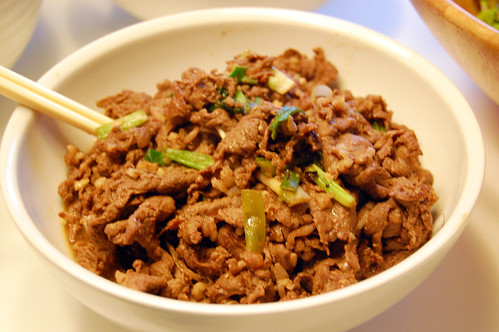
Bulgogi, or the well-known sweet and savory "barbecued" beef that's thinly sliced. This was an incredibly simple and delicious dish -- all that's needed is for the beef to mature in the marinade. Also a hit with everyone.

Ginger Jelly Dessert
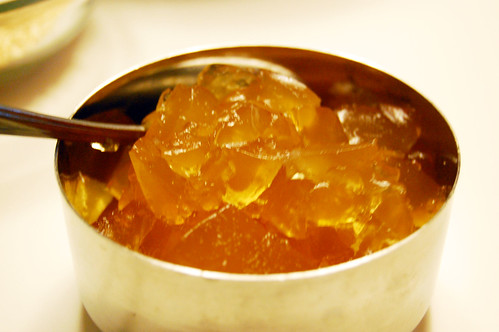
Saenggang Jelly, or ginger jelly. Most decidedly NOT a hit with everyone. First you have to really, REALLY enjoy the taste of ginger. Then you have to enjoy the heat in your mouth after a few mouthfuls of this super strong dessert. It creeps up on you, and just isn't very pleasant. Even those among us who enjoy ginger a lot couldn't handle eating all of it. Granted, we didn't drizzle it with dark corn syrup as the recipe indicated (because we didn't have any), so I don't know if that would have made a big difference. Honestly though, I can't remember EVER having a Korean dessert in a restaurant setting, and recipes for them in cookbooks seem very sparse; maybe dessert just isn't a forte of the cuisine.

I also made something else that I neglected to take a picture of, that everyone absolutely loved: Kom Tang, or beef bone soup. I actually don't even know how Korean it was, since I made a lot of adjustments, especially toward the end when I was running out of time. The recipe calls for beef knuckles, but I couldn't find it at either H-Mart nor 99 Ranch, so I ended up using beef neck bones instead. That right there might make it un-Korean, I don't know. I was also supposed to cut the meat and cartilage from the bones and drop the former but not the latter back into the soup; I skipped this step entirely. We're used to eating meat from bones in soup, after all. I also did not remove the carrot and onion, again due to time contraint. I used daikon, which I had on hand, which I'm not sure if that can be considered "Korean radish" (the recipe does not get more specific than that). Finally, I neglected to add all of the ingredients that I was supposed to at the end, because I just plain forgot, lol. Yet, as I said, everyone LOVED the soup!

I wanted to make "purple rice," which seems to be pretty standard at Korean restaurants, but it turns out that you have to soak black rice (a bit of black rice mixed with white rice is what turns the rice violet in color) for hours and hours before it softens enough to be cooked with white rice, which I didn't realize. So we just had regular sticky white rice.

All in all, a big success, and a few of these dishes will likely find themselves in my permanent repertoire!

Jap Chae (recipe adapted from The Korean Table)

Ingredients:
  • 1 tbsp Sweet Soy Base Sauce (recipe follows)
  • 1 tbsp minced green onion
  • 1 tsp dark sesame oil
  • 1/4 lb sirloin tips or ribeye steak, cut into matchstick strips
  • 5 oz dried Korean vermicelli noodles
  • 1/2 lb spinach
  • 2 tbsp canola or other neutral oil
  • 1 small onion, sliced
  • 1 carrot, peeled and cut into matchstick strips
  • 8 dried shitake mushrooms, reconstituted in water and cut into matchstick strips
  • 1 tbsp dark sesame oil
  • 5 tbsp Sweet Soy Base Sauce
  • 1 tbsp roasted sesame seeds
  • salt and pepper to taste
Method
  1. In a small bowl, add the beef and the first 3 ingredients to make the marinade. Toss the beef strips until thoroughly coated. Let the beef marinate while preparing the other ingredients.
  2. Place the dried noodles in a large heatproof mixing bowl. Pour about 4 cups of boiling water over the noodles and let soften, about 8 minutes. Drain the noodles. If they get sticky just give them a quick rinse with warm water.
  3. Fill a medium saucepan halfway with water and bring to a boil. Add the spinach and cook for 1 minute. Drain and set aside.
  4. In a large skillet, add 1 tbsp of canola oil and place over medium heat. Stir-fry the onion, carrot, and mushrooms separately, seasoning each with a pinch of salt. Add additional oil to the skillet as needed. Place each vegetable, when done, into a large serving bowl.
  5. In the same skillet, add the beef and stir-fry for 3 minutes. Add to the serving bowl.
  6. To the skillet, add the 1 tbsp of sesame oil and the 5 tablespoons of Sweet Soy Base Sauce. Bring to a boil. Add the softened cellophane noodles and mix well. The noodles will become transparent over the heat.
  7. Add the noodles to the serving bowl along with the cooked vegetables and beef. Toss until the ingredients are evenly distributed. Taste and season with salt and pepper if needed.
Sweet Soy Base Sauce
Ingredients
  • 1/2 cup water
  • 4 cloves garlic, thinly sliced
  • 6 thin slices of fresh ginger, peeled
  • 1 tsp black peppercorns, crushed
  • 1 cup low-sodium soy sauce
  • 1/2 cup light brown sugar
  • 1/4 cup red or white wine
Method
  1. Combine water, garlic, and peppercorns in a medium saucepan and bring to a boil. Lower the heat and simmer for 10 minutes.
  2. Add the soy sauce, brown sugar, and wine. Turn the heat to high and boil for 2 minutes.
  3. Remove from the heat and let it cool to room temperature.
  4. Strain the sauce through a sieve into a large mixing bowl. Discard the solids.
Bulgogi (recipe adapted from The Korean Kitchen)
Ingredients
  • 1 1/2 lbs boneless rib steak, cut into very thin slices 5-6 inches long by 2 inches wide
  • 4 tsp sugar
  • 1/4 cup soy sauce
  • 3 garlic cloves, crushed or chopped fine
  • 3 scallions, cut into 1-inch pieces
  • 1/4 tsp pepper
  • 1 tsp Korean sesame oil
Method
  1. Mix the beef and sugar together. Let it rest for 2 minutes, then add the soy sauce, garlic, scallions, pepper, and sesame oil. Toss the mixture well to integrate all the flavors, and let it stand at room temperature for a minimum of 1 hour (or overnight in the refrigerator) to allow the meat to mature.
  2. Preheat a large, heavy skillet over moderate heat for 2 minutes. Add the beef slices, along with any remaining marinade, to the skillet. Stir fry, without oil, for 2-3 minutes, until done.
Kom Tang (original recipe; my notes on what I changed, after)
Ingredients
  • 8 cups water
  • 3-5 beef knuckles with meat and cartilage attached, well rinsed
  • 1 carrot, halved lengthwise
  • 1 medium-size onion, halved
  • 1 Korean radish, peeled and cut into a 4-inch piece
  • 1 tsp salt, or to taste
  • 5 scallions, sliced thin
  • 1 tsp toasted sesame seeds
  • 1 tsp hot chili powder
  • 1 tsp chopped fresh ginger
Method
  1. Bring the water, bones, carrot, onion, and radish to a boil over high heat for 20 minutes. Skim off and discard the foam. Reduce the heat to low and simmer, covered, for at least 2 hours, which should be sufficient to tenderize the ingredients.
  2. Remove the bones from the broth; cut off the meat and cartilage and cut into 1/2-inch cubes. Discard the carrot and onion.
  3. Slice the radish into thin 1-inch squares. Add to the hot broth with the meat pieces, salt, scallions, sesame seeds, hot chili powder, and ginger. Mix briskly and serve immediately.
My Changes
  1. I used beef neck bones.
  2. I used Daikon radish, and sliced it into 1-inch pieces from the outset.
  3. I skimmed the foam at the beginning and at the end.
  4. I did not remove the meat/cartilage from the bone and instead served with the bones intact.
  5. I did not remove the carrot or onion.
  6. I did not add the ingredients from the scallions onward, at the end.
  7. I ended up simmering the soup for 4-5 hours, as I was preparing the rest of the meal.

Friday, August 14, 2009

Spinach & Feta Cream Cheese Spread

This is one of those recipes that Jade and I discovered ages ago, when I liked cooking, but it wasn't the passion it is now. Many of the recipes that I used to make from that period involved pre-prepared food (you know, such as mixes, or juice I wouldn't squeeze myself, or "helper"-type things), and when I revisit them from time to time, more often than not I end up tossing the recipes away. Not only because they may involve ingredients that I can't pronounce, but because it just doesn't taste very good. Preparing fresh food has spoiled me (in a good way).


This is not one of those recipes. It might involve some pre-preparedness, but it's not the kind I feel guilty about -- I still know what's going into it. As for flavor, well, that's stood the test of time. This is just as yummy as I remember it being, the feta and garlic lending bite to the cream cheese, the spinach giving it depth and color, and the yogurt to thin and smooth everything out. I actually adapted the recipe from the original to include the yogurt, because I'm actually using this as a veggie dip this time, and without the yogurt it's more of a spread. In fact, even with the yogurt it's still quite thick and can be easily spread on crackers. I think I actually like this version better than the old; next time I'm going to add a handful of pine nuts as well. I think the flavor and crunch of the nuts would complement the other flavors very nicely -- but only if it's going to be served immediately. Otherwise the nuts will get soggy and it won't be such a great addition.

The pre-preparedness comes in the form of frozen chopped spinach (you can use fresh if you like) and crushed garlic from Trader Joe's (you can crush fresh garlic if you like). I used a block of feta and crumbled it myself; to save time you can buy the pre-crumbled kind in a tub. As Jade notes you can mix everything together in a food processor, but this comes together easily with a big bowl and a fork -- just make sure you mix everything thoroughly.

This recipe is also very flexible and should be made according to your own taste; add more feta, less garlic, whatever pleases your taste buds.


Spinach & Feta Cream Cheese Spread

Ingredients
  • 8oz cream cheese
  • 4oz feta cheese, crumbled
  • 10oz frozen chopped spinach, thawed and drained completely of water
  • 1 1/2 tsp crushed garlic
  • 1/3 cup plain yogurt (optional)
  • 2 tbsp pine nuts (optional)

Method

  1. Thoroughly mix the cream cheese and feta cheese together, crushing the feta so it melds with the cream cheese.
  2. Add the spinach and garlic, combining until there are no big patches of plain cream cheese.
  3. If using, add the yogurt to thin out the mixture, again mixing well. Add more yogurt by the tablespoon to achieve desired consistency. Finally, mix in the pine nuts.
  4. Serve with crackers and/or fresh-cut veggies. (You can easily prepare this spread ahead of time and set it out at room temperature 30 minutes before serving. If using the pine nuts, however, serve immediately.)

Tuesday, May 19, 2009

Indian Cuisine at Home

I love Indian cuisine, and so do my cousin and her husband. So when they asked me to cook up an Indian meal for them last weekend, I obliged happily.

One of the reasons I jump at the chance to make Indian food is because in order to make one or two dishes, you have to pretty much stock up on spices. And once you've stocked up on spices (which are usually sold in quantities far greater than you need for one meal), you don't want them to go to waste, do you? Of course not.


Another reason Indian cuisine is great is because it's easy to satisfy both vegetarians and non-vegetarians alike. I've always thought that if I were a vegetarian, I'd have to eat Indian food a lot, because it's one of the few ways that vegetables are so infused with flavor that I barely notice the absence of meat (not that I don't like vegetables on their own, but if I have them solely and repeatedly, I really notice the absence of meat).


At first I was going to make two dishes -- aloo gobi and murgh makhani, along with homemade raita and naan. But then I started to feel bad that my cousin and I would have sauce to eat with our naan while the aloo gobi was dry so my cousin's husband wouldn't (he's a vegetarian). At the last minute I decided to make palak paneer ... the only problem being that I didn't have the time to make paneer, and I don't have an Indian grocery store close enough to me to make the trip worth it. And to be honest, I wasn't really heart broken about it; while I enjoy making my own paneer, I'm rather indifferent to eating it. It turns out that my cousin and her husband feel the same way, so it was all for the best. I ended up replacing the cheese with peas (as the palak on its own seemed to need a bit of chunkiness), and thus creating "palak mattar." Hee. I'm going to be making it that way from now on -- just as yummy, in my opinion, but easier and fewer calories.

The raita, which we like to eat with pretty much everything, was delicious, and the naan was as well, even if it didn't turn out quite as aesthetically pleasing as I had wanted (though there were some nice-looking pieces; the kids got to them before I could take a picture). The murgh makhani's sauce was absolutely perfect; it tasted just the the butter chicken I've had in restaurants. The only thing I'll change for next time is the kind of chicken meat I used -- breast rather than thigh. I prefer dark meat, and this dish is usually made with it, but at the time I went to the store they didn't have anything but breasts.

For dessert we had a wonderful cheesecake, but that's going to have to wait for another post. :-)

Palak Mattar (recipe adapted from here)


Ingredients:
  • 1 10oz package of frozen chopped spinach or 4 cups of fresh, finely chopped spinach
  • 3/4 cup of frozen peas
  • 2 medium tomatoes
  • 1 tsp chopped ginger
  • 1 tsp coriander powder
  • 1/2 tsp turmeric powder
  • 1/2 tsp red chili powder
  • 1 tbsp oil
  • 1/2 tsp cumin seed
  • pinch of asofetida
  • 1/2 tsp salt, or to taste
  • 2 tbsp of whole wheat flour
  • 1/3 cup heavy cream

Method:

  1. If you're using frozen spinach, thaw it and squeeze out the water.
  2. In a blender, puree the tomatoes and ginger together.
  3. Mix together the coriander, turmeric, and red chili powder with the tomato puree and set it aside.
  4. Mix the whole wheat flour with the heavy cream and set that aside as well.
  5. Heat the oil in a saucepan. Test the heat by adding one cumin seed to the oil; it should sizzle enthusiastically. If it doesn't the oil's not hot enough.
  6. Add the asofetida and cumin seeds. Let the seeds sizzle for a bit, then add the tomato puree mixture and let it cook for a few minutes until the tomato puree is reduced by about half.
  7. Add the spinach, mix well, and let it cook on medium low heat for about 10 minutes, covered.
  8. Add heavy cream mixture cook another 5 minutes or so.
  9. Add the peas and fold them gently into spinach. Let the dish simmer for about 3 minutes, or until heated through, then serve immediately.
Aloo Gobi (recipe adapted from here)


Ingredients:
  • 1 medium-sized cauliflower, cut into bite-size florets
  • 2 large potatoes, cut into bite size pieces
  • 1 cup frozen green peas
  • 2 tbsp oil
  • 1/4 cup water
  • 1/2 tsp cumin seeds
  • pinch of asofetida
  • 1/2 tsp turmeric powder
  • 1 medium onion, diced
  • 1 inch piece ginger, minced or grated
  • 5 cloves garlic, minced
  • 2 large tomatoes, chopped
  • 2 tsp coriander powder
  • 1 tsp cumin powder
  • 1 tsp garam masala
  • red chili powder, to taste
  • 1/2 tsp amchur (mango powder)
  • salt, to taste
  • 5 sprigs cilantro, chopped

Method:

  1. Heat oil in a large pot.
  2. Test if the oil is ready by adding a cumin seed -- it should sizzle enthusiastically right away. When the oil is hot, add all the cumin seeds and let them to sizzle for a few moments.
  3. Add the asofetida, turmeric powder, and diced onion. Saute about 3 minutes.
  4. Add the ginger and garlic to the onions. Saute until the onions are soft and just beginning to brown. Stir frequently.
  5. Mix in the tomatoes and cook until the tomatoes have broken down quite a bit and the oil starts to separate from the mixture. Stir frequently.
  6. While the tomatoes are cooking, place the potatoes in a microwave safe bowl, sprinkle on a little salt, add 1/4 cup water, cover the bowl, and microwave for about 3-5 minutes, until they are about half cooked.
  7. Wash the cauliflower florets and place them in a microwave safe bowl, cover it, and microwave for about 3-5 minutes, until they are about half cooked. Lightly salt the cauliflower while it is still warm. (Please note that you salt the potatoes before they're microwaved and the cauliflower after. Also you can skip the microwaving step altogether, it'll just take longer to cook.)
  8. Once oil has separated from the tomato mixture, add the coriander powder, garam masala, red chili powder, cumin powder, amchur and salt to taste, then mix well.
  9. Add the half-cooked potatoes, mix well to coat all the potato pieces with spices, and turn the heat to medium low. Cover and cook for 5 minutes, or until the potatoes are tender but not breaking apart.
  10. Add the green peas and half-cooked cauliflower and mix well to evenly coat the cauliflower with spices. Cover and cook until all veggies are tender.
  11. Take the pot off the heat and mix in the chopped cilantro.
Murgh Makhani (recipe adapted from here)


Ingredients
  • 1 lb chicken thighs, cut into bite-sized pieces
  • 2-3 tbsp butter
  • 4 shallots, sliced into thin strips
  • 2 tsp lemon juice
  • 1 tbsp ginger, grated
  • 1 tbsp garlic, minced
  • 1 tbsp garam masala
  • 1 tsp chili powder
  • 1 tsp ground cumin
  • 1 tsp ground fenugreek
  • 1 bay leaf
  • 1/4 cup plain yogurt
  • 2/3 cup cream
  • 1 cup tomato sauce
  • 1/2 tsp red chili powder (or to taste)
  • salt and pepper to taste
  • 3-4 tbsp cilantro, chopped

Method

  1. Cook the shallots in butter until they are limp and soft. Remove them from the pan, leaving as much of the butter as possible, and reserve them.
  2. Turn up the heat and add the chicken. Cook quickly, browning all sides.
  3. When the chicken is cooked through, add the spices, ginger and garlic, and stir for a few moments.
  4. If the pan is dry, add a few tbsps of water and use the liquid to deglaze, scraping up any bits of cooked chicken or spice that have stuck to the bottom of the pan. More than likely you'll have chicken juices to do this with.
  5. Add the tomato sauce, lemon juice, and the cooked shallots into the pan and set it to simmer.
  6. Put a few tbsps of the sauce in a bowl and mix it with the cream and the yogurt. Pour it into the chicken mixture.
  7. Simmer the dish for a few minutes. Taste it and add salt as desired.
  8. Place the chicken and sauce into a serving bowl and sprinkle chopped cilantro on top.

Thursday, December 11, 2008

Palak Paneer and Homemade Cheese

Unfortunately there won't be a Friday dinner tomorrow, nor for the next month or so, as I'm going on vacation! I will, however, be eating lots of good food and I'll be bringing my camera with me. :D Depending on computer/time availability, I may be able to blog a bit and share any delectable photos I've got.

Before I go though, I wanted to finally post those Indian recipes I talked about so long ago (or so it seems), as I'm totally behind on that. I got started with raita, but what about what you eat raita with?

One good choice is palak paneer, which is a spinach and fresh cheese (paneer) dish. If you like spinach as I do, it's a nice, safe choice. It's reminiscent of creamed spinach -- just flavorful in an entirely different way. Paneer can be purchased or easily made at home. That's right, make your own fresh cheese at home! It's super easy and not even that time consuming.

All you need is half a gallon of whole milk, 3-4 tablespoons (about 1/4 cup) of acid, such as lemon/lime juice or vinegar, cheesecloth, and a large pot. Instructions are always more fun with visual representation, so here we go (a few of the pics are fuzzy, as I wasn't using my tripod alas):


Bring half a gallon of whole milk (and yes, it needs to be whole milk -- you're making cheese so you want as much of the solids as possible) to boil. When it's boiling, add the lemon juice. Turn down the heat a bit. Start stirring and do this continuously.


Almost immediately, you'll see the curds start to separate from the whey. Keep stirring!


Stir, stir, stir. You'll know it's done when the whey has a light greenish tinge to it. That sounds wrong, but looks perfectly natural when you see it. You should be able to scoop up obvious curds now.


Place a strainer over a large bowl and some cheesecloth in the strainer.


Pour the contents of the pot into the cheesecloth-lined strainer. The curds should stay in the cheesecloth while all the whey goes into the bowl.


Close up! Looks like cottage cheese, doesn't it?


There are multiple ways you can do this next step; go with what's easiest for you. The goal is to drain as much of the whey out of the curds as you can. Here I've tied some kitchen twine tightly around the cheesecloth, and tied the other end to a knob on one of my cupboards. It's hanging over the bowl of whey so that the excess drips in there. You can also tie it over the faucet, or maybe around a long plastic spoon and drape that over a pitcher, etc. Leave this for about 30 minutes.


After 30 minutes, unwrap the cheesecloth from the cheese. It'll look something like this.


Put the cheese on a plate and drape the cheesecloth over it. Then put a heavy weight on top, to further squeeze out any remaining whey. The heaviest thing I could think of was a cast-iron pan, so I used two of them. :D


It's been suggested to save the whey for later use, and being that I don't like waste, I saved about 4 cups of it. I still haven't found a recipe that uses whey, but it's in the freezer for when I do.


After another half hour or so, it'll be flattened and look something like this.


Now it's ready to be cubed into whatever Indian dish you're using it in!

Now that wasn't too difficult, was it? Since the cheese hasn't been aged at all, it doesn't have much flavor to it. It really just, as far as I can tell, adds a texture contrast to the dish. In fact, in that way it reminds me of very firm tofu.

Back to the palak paneer. There are many kinds of paneer dishes; I chose spinach because I like it. Go with your preference. The recipe I used is from Show Me the Curry, as I enjoyed their videos and their recipes are very approachable.

The first thing I did was prepare the paneer, though you can wait until you've started the masala, if you like.


Here I've heated about a tablespoon of oil and have dropped cubes of paneer into it. Paneer is one of the few cheeses that doesn't melt! Your goal is to get them nice and brown.


They're just starting to brown, so I stir fry them a bit to get as much of the cheese's surface area exposed to the pan as possible.


When the paneer has been browned (on all sides if possible), drop the cubes into a bowl of cold water. This will help get out some of the excess oil. It will also soften the cheese. The paneer can stay in the water until you're ready to add it to the rest of the ingredients. At that point you'll want to gently squeeze out any excess water from them.


This paneer has been browned, soaked, and dried, and is ready to be added to the dish! As you can see, not all the paneer has been perfectly browned; just do the best you can and when most of them are browned just pull them from the heat. You don't want them to burn.


First thing that goes into the pan is some oil, along with the pureed onion.


Next should be the pureed tomatoes. Don't skip pureeing them (as I did) unless you're okay with bits of red standing out in your palak paneer. I thought the diced tomato would melt into the mixture eventually; it didn't do so completely.


Add the spinach. It's also instructed for the spinach to be blended using a hand blender; I was lazy and skipped that step, since the chopped spinach is already pretty much falling apart. I imagine blending it would make the final dish even creamier.


The spices go in next. Generally I like to measure out all the amounts of spices ahead of time.


Now the dish should be looking something like this. See how the tomatoes don't completely melt in? Next time I'll be pureeing them for sure.


Add the cream/milk. Mmm, creamy curry goodness.


Finally, when you're about ready to serve, add the paneer. Since the dish is already fully cooked, you don't need to cook this step for very long, as mixing too much will just make the paneer fall apart.

Serve with rice or your choice of Indian bread. Delicious!

Palak Paneer (recipe found here, with some changes by me for clarification)

Ingredients:
  • 16oz frozen chopped spinach, thawed and drained
  • 7oz paneer
  • 3 tbsp oil, divided
  • 2 medium onions, minced or pureed
  • 1-inch piece of ginger, minced
  • 4 cloves garlic, minced
  • 1/2 cup water
  • 2 large tomatoes or 1 14oz can of diced tomatoes, pureed (not canned tomato puree)
  • 2 tsp garam masala
  • 1 tsp cumin powder
  • 2 tsp coriander powder
  • 1/4 tsp turmeric powder
  • red chili powder, to taste
  • salt, to taste
  • 1/2 cup heavy whipping cream
  • milk, to taste (optional)

Method:

  1. Cook frozen spinach with 1/2 cup water in a microwave safe dish for 7-8 minutes, stirring in between. Blend cooked spinach to desired texture (avoid over-blending).
  2. Heat 2 tbsp oil in a medium non-stick pan on high heat. Once oil is hot, add in the minced onions, stir, cover and let it cook for about 5 minutes.
  3. Add in the ginger and garlic and mix. Cook for another 4-5 minutes.
  4. Add in the tomates, cover and cook until the oil separates from the mixture. Stir often to keep the mixture from burning.
  5. While the onion and tomato mixture is cooking, cube the paneer to your desired size. In a non-stick frying pan, heat the remaining 1 tbsp oil. Once oil is hot, add in the paneer cubes and let them cook till they are golden brown on all sides. Remove from the pan into a plate with paper towel to soak the excess oil. In a couple of minutes, pour the paneer into a bowl of cold water. Let it sit for 5 minutes.
  6. When the onion and tomato mixture is ready, add in the blended spinach and mix.
  7. Add the garam masala, cumin powder, coriander powder, salt, chili powder and turmeric powder. Mix well and cook for 3-5 minutes.
  8. Add in the desired amount of cream and/or milk. Mix and cook for another few minutes.
  9. Gently squeeze the water out of the paneer and add the paneer to the spinach mixture.
  10. Stir gently and serve hot.