Sunday, December 6, 2009

Homemade California Rolls & Ebi Nigiri

Before this weekend I'd never attempted to make my own sushi rolls. Considering how adventurous I usually am with food preparation (though not, you know, in a hygiene way), and how much I love sushi, it's kind of odd. In any case the inspiration this time came from my bf, who can eat massive quantities of rolls (so he usually comes away from Japanese restaurants a little bit hungry, because massive quantities of rolls = $$$), and was craving them. So we decided to try making our own, which would be good in a financial sense, and also fun!

Verdict: it WAS both fun and delicious, and did make more financial sense, but I have to say that it's hard work! Really, many props to sushi chefs, whose creativity and skill I'd never quite appreciated to this level before, now having tried to do what they do.

We decided to keep it simple for this first excursion (though it was amazing how complex even 'simple' stuff is!) and made California rolls and ebi nigiri. While not the perfection you'd get in a real sushi place, we were pretty proud of how our attempts came out! (Plus, no matter what it looks like, it's still delicious, so we had that going for us.)


First, we had to assemble equipment and ingredients.

Equipment:
- rice cooker
- bamboo mat
- skewers
- plastic wrap
- super sharp knife
- 1 bowl of cold water
- 1 bowl of ice water
- large non-metallic bowl

Ingredients:
- imitation crab meat (usually made of fish)
- avocado
- English cucumber
- shrimp (headless)
- tuna sashimi (maguro)
- nori (toasted seaweed)
- short-grain (sushi) rice
- tobiko (little fish eggs)
- sesame seeds
- rice vinegar
- sugar
- Kosher salt

First we made the sushi rice. Washed the rice thoroughly (meaning several changes of water until it ran fairly clear) then let it sit in water for 30 minutes. Used the rice cooker to make 3 cups (uncooked) rice. I worried that there wasn't enough liquid, but followed the rice cooker's instructions and it came out fine (if you make rice on a stove top, use equal amounts of water and rice). After it was done I let it sit and steam in the cooker for about 15 minutes. In the meanwhile, I made the vinegar mixture by heating the rice vinegar, sugar, and salt in the microwave until the latter two were dissolved. Scooped out the rice into a large non-metallic bowl and let it cool for a bit, then poured the vinegar solution over it. Folded the rice together well (our research on sushi rice showed that we weren't to mix/stir the rice, as this would break the grains). Set aside to cool completely.

In the meanwhile, we started to prepare the ebi. Set a pot of water to boil. Skewered shrimp onto skewers through the head and body, all the way to the tail, so that they were stretched out fairly straight (this is to keep them from curling when they're cooking). Tossed them into the boiling water for about 5 minutes, then removed them to an ice water bath to stop the cooking process (and conveniently, to be able to handle them without burns). Twisted the shrimp off the skewers. Shelled them up to the tail. Sliced them carefully down the middle of the belly without cutting all the way through. Spread them open and removed/washed away any visible veins. I wish I'd taken photos of this process but you can find helpful videos on YouTube.

Then there was the slicing of the imitation crab, avocado, cucumber, and maguro.


Finally, assembly. We made ebi nigiri, and also used a couple of slices of maguro to make nigiri as well. That was fairly easy.

Next came the rolls! Wrapped the bamboo mat in plastic wrap. Put a sheet (or half sheet, depending on how big you want your rolls) of nori on top. Wet hands thoroughly with water -- very important step or you'll have sticky rice all over you -- then took a portion of completely cooled sushi rice and spread it over the nori. I'd have to wet my hands every so often, whenever they dried enough that the rice started sticking to them. Flipped the nori over so that the rice was on the bottom. Layered in the filling (we skipped the Kewpie/Japanese mayo that some places use) -- depending on if you use a half or whole sheet of nori you can put in more or less. Carefully used the bamboo sheet to roll it up. I learned that a very important step here is to, after you've made the first roll-in, make sure it's tucked in really tight, and continue to make sure it's tucked in tight as best as you can while you're rolling it up, because otherwise the roll will be really loose and the filling will fall out easily.

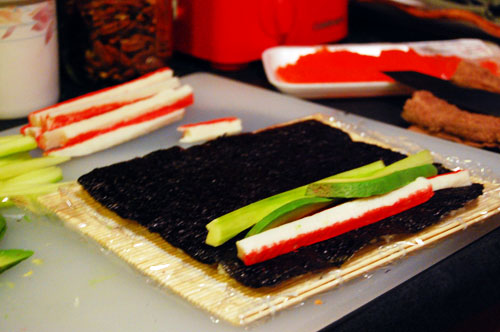


After the roll has been completed, you'll want to take your very sharp knife and dip it in a bowl of cold water. Slice the roll in half, then place the halves side by side. Dip your knife in cold water again and slice familiar-sized pieces. After every slice be sure to dip your knife in water. We learned this was a super important step to making sure that cuts were easy (otherwise the sticky rice will make it very difficult to cut).


We then rolled each piece in tobiko (or sesame seeds). In theory you could roll the big roll in tobiko, then slice into portions, but some tobiko would inevitably stay on the cutting board and get on consequent rolls in random places, which doesn't look as nice.

Serve with wasabi, soy sauce, and green tea, and enjoy!
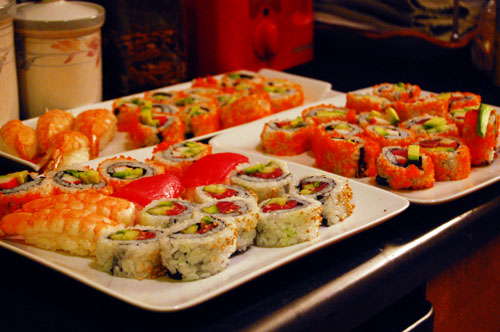


We made a ton of rolls that we couldn't even finish, and have ingredients to make even more. Definitely the way to go if you know someone who's a bottomless pit when it comes to rolls! Next time we'll branch out and try some other kind of filling ingredients ... like shrimp tempura! Yum.

Tuesday, September 8, 2009

Pecan Honey Sticky Buns

I've had a good friend of mine visiting the last couple of weeks, and though it would have been easy to let ourselves eat out for every meal, I was determined to make at least two homecooked meals. I made 'perfect' mac & cheese, chicken marsala (recipe to come), 3 kinds of ice cream, salads, Zuni Cafe buttermilk mashed potatoes, and pecan honey sticky buns.

The last actually required that I also make a loaf of buttery brioche, because it uses one-half recipe of that dough. Yes, these sticky rolls are extra sinful because brioche is its base. The chilled dough is rolled out, filled with even more butter, cinnamon, and sugar, then cut into rolls. The rolls are placed in a baking dish with the honey glaze and pecans, and the whole thing is baked for 30 minutes. The rolls are unmolded immediately after coming out of the oven, the glaze bubbling all around them, and happily devoured by anyone standing nearby.

One of the great things about this recipe is that you don't have to make a ton of rolls at once if you don't want (for instance, if you're only serving one or two people). They don't keep well after they've been baked, so you don't want to make a lot if they're not going to be eaten right away. However, immediately after you've made the dough log (or even after cutting the log into individual buns), you can wrap the dough and store it in the freezer until you're ready to make another batch, and adjust the amount of glaze accordingly.


Pecan Honey Sticky Buns from Dorie Greenspan's Baking: From My Home to Yours

Makes 15 buns

Ingredients:

For the glaze:

  • 1 cup (packed) light brown sugar
  • 8 tbsps unsalted butter, cut into 4 pieces
  • 1/4 cup honey
  • 1-1/2 cups pecans (whole or pieces)
For the filling:
  • 1/4 cup sugar
  • 3 tbsps (packed) light brown sugar
  • 1 tbsp ground cinnamon
  • 3 tbsps unsalted butter, at room temperature
For the buns:
  • 1/2 recipe dough for Golden Brioche loaves (below), chilled and ready to shape (make the full recipe and cut the dough in half after refrigerating it overnight)
Method:
  1. Generously butter a 9x13-inch baking pan (a Pyrex pan is perfect for this).
  2. To make the glaze: In a heavy-bottomed saucepan, bring the brown sugar, butter, and honey to a boil over medium-low heat, stirring frequently to dissolve the sugar. Pour the glaze into the buttered pan, evening it out as best you can by tilting the pan or spreading the glaze with a heatproof spatula. Sprinkle over the pecans.
  3. To make the filling: Mix the sugars and cinnamon together in a bowl. If necessary, in another bowl, work the butter with a spatula until it is soft, smooth and spreadable.
  4. To shape the buns: On a flour-dusted work surface, roll the chilled dough into a 16-inch square. Using your fingers or a pastry brush, spread the softened butter over the dough. Sprinkle the dough with the cinnamon sugar, leaving a 1-inch strip bare on the side farthest from you. Starting with the side nearest you, roll the dough into a cylinder, keeping the roll as tight as you can. (At this point, you can wrap the dough airtight and freeze it for up to 2 months . . . . Or, if you want to make just part of the recipe now, you can use as much of the dough as you’d like and freeze the remainder. Reduce the glaze recipe accordingly).
  5. With a chef’s knife, using a gentle sawing motion, trim just a tiny bit from the ends of the roll if they’re very ragged or not well filled, then cut the log into 1-inch thick buns. (Because you trim the ragged ends of the dough, and you may have lost a little length in the rolling, you will get 15 buns, not 16.) Fit the buns into the pan cut side down, leaving some space between them.
  6. Lightly cover the pan with a piece of wax paper and set the pan in a warm place until the buns have doubled in volume, about 1 hour and 45 minutes. The buns are properly risen when they are puffy, soft, doubled and, in all likelihood, touching one another.
  7. Getting ready to bake: When the buns have almost fully risen , center a rack in the oven and preheat the oven to 375 degrees F.
  8. Remove the sheet of wax paper and put the pan on a baking sheet lined with parchment or a silicone mat. Bake the sticky buns for about 30 minutes, or until they are puffed and gorgeously golden; the glaze will be bubbling away merrily. Pull the pan from the oven.
    The sticky buns must be unmolded minutes after they come out of the oven. If you do not have a rimmed platter large enough to hold them, use a baking sheet lined with a silicone mate or buttered foil. Be careful - the glaze is super-hot and super-sticky.

Golden Brioche Dough

Ingredients

  • 2 packets active dry yeast
  • 1/3 cup just-warm-to-the-touch water
  • 1/3 cup just-warm-to-the-touch whole milk
  • 3 1/3 cups all-purpose flour
  • 2 teaspoons salt
  • 3 large eggs, at room temperature
  • 1/4 cup sugar
  • 3 sticks (12 ounces) unsalted butter, at room temperature but still slightly firm

Glaze for the loaves:

  • 1 large egg
  • 1 tablespoon water

Method

  1. Put the yeast, water and milk in the bowl of a stand mixer and, using a wooden spoon, stir until the yeast is dissolved. Add the flour and salt, and fit into the mixer with the dough hook, if you have one. Toss a kitchen towel over the mixer, covering the bowl as completely as you can– this will help keep you, the counter and your kitchen floor from being showered in flour. Turn the mixer on and off a few short pulses, just to dampen the flour (yes, you can peek to see how you’re doing), then remove the towel, increase the mixer speed to medium-low and mix for a minute or two, just until the flour is moistened. At this point, you’ll have a fairly dry, shaggy mess.
  2. Scrape the sides and bottom of the bowl with a rubber spatula, set the mixer to low and add the eggs, followed by the sugar. Increase the mixer speed to medium and beat for about 3 minutes, until the dough forms a ball. Reduce the speed to low and add the butter in 2-tablespoon-size chunks, beating until each piece is almost incorporated before adding the next. You’ll have a dough that is very soft, almost like batter. Increase the speed to medium-high and continue to beat until the dough pulls away from the sides of the bowl, about 10 minutes.
  3. Transfer the dough to a clean bowl (or wash out the mixer bowl and use it), cover with plastic wrap and leave at room temperature until nearly doubled in size, 40 to 60 minutes, depending upon the warmth of your room.
  4. Deflate the dough by lifting it up around the edges and letting it fall with a slap to the bowl. Cover the bowl with the plastic wrap and put it in the refrigerator. Slap the dough down in the bowl every 30 minutes until it stops rising, about 2 hours, then leave the uncovered dough in the refrigerator to chill overnight.
  5. The next day, butter and flour two 8 1/2-x-4 1/2-inch pans.
  6. Pull the dough from the fridge and divide it into 2 equal pieces. Cut each piece of the dough into 4 equal pieces and roll each piece into a log about 3 1/2 inches long. Arrange 4 logs crosswise in the bottom of each pan. Put the pans on a baking sheet lined with parchment or a silicone mat, cover the pans lightly with wax paper and leave the loaves at room temperature until the dough almost fills the pans, 1 to 2 hours. (Again, rising time with depend on how warm the room is.)
  7. Getting Ready To Bake: Center a rack in the oven and preheat the oven to 400 degrees F.
    To Make the Glaze: Beat the egg with the water. Using a pastry brush, gently brush the tops of the loaves with the glaze.
  8. Bake the loaves until they are well risen and deeply golden, 30 to 35 minutes. Transfer the pans to racks to cool for 15 minutes, then run a knife around the sides of the pans and turn the loaves out onto the racks. Invert again and cool for at least 1 hour.

Friday, August 14, 2009

Spinach & Feta Cream Cheese Spread

This is one of those recipes that Jade and I discovered ages ago, when I liked cooking, but it wasn't the passion it is now. Many of the recipes that I used to make from that period involved pre-prepared food (you know, such as mixes, or juice I wouldn't squeeze myself, or "helper"-type things), and when I revisit them from time to time, more often than not I end up tossing the recipes away. Not only because they may involve ingredients that I can't pronounce, but because it just doesn't taste very good. Preparing fresh food has spoiled me (in a good way).


This is not one of those recipes. It might involve some pre-preparedness, but it's not the kind I feel guilty about -- I still know what's going into it. As for flavor, well, that's stood the test of time. This is just as yummy as I remember it being, the feta and garlic lending bite to the cream cheese, the spinach giving it depth and color, and the yogurt to thin and smooth everything out. I actually adapted the recipe from the original to include the yogurt, because I'm actually using this as a veggie dip this time, and without the yogurt it's more of a spread. In fact, even with the yogurt it's still quite thick and can be easily spread on crackers. I think I actually like this version better than the old; next time I'm going to add a handful of pine nuts as well. I think the flavor and crunch of the nuts would complement the other flavors very nicely -- but only if it's going to be served immediately. Otherwise the nuts will get soggy and it won't be such a great addition.

The pre-preparedness comes in the form of frozen chopped spinach (you can use fresh if you like) and crushed garlic from Trader Joe's (you can crush fresh garlic if you like). I used a block of feta and crumbled it myself; to save time you can buy the pre-crumbled kind in a tub. As Jade notes you can mix everything together in a food processor, but this comes together easily with a big bowl and a fork -- just make sure you mix everything thoroughly.

This recipe is also very flexible and should be made according to your own taste; add more feta, less garlic, whatever pleases your taste buds.


Spinach & Feta Cream Cheese Spread

Ingredients
  • 8oz cream cheese
  • 4oz feta cheese, crumbled
  • 10oz frozen chopped spinach, thawed and drained completely of water
  • 1 1/2 tsp crushed garlic
  • 1/3 cup plain yogurt (optional)
  • 2 tbsp pine nuts (optional)

Method

  1. Thoroughly mix the cream cheese and feta cheese together, crushing the feta so it melds with the cream cheese.
  2. Add the spinach and garlic, combining until there are no big patches of plain cream cheese.
  3. If using, add the yogurt to thin out the mixture, again mixing well. Add more yogurt by the tablespoon to achieve desired consistency. Finally, mix in the pine nuts.
  4. Serve with crackers and/or fresh-cut veggies. (You can easily prepare this spread ahead of time and set it out at room temperature 30 minutes before serving. If using the pine nuts, however, serve immediately.)

Wednesday, August 12, 2009

The Best Sandwich in the World

Okay, granted, I haven't eaten every sandwich in the world. But if I did, I can't imagine that the Cuban Roast sandwich from Paseo would rank anywhere but in the top 5. It's certainly the best sandwich I've ever eaten. I'll go completely out of my way (to Fremont) to pick one up. I'll make up excuses for why I need to be in the area, though I don't ever really need to be in that area. Well, they've opened up another location (in Ballard), so I suppose I can now start making excuses for another area.


The Cuban Roast is their most popular sandwich, and it's not hard to see why. Tender, succulent, marinated pork shoulder stuffed into a hearty roll with large ribbons of translucent grilled onions, jalapenos, romaine lettuce, bits of cilantro, and aioli. If you eat there you also get a corn on the cob on the side. If you're getting the sandwich to go, you'll need to ask for the corn if you want it, as by default it's not included.

I'm not going to lie: eating this sandwich (or really, any of them), is very messy. There's so much packed into it that it inevitably oozes out of where the bread is weakest. But it doesn't matter. The best part is eating all the stuff that's fallen out, after the sandwich itself is gone!

In the past, they ran out of sandwiches before dinner, so if you're bound and determined to have one, you need to go earlier or call in advance to place your order when they've still got sandwich bread. Now that there's two locations, there's two places to get your fix if one's run out. Their Website also has LiveMenu, which apparently tells you by color code whether they've run out of something. Not sure how reliable it is, though.


They have many delectable-sounding sandwiches that I have yet to try, because I am so enamored of the Cuban Roast that I can't bring myself to get anything else. I have had the tofu sandwich, however, which is very good and is much lighter fare than the Cuban Roast. My cousin and I like to split both. With the tofu you can specify a level of spiciness that you prefer -- I like 3 of 5 stars. I've also tried the prawns, many moons ago, and while it was good it wasn't as good as the roast. One day I'm going to try the seared scallops. One day.

Sunday, August 9, 2009

La Rustica

This post is a few months late, but better late than never, so they say. This meal was enjoyed at La Rustica in West Seattle, during Seattle Urban Eats, when they offered a 3-course meal for $30. La Rustica is a small, charming place overlooking the water, serving Northern Italian food. Unlike most restaurants that participate in these promotions, La Rustica's portions were extremely generous (as they are normally). They don't take reservations unless you've got 6 or more in your party, so depending on how busy they are, you may need to wait a bit. The food and the view make it worth it, though.

Every table starts with a basket of fresh, housemade garlic bread, thin and chewy. I dare you to only eat one basket of this stuff.


One of their starters, Bruschetta al Salmonaccio. This is available on their regular menu for $10.95. Description: Thinly sliced salmon marinated in lemon, olive oil, stone-ground mustard and garlic. The portion is so large that it is practically an entree in itself. Tender and flavorful.


Another starter, Ostriche al Forno. It's also available on their regular menu for $12.95. Description: Baked oysters stuffed with spinach, marscapone and cream. It comes with two hot, creamy, and utterly delicious oysters. Unlike the salmon, however, this appetizer is really only good for 1 person. Okay, maybe 2 if you're willing to share. In terms of bang for your buck, the salmon is definitely the way to go.


Here's where the promotional menu deviates a bit from their regular menu. Pictured here is the lamb shank, which isn't normally available. The meat is tender and falling off the bone. It's served with fresh veggies and a side of pasta. It's enormous. Other options included Scampi Allo Spiedo (marinated prawns and pancetta) - $24.95; and Paella Napoletana (saffron rice, sausage, chicken, mussels, clams, prawns and wild boar) - $27.95.


My mother proudly wanted me to include her polished plate.


Dessert was a rich and sinful Chocolate Creme Brulée. It doesn't look like much, but looks can be deceptive, and such is the case here. Chocolatey, creamy, and not too sweet. I can't remember if it's on their regular menu or not, but I sure hope so!


The next Seattle Urban Eats takes place in October. Here's to hoping La Rustica participates again, because I am so there.

Saturday, August 8, 2009

Stracciatella, or Chocolatey Flakey Ice Creamy Deliciousness

I have a good reason for making ice cream today, even though it's cloudy and rather cold (cold enough to bring out long pajama pants, which, let's face it, I love wearing). I ordered the darn ice cream machine, it arrived, and I needed to make sure it was working properly right? Right. Never mind that I ordered it a week and a half ago, when Seattle broke our all-time record high, reaching 103°F (with hardly anyone having air conditioning, mind you). The point is that I was trying to be a responsible consumer. And also that ice cream is delicious.


I resisted getting an ice cream machine for a long time, I'm not quite sure why. I think it always felt like one of those extraneous kitchen appliances that would gather dust after one or two uses, because it's so incredibly easy to buy ice cream (and if you're not picky, quite inexpensively), so who wants to bother with the mess of making your own at home? Well, time passed, technology got better, and now the 'mess' part is pretty minimal since they've come up with machines that don't require any ice or rock salt. Then my excuse was that my not-large freezer was jam-packed with things and I simply didn't have the will to clean it out, when the rest of my house was in shambles (have I mentioned what a crappy summer it's been?). My mom took that excuse away when she visited and cleaned my place from top to bottom, so I actually did have time to clean out my freezer (found a giant bag -- unopened -- of Trader Joe's frozen strawberries ... from 2004).

And since I have a food blog, and it was hot as Hades, I ran out of reasons for not getting an ice cream maker.

Now I'm going to state the obvious. IT'S AWESOME. I don't regret waiting to get one, but now that I have it, I'm so glad I do. It's easy to use, and making the ice cream itself is pretty cinchy also. Naturally for my first foray into ice-cream making I chose to turn to David Lebovitz's The Perfect Scoop. :D I wanted to make something simple and traditional, a flavor I enjoy immensely, but is often overlooked for something more flashy: vanilla. It's no coincidence that it's also the first recipe in the book. I also wanted to make vanilla because I've been saving this one vanilla bean for just the right recipe, and this was definitely the moment.


Because this recipe is made with egg yolks, thus making a custard, it may also be more commonly known as "French vanilla," which is, of course, richer than regular vanilla (and gives it a yellowish hue). Confession: I couldn't resist making things a little more interesting, so I turned it into stracciatella, which is a fancy Italian way of saying "chocolate chip ice cream." Although it's more like chocolate flakes than chips, really. It has a vanilla ice cream base, but at the last moment of churning you add a thin stream of bittersweet chocolate, which gets broken up into little flakes in the ice cream, and is so very much better than actual whole chocolate chips (in my humble opinion).

It took my ice cream maker 25 minutes to churn the ice cream to a consistency I liked (I like it thicker, almost hard, rather than soft serve/frozen yogurt-like). I packed it into a plastic container and let it freeze for a few hours to harden even more. I was a bit concerned that the ice cream would be icy or too hard to scoop, but it was absolutely perfect. Creamy, firm yet with a lot of give, it was the perfect texture, and of course the flavor was fantabulous.


Stracciatella (Chocolate Flake Ice Cream) adapted from The Perfect Scoop by David Lebovitz

Ingredients
  • 2 cups heavy cream, divided
  • 1 cup whole milk
  • 6 large egg yolks
  • 3/4 cup sugar
  • 1 vanilla bean, split lengthwise
  • 3/4 tsp vanilla extract
  • Pinch of salt
  • 4.5 oz bittersweet chocolate, melted

Method

  1. In a medium saucepan, gently warm 1 cup of heavy cream, milk, sugar, and salt, until the sugar has dissolved. Scrape the seeds from the vanilla bean into the warmed mixture and stick the bean itself in there as well. Cover the saucepan, remove from heat, and let steep at room temperature for 30 minutes.
  2. Meanwhile, pour the remaining cup of heavy cream into a large bowl and set a strainer on top. Prepare an ice bath by filling a large bowl (one that can fit the bowl with the 1 cup of heavy cream in it) with ice and water.
  3. In a medium bowl, whisk together the egg yolks.
  4. Slowly (especially at the beginning) pour the warm mixture into the egg yolks, whisking constantly. Then carefully pour the mixture back into the saucepan.
  5. Set the saucepan over medium heat and stir constantly with a wooden spoon. Heat until the custard thickens. You'll know it's ready if it coats the back of the wooden spoon (it won't be super thick), and when you draw your finger across it, it should leave a definitive trail.
  6. Pour the custard through the strainer, into the heavy cream. Stir the cream and custard to incorporate. Take the bean from the strainer and add it to the final mixture. Add the vanilla extract.
  7. Put the bowl into the ice bath, and stir until the mixture has cooled.
  8. Cover the bowl with plastic wrap and chill thoroughly in the refrigerator. (I let it sit overnight.)
  9. When you're ready to churn the ice cream, remove the vanilla bean and rinse it. Let it dry out, then use it for another purpose (such as sticking it in your sugar container to make vanilla sugar).
  10. Freeze the ice cream according to your ice cream machine's instructions.
  11. Melt the chocolate in the microwave or by a double-boiler method.
  12. About 5 minutes before the ice cream is done, pour the chocolate in a thin stream directly onto the ice cream (not the mixer arm).

Thursday, August 6, 2009

I'm Back ... with Pesto

This summer has been ... dismal. I want to find something positive to say, but really, it's been the crappiest summer I've had in memory. It's why I had to take a hiatus from this journal. Actually it's not just summer's fault, it all started around April, so spring has some blame as well, but if I never have another year like this one it'll be too soon. Maybe fall will bring better tidings, and the Seattle weather is helping that right along, being cloudy and 68°F today.


In food news, my cousin now has a fresh vegetable garden, and so far it's yielded a lot of salad. A lot of salad. That's fine though, because with summer fruit and tomatoes bursting with flavor, there are worse things to have to eat. :D The other 'crop' her new garden has so far yielded in abundance is basil. After eating her basil, I must say that if you have the will and space (they can be potted) and don't have a brown thumb like I have, grow your own basil. It's 100 times more flavorful than the kind you buy in the grocery store. The difference is amazing.


So I've been having a lot of fresh mozzarella with basil and tomato, one of my favorite things to eat, and of course, with so much basil, it's practically a requirement to make pesto.

I tried making pesto with my mortar and pestle for the first time, and I just have to say ... those that make their pesto this way all the time, bless you. Bless your patience and tireless muscles, because I had to give up and bring out the Mini-Prep. Making pesto is such a cinch, and so delicious, that I'm not sure why I don't do it more often, even if I have to use store-bought basil. Toss the pesto with some pasta (preferably something like rotini, so the pesto can get nice and settled into all the little nooks and crannies) and sliced grape tomatoes and pow! You have a meal that bursts with flavor, each bite a revelation.

Seriously, it's that good.


Pesto (from Deborah Madison's Vegetarian Cooking for Everyone)

Ingredients
  • 1 or 2 plump garlic cloves
  • 1/2 tsp sea salt (plus more to taste)
  • 3 tbsp pine nuts
  • 3 cups loosely packed basil leaves, stems removed, leaves washed and dried (preferably Genovese (Italian) basil)
  • 1/2 cup freshly grated Parmesan, preferably Parmigiano-Reggiano
  • 2-3 tbsp grated pecorino Romano to taste
  • 1/2 cup extra virgin olive oil
  • 2 tbsp soft butter (optional)
Method
  1. By hand: Smash the garlic with 1/2 tsp salt and the pine nuts to break them up, then add the basil leaves a handful at a time. (If you're impatient, you can speed things up by tearing the leaves into smaller pieces first.) Grind them, using a circular motion, until you have a fairly fine paste with very small flecks of leaves. Briefly work in the cheeses and butter, then stir in the olive oil. Taste for salt.
  2. In a food processor: Use the same ingredients but in the following order: Process the garlic, salt, and pine nuts until fairly finely chopped, then add the basil and olive oil. When smooth, add the cheeses and butter and process just to combine.

Thursday, May 21, 2009

Cheesecake with Strawberry Sauce

I'm now going to make a confession now that's going to horrify many a dessert lover out there: I don't really like cheesecake. In fact, the only cheesecake I really like is the kind at the Cheesecake Factory, and then it's because theirs are so light and fluffy that they barely taste like cheesecake. (My favorite, by the by, is Craig's Crazy Carrotcake Cheesecake. It's DELISH.)

I'd never even had the remote desire to make my own, until this recipe. Something about it called to me. And now I know why. It's a creamy, light, and delicious cheesecake that is very like CF's. By light I don't mean light in calories -- no, I don't fool myself about that -- I mean it isn't dense and heavy, like most cheesecakes I don't care for.


It tastes better cold than at room temperature, and I made a strawberry sauce to go with it that can be served at any temperature. In fact, I highly recommend making the sauce; its fruity tartness complements the cheesecake really well.


The trick to a cheesecake without cracks is baking it for an hour, then leaving it to cool in there for 5-6 more hours, without ever opening the oven. That means it's not a dessert you can pull together at the last minute. Immediately after removing it from the oven, I covered it with plastic wrap and put it in the fridge overnight. I didn't remove the springform pan until I was just about ready to serve.

The one "negative" -- but this is about personal taste -- is that the crust was a bit more cakey than crusty. The next time I make this I'll try baking the crust for 10-15 minutes first, then filling it.


Cheesecake with Strawberry Sauce (recipe adapted from chumas at LiveJournal)

Ingredients

For the crust:
  • 1 1/2 cups graham cracker crumbs
  • 1/4 cup melted butter
  • 1/8 cup sugar
  • 1/2 tsp ground cinnamon

For the filling:

  • 32oz cream cheese (4 8oz packages)
  • 1 cup granulated sugar
  • 3/4 cup milk (I used 2%)
  • 4 eggs
  • 1 cup sour cream
  • 1 tbsp vanilla extract
  • 2 tbsps all-purpose flour

For the strawberry sauce:

  • 1 10oz package frozen strawberries
  • 1/4 cup granulated sugar
  • 1/4 cup lemon juice

Method

  1. To make the crust, mix all the ingredients together and press into a buttered 9-inch springform pan.
  2. Place a rack on the lower third of the oven and preheat the oven to 325°F. Make sure all filling ingredients are at room temperature; that will help ensure a smooth batter. Heat a kettle of water.
  3. In the bowl of a stand mixer with the paddle attachment, mix the cream cheese with the sugar until it's smooth. Don't overmix. (This can all be done by hand as well, if you prefer.)
  4. Switch to the whisk attachment and blend in the milk. Add the eggs one by one, mixing just enough to incorporate. Don't overmix.
  5. Add in the sour cream, vanilla and flour, then blend until smooth. Don't overmix. Small lumps are okay, big ones are not.
  6. Pour filling onto the prepared crust.
  7. Set the cheesecake on a sheet pan and slide it into the oven. Take the kettle of water you heated and pour hot water into the sheetpan, covering the sides of the springform pan by about 1/2 inch or more.
  8. Bake the cheesecake for 1 hour. Turn the oven off and let it cool in the oven with the door closed for 5 to 6 hours; this prevents cracking. You can turn the pilot light on to peek at the cake, which will be lighly browned on top, but do NOT open the oven.
  9. At the end of that time, carefully take the tray out of the oven (there will likely still be some water in it, so you don't want to spill it). Wrap the cheesecake -- springform pan and all -- with some plastic wrap and stick it in the fridge until chilled. Before serving, carefully remove the springform pan.
  10. To make the strawberry sauce, heat all the ingredients in a small saucepan until it boils. Turn the heat down so that the sauce is simmering gently. Simmer for 10 minutes, stirring occasionally and crushing the strawberries down to pulp. Serve warm or cold with cheesecake.

Tuesday, May 19, 2009

Indian Cuisine at Home

I love Indian cuisine, and so do my cousin and her husband. So when they asked me to cook up an Indian meal for them last weekend, I obliged happily.

One of the reasons I jump at the chance to make Indian food is because in order to make one or two dishes, you have to pretty much stock up on spices. And once you've stocked up on spices (which are usually sold in quantities far greater than you need for one meal), you don't want them to go to waste, do you? Of course not.


Another reason Indian cuisine is great is because it's easy to satisfy both vegetarians and non-vegetarians alike. I've always thought that if I were a vegetarian, I'd have to eat Indian food a lot, because it's one of the few ways that vegetables are so infused with flavor that I barely notice the absence of meat (not that I don't like vegetables on their own, but if I have them solely and repeatedly, I really notice the absence of meat).


At first I was going to make two dishes -- aloo gobi and murgh makhani, along with homemade raita and naan. But then I started to feel bad that my cousin and I would have sauce to eat with our naan while the aloo gobi was dry so my cousin's husband wouldn't (he's a vegetarian). At the last minute I decided to make palak paneer ... the only problem being that I didn't have the time to make paneer, and I don't have an Indian grocery store close enough to me to make the trip worth it. And to be honest, I wasn't really heart broken about it; while I enjoy making my own paneer, I'm rather indifferent to eating it. It turns out that my cousin and her husband feel the same way, so it was all for the best. I ended up replacing the cheese with peas (as the palak on its own seemed to need a bit of chunkiness), and thus creating "palak mattar." Hee. I'm going to be making it that way from now on -- just as yummy, in my opinion, but easier and fewer calories.

The raita, which we like to eat with pretty much everything, was delicious, and the naan was as well, even if it didn't turn out quite as aesthetically pleasing as I had wanted (though there were some nice-looking pieces; the kids got to them before I could take a picture). The murgh makhani's sauce was absolutely perfect; it tasted just the the butter chicken I've had in restaurants. The only thing I'll change for next time is the kind of chicken meat I used -- breast rather than thigh. I prefer dark meat, and this dish is usually made with it, but at the time I went to the store they didn't have anything but breasts.

For dessert we had a wonderful cheesecake, but that's going to have to wait for another post. :-)

Palak Mattar (recipe adapted from here)


Ingredients:
  • 1 10oz package of frozen chopped spinach or 4 cups of fresh, finely chopped spinach
  • 3/4 cup of frozen peas
  • 2 medium tomatoes
  • 1 tsp chopped ginger
  • 1 tsp coriander powder
  • 1/2 tsp turmeric powder
  • 1/2 tsp red chili powder
  • 1 tbsp oil
  • 1/2 tsp cumin seed
  • pinch of asofetida
  • 1/2 tsp salt, or to taste
  • 2 tbsp of whole wheat flour
  • 1/3 cup heavy cream

Method:

  1. If you're using frozen spinach, thaw it and squeeze out the water.
  2. In a blender, puree the tomatoes and ginger together.
  3. Mix together the coriander, turmeric, and red chili powder with the tomato puree and set it aside.
  4. Mix the whole wheat flour with the heavy cream and set that aside as well.
  5. Heat the oil in a saucepan. Test the heat by adding one cumin seed to the oil; it should sizzle enthusiastically. If it doesn't the oil's not hot enough.
  6. Add the asofetida and cumin seeds. Let the seeds sizzle for a bit, then add the tomato puree mixture and let it cook for a few minutes until the tomato puree is reduced by about half.
  7. Add the spinach, mix well, and let it cook on medium low heat for about 10 minutes, covered.
  8. Add heavy cream mixture cook another 5 minutes or so.
  9. Add the peas and fold them gently into spinach. Let the dish simmer for about 3 minutes, or until heated through, then serve immediately.
Aloo Gobi (recipe adapted from here)


Ingredients:
  • 1 medium-sized cauliflower, cut into bite-size florets
  • 2 large potatoes, cut into bite size pieces
  • 1 cup frozen green peas
  • 2 tbsp oil
  • 1/4 cup water
  • 1/2 tsp cumin seeds
  • pinch of asofetida
  • 1/2 tsp turmeric powder
  • 1 medium onion, diced
  • 1 inch piece ginger, minced or grated
  • 5 cloves garlic, minced
  • 2 large tomatoes, chopped
  • 2 tsp coriander powder
  • 1 tsp cumin powder
  • 1 tsp garam masala
  • red chili powder, to taste
  • 1/2 tsp amchur (mango powder)
  • salt, to taste
  • 5 sprigs cilantro, chopped

Method:

  1. Heat oil in a large pot.
  2. Test if the oil is ready by adding a cumin seed -- it should sizzle enthusiastically right away. When the oil is hot, add all the cumin seeds and let them to sizzle for a few moments.
  3. Add the asofetida, turmeric powder, and diced onion. Saute about 3 minutes.
  4. Add the ginger and garlic to the onions. Saute until the onions are soft and just beginning to brown. Stir frequently.
  5. Mix in the tomatoes and cook until the tomatoes have broken down quite a bit and the oil starts to separate from the mixture. Stir frequently.
  6. While the tomatoes are cooking, place the potatoes in a microwave safe bowl, sprinkle on a little salt, add 1/4 cup water, cover the bowl, and microwave for about 3-5 minutes, until they are about half cooked.
  7. Wash the cauliflower florets and place them in a microwave safe bowl, cover it, and microwave for about 3-5 minutes, until they are about half cooked. Lightly salt the cauliflower while it is still warm. (Please note that you salt the potatoes before they're microwaved and the cauliflower after. Also you can skip the microwaving step altogether, it'll just take longer to cook.)
  8. Once oil has separated from the tomato mixture, add the coriander powder, garam masala, red chili powder, cumin powder, amchur and salt to taste, then mix well.
  9. Add the half-cooked potatoes, mix well to coat all the potato pieces with spices, and turn the heat to medium low. Cover and cook for 5 minutes, or until the potatoes are tender but not breaking apart.
  10. Add the green peas and half-cooked cauliflower and mix well to evenly coat the cauliflower with spices. Cover and cook until all veggies are tender.
  11. Take the pot off the heat and mix in the chopped cilantro.
Murgh Makhani (recipe adapted from here)


Ingredients
  • 1 lb chicken thighs, cut into bite-sized pieces
  • 2-3 tbsp butter
  • 4 shallots, sliced into thin strips
  • 2 tsp lemon juice
  • 1 tbsp ginger, grated
  • 1 tbsp garlic, minced
  • 1 tbsp garam masala
  • 1 tsp chili powder
  • 1 tsp ground cumin
  • 1 tsp ground fenugreek
  • 1 bay leaf
  • 1/4 cup plain yogurt
  • 2/3 cup cream
  • 1 cup tomato sauce
  • 1/2 tsp red chili powder (or to taste)
  • salt and pepper to taste
  • 3-4 tbsp cilantro, chopped

Method

  1. Cook the shallots in butter until they are limp and soft. Remove them from the pan, leaving as much of the butter as possible, and reserve them.
  2. Turn up the heat and add the chicken. Cook quickly, browning all sides.
  3. When the chicken is cooked through, add the spices, ginger and garlic, and stir for a few moments.
  4. If the pan is dry, add a few tbsps of water and use the liquid to deglaze, scraping up any bits of cooked chicken or spice that have stuck to the bottom of the pan. More than likely you'll have chicken juices to do this with.
  5. Add the tomato sauce, lemon juice, and the cooked shallots into the pan and set it to simmer.
  6. Put a few tbsps of the sauce in a bowl and mix it with the cream and the yogurt. Pour it into the chicken mixture.
  7. Simmer the dish for a few minutes. Taste it and add salt as desired.
  8. Place the chicken and sauce into a serving bowl and sprinkle chopped cilantro on top.

Monday, May 18, 2009

A Simple, No-Fuss Tomato Sauce

No really. This is the epitome of simple. And mind-blowingly delicious.

You can't know how easy it is to make truly simple and delicious food until you've made this sauce -- then tasted it. The effort you put in is given back to you tenfold in a sauce that's bright and rich at the same time.


I love vegetables, and tomato sauces, but on their own they don't seem quite enough (this is why my stint as a vegetarian only lasted 3 months, years ago). What's missing is that fat mouth-feel. That rounded, complete, yes, this is what is filling and good, feel.

This sauce gives you that, along with an intense tomato flavor. There's nothing it in but tomatoes, a bit of salt, an onion, and the secret weapon ... butter. What, no garlic, no olive oil, no basil? It seems like a very non-traditional Italian sauce, and yet it comes from one of the most widely respected Italian cookbooks of all time, Marcella Hazan's Essentials of Classic Italian Cooking.

It's so easy and so effortless that I can't imagine buying jarred marinara sauce again.


Marcella Hazan's Basic Tomato Sauce

Ingredients
  • 1 28oz can of plum tomatoes (I got mine from Trader Joe's)
  • 1 medium onion, halved
  • 5 tbsp butter
  • salt to taste

Method

  1. Combine all the ingredients in a saucepan and simmer for 45 minutes. Throw the onion halves away (or if you're like me, you'll just eat them separately).

Saturday, May 16, 2009

Failed Kalamata Olive Loaf

I've made a number of things over the past week or so, some of which are worth repeating and others ... not so much. But I've always said that I wanted to chronicle my failures as well as my successes, so I will.

This first one is a very disappointing failure, because I so wanted it to turn out well. It was a kalamata olive bread. I'm going to my cousin's this weekend to cook a meal, and I wanted to offer the loaf at the same time, because her husband has expressed interest in the past for olive bread. I found a recipe online that I thought looked promising, and set to work. Initially things were going really well.

I took some starter from the fridge and fed it -- the recipe called for 100% hydration starter, so I fed 1 ounce of starter 5 ounces of water and 5 ounces of flour and set the yeast to working in my proofing box. I checked on it after about 6 hours, but it was looking pretty lethargic, so I left it in the box for 2-3 more hours. At that point, the yeast was bubbly and active. See evidence:


I mixed the starter with the dough ingredients and placed it into a large greased bowl. At this point the dough was tacky but not insanely sticky. Witness:


And a close up:


This was the brand of kalamata olives that I used. It's from Trader Joe's, and I chose it with Trix's advice because it was stored in a solution that did not include vinegar.


This is when things began to go wrong. It was about 9pm, and I figured it would take 6-8 hours for it to double. However, that meant 3-5am, which I didn't relish. It seems insane to me to get up at insane hours just for bread. At midnight I checked on the dough, hoping against hope that it would have worked at a magically speedy pace and would have doubled in 3 hours. No such luck. It looked like it had barely risen at all. I decided that since the starter had struggled to get going in the first place, wild yeast take longer in general to work, and the dough currently seemed rather lethargic, I'd be safe if I got up at 6am to punch it down and get it ready for its final proofing step. After all, 6am wasn't that far off from the higher end of my estimation.

When my alarm went off at 6am, I thought about staying in bed for another hour (as I always do), but an early morning meeting compelled me to get up. I then considered taking a shower to wake myself up before tackling the bread, but decided that I should probably at least check on the dough.

Oh, the horror I felt when I saw that the yeast had gone into overdrive, filling the bowl and then some. That's right, it overflowed right onto the floor (first time that's ever happened to me). Here's a photo to show you how diligently the yeast had been working:


Keep in mind that at this point I had removed the plastic covering, onto which was stuck lots of the dough, and had thrown away all the stuff that had oozed onto the ground. Obviously, the dough was WAY overproofed. Still, I thought that maybe it wasn't such a horrible thing, maybe bread could still be salvaged from this.

That's when I made my second mistake. I blame the fact that it was 6am in the morning and my brain was barely awake. I dragged out the large cutting board that I use to work dough, and plopped the dough onto it. That's right, without flouring it first. Now, in my minor defense, the recipe didn't specify flouring the surface where I'd be kneading the dough -- but knowing that the dough was way overproofed, I should've anticipated that it would be gooey and wet. Which it was. It was gluey and just completely unmanageable. I plopped half of it back into the bowl, and attempted to "shape" the other half, but it just wasn't happening. It was basically liquid, not solid, and I probably used an extra cup of flour, possibly more, to get it into some semblance of a ball and placed into my makeshift basket.

I learned my lesson from the first half, so I heavily floured the surface before pouring -- yes, that's what I was doing -- the second half out. Due to the preemptive flouring I was able to "form" -- as much as a glob of glue can be formed -- the second "loaf" -- if a blobby thing can be considered a loaf -- at a fraction of the time it had taken me to form the first one. However, that also meant that a lot less flour was going into it. That was a concern because the next step required a slow retardation of the dough in the fridge, for 12-18 hours. Since the dough had been overproofed, there was probably no more flour for the yeast to eat, which meant that the loaves probably wouldn't do much in the fridge except get cold.

I'm just not comfortable enough with baking bread yet to salvage a situation like this. Should I have added a bunch more flour, even though the recipe at this point specified no additional flour? Should I have just scrapped the whole thing?

I decided to press forward as I was supposed to had the dough proofed the correct amount. I placed the shaped loaves into the fridge. About 12 hours later, I removed them so that they could warm to room temperature (about 2 1/2 hours). I slashed them while they were cold, because it's easier that way. I baked them as specified, though I did use the hot water/cast iron pan steaming method. Still, they never got very brown.

The results? Well, see for yourself. This was the one that had a bunch of flour added to it:


This was the one that was shaped quickly with very little additional dough:


Obviously, I'd been right in my assumption -- the yeast had no more to eat, and thus the bread did not rise very much during the final proof. Additionally, neither loaf rose very much while in the oven, especially the second, which looks more like a flatbread. :/ Flavor wise, the bread is VERY sour. That's rather appealing in its own way; I just wish I could achieve that level of sourness without creating mutant bread.

I'm still eating both, they're quite edible, just not pretty. Toasted, the texture is normalized (to toast), which improves it. And it has a very strong kalamata olive flavor, which is nice.

This experience was particularly disappointing because I recently made a regular sourdough loaf that also had extremely sticky/wet dough -- though that time I didn't overproof it -- and I was hoping that this would make up for that experience. Oh well. One thing is for sure ... I'm not going to give up on this recipe until I've made it the way it should be made, and then we'll see if it's a keeper. I'm not really convinced that the method is that great, but right now I don't have much room to talk. :P